Powered by Blogger.
Saturday, August 31, 2013

Tutorial: useful Lightroom shortcuts

Note: As my list of Photoshop keyboard shortcuts seems to be quite popular I would like to share a list of my favourite Lightroom keyboard shortcuts today. BTW there is also a list of Photomatix Pro shortcuts available here.

Modules and view

These shortcuts are used to navigate between different modules and also to choose different ways to preview your photos:
  • G - go to Grid view in Library - useful for viewing a lot of photos at once. I often use this view to group photos, stack them, find bracketed sets or panoramas
  • E - go to Loupe in Library (view preview of a photo). Mode that is useful to preview your photos
  • D - Develop selected photo
  • C - compare 2 images
  • N - survey images - lets you see a number of images at once and pick your favourite one. Useful if you have a number of similar images and want to choose the best one (eg. in terms of focus or composition).
  • L - toggle "light" mode. Useful for previewing image on completely dark background
  • F - shows currently selected photo in full-screen mode. Click again to leave full-screen mode
Rating and labels
  • 0 - set rating to 0
  • 1 to 5 - set rating to a given number of stars
  • 6 - set Red color label
  • 7 - set Yellow color label
  • 8 - set Green color label
  • 9 - set Blue color label
  • CTRL + UP ARROW - increase Flag rating (usually to mark as Picked)
  • CTRL + DOWN ARROW - decrease Flag rating (ustually to mark as Rejected)
Tools
  • R - crop tool 
  • Q - spot removal tool
  • M - graduated filter tool
  • CTRL + M - radial filter tool
  • K - adjustment brush tool

Other
  • CTRL + BACKSPACE - delete rejected photos from current folder
  • CTRL + G - stack selected photos 
  • CTRL + ' - create virtual copy of a phot
  • Z - zoom in/out
  • SHIFT + TAB - toggle visibility of all panels 
  • ALT - ALT key is somewhat special in Lightroom. Click and hold it in Develop module and a lot of buttons will work differently (eg. they will allow you to reset or preview various things)
Friday, August 30, 2013

Pinks in the sky

I've shared a few photos from that very sunrise on Fuerteventura already but it was really gorgeous one with all those pinks and purples in the sky so here is yet another HDR photo for you to watch.

In the case of this photo I took 5 exposures, 1.5 EV apart, Fused them in Photomatix Pro using Natural processing method and then finished it in Photoshop using luminosity masks.

Technical details:
Camera: Canon 5D MK II
Lens: Canon 24-105 f/4 L IS USM
Focal length: 55 mm
Aperture: f/16.0
Exposure time: 3.2 s ("middle" exposure)
ISO: 100
Number of exposures: 5
E.V. Step: 1.5
Flash used: no
Tripod: yes
Filters: ND8 neutral density filter
Technique: Fusion/Natural, luminosity masks
Software: Magic Lantern 2.3, Photomatix Pro 4.2.7 (Fusion/Natural), Lightroom 5.0, Photoshop CC
Thursday, August 29, 2013

My muse

Stepping out of your comfort zone might be difficult but at the same time it can help you greatly in improving your general photography skills. As you know most of the time I'm photographing landscapes, sometimes architecture and I very frequently use HDR, Fusion or manual blending to extend dynamic range. But I often photograph other subjects: from animals in zoo, street scenes to portraits. I take macro photos and action as well. Although I don't share them very often (because most of the time these photos are nowhere near quality of my typical photos) this helps me to progress and to learn new things. For that reason I suggest you try something similar. Take your camera and go photographing some subjects you don't feel very comfortable about.

In the case of above photo I placed my girlfriend opposite the sun and used golden reflector to add some light to her face. Using reflector was rather difficult because the conditions were very windy but I'm quite happy with the light I got here. I'm also happy with the natural result I got. Had plenty of fun taking this picture.

Technical details:
Camera: Canon 5D MK III
Lens: Canon 100 f/2.8 L IS USM Macro
Focal length: 100 mm
Aperture: f/4.0
Exposure time: 1/125
ISO: 200
Number of exposures: 1
E.V. Step: n/a
Flash used: no
Tripod: no
Filters: no
Technique: HDR, tone-mapping, luminosity masks
Software: Magic Lantern 2.3, Portrait Professional 11, Lightroom 5.0, Photoshop CC
Wednesday, August 28, 2013

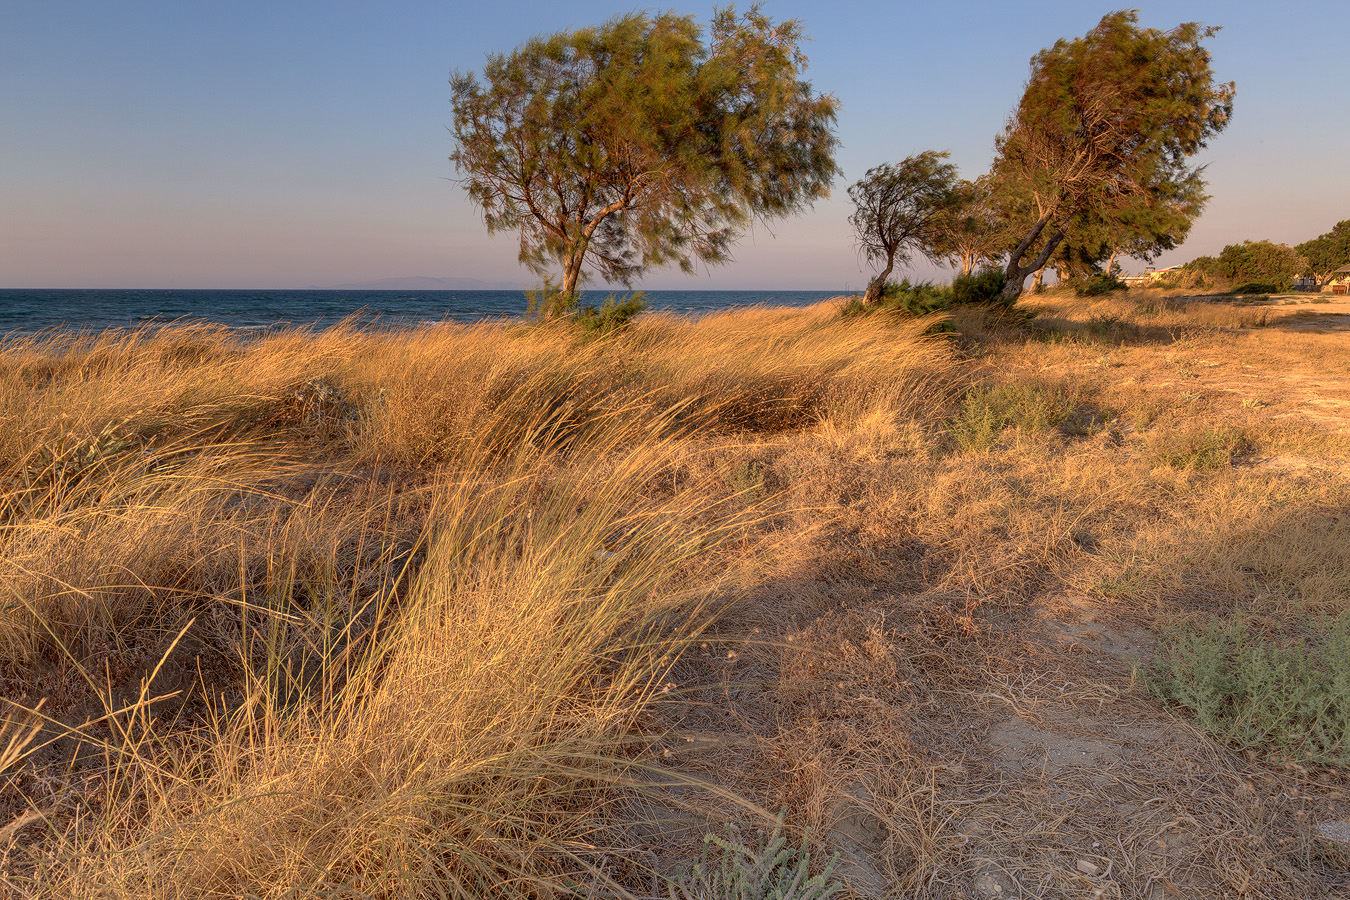
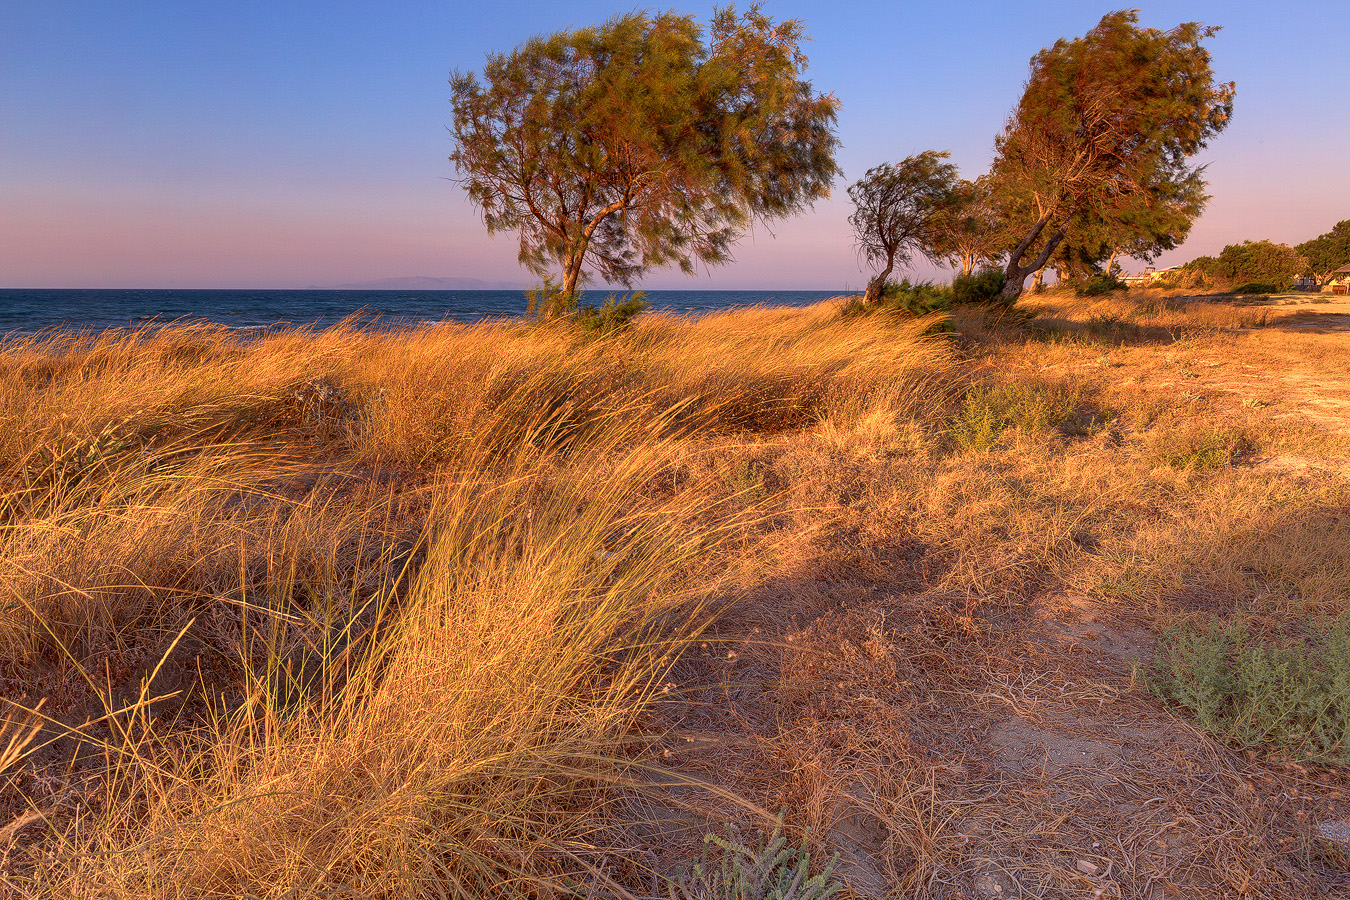
Before/after comparison: Golden light

before after
Time for another before/after comparison + some post processing details. This time a sunset photographed in Amoudara, Crete. There was some beautiful warm light during golden hour so I took hundreds of pictures. Here is one of them.

I took 7 exposures at 1 EV spacing, merged them to HDR and tone-mapped in Photomatix Pro (which is Before). Then I edited my image with luminosity masks technique in Photoshop CC (After).

In the image below you can see what layers I used to create final image. Starting from bottom they are:
  1. Background - image produced by Photomatix Pro.
  2. Global color balance - I applied some global colour correction to my image but only to midtones (Cyan/Red: +3; Magenta/Green: -5; Yellow/Blue: +5) to make the light look more sunsetty.
  3. Highlights color balance - I then applied colour balance correction only to brightest parts of the sky and grass (Cyan/Red: 0; Magenta/Green: -18; Yellow/Blue: +10)
  4. Global contrast - applied some contrast to midtones only using Curves adjustment layer.
  5. Highlights contrast - added contrast to highlights in sky and grass
  6. Shadows contrast - added some contrast to darkest parts of the image and slightly brightened them up (I used Screen blending mode to get brightening effect)
  7. Highlights saturation - added some extra saturation to sky and grass (Master: +37)
  8. Shadows saturation - added a bit of saturation to darkest parts of the image (Master: +15)
  9. Sharpening - added some sharpening.

Finally some EXIF and other technical specs:

Technical details:
Camera: Canon 5D MK III
Lens: Canon 24 f/1.4 L USM II
Focal length: 10 mm
Aperture: f/18.0
Exposure time: 1/13 s ("middle" exposure)
ISO: 100
Number of exposures: 7
E.V. Step: 1
Flash used: no
Tripod: yes
Filters: no
Technique: HDR, tone-mapping, luminosity masks
Software: Magic Lantern 2.3, Photomatix Pro 4.2.7 (Details Enhancer), Lightroom 5.0, Photoshop CC
Tuesday, August 27, 2013

Human camera review


Although Human camera is on the market for quite a few years (first prototypes are dated 4.4 million years back) I don't think there is a proper review so I decided to write one myself.

Technical specs

Let's start with some technical specs:
  • dual-lens (lenses are identical)
  • shutter speed of 1/30 (fixed)
  • aperture f/2.8 - f/14.9
  • focal length - 23 mm (equivalent of 50 mm for 35 mm film)
  • image stabilization
  • ultra fast burst mode (18 to 30 frames per second depending on the model)
  • built-in memory of 2.5 petabytes
The specs aren't impressive maybe (especially the shutter speed is rather disappointing - I would love to be able to use faster shutter speeds as well as to capture long exposures) but if you're into street photography or photojournalism you will find them enough for your needs as they offer very realistic perspective. Specs also usually meet my needs in landscape photography but there are cases when I would prefer a bit wider angle.

Human camera comes with a pair of identical lenses what offers some great 3D opportunities. However, mine came with one of the lenses a bit destroyed (it has some huge issues with focusing that can't be repaired) so I'm not sure how this experience looks and feels for others.

The build quality is quite impressive as well as is weather sealing (if you want to protect it further there are thousands of housing and cloths to choose from).

Auto-Focus

Auto-focus is fast and accurate although many examples of the camera and lenses have noticeable front- or back-focus. However, these can be easily fixed by buying additional correcting filters: screw-in filters you put directly on the lens (so called contact lenses) or glasses system (holder comes with a variety of lenses to choose from).

Image quality
    Colour reproduction and white balance are both fantastic. So far I haven't seen a camera with better of either these two. Colours are very natural although sometimes you would prefer more saturation and contrast. White balance is correct most of the time.

    By default Human camera runs in HDR-mode. Although static dynamic range is rather low and it's about only 6 EV (not impressive at all), Human camera has a great feature to adjust exposure automatically when moved what results in a dynamic range of about 20 EV! It's huge.

    Sharpness is very good in the middle of the frame but it decreases quite much towards the edges of the frame even at aperture of f/14. No fix exists for this issue.

    Low light capabilities are rather disappointing as in low-light camera goes to a monochrome mode (with some weird blue cast that's very hard to correct) and also has problems properly exposing the scene so most of the images will turn out heavily underexposed. Good thing is they are virtually free of noise (both colour and luma). Also dynamic range in low light situations is rather bad. For instance if you have a bright source in a frame almost all details in shadows are lost.

    Camera comes with a lot of memory to save your pictures - probably more than you will ever need because it can store as much as 2.5 petabytes of data. As a comparison you would need to run your television for more than 300 years non-stop to run out of space. That's quite a lot. I noticed a few problems though:
    • you cannot easily print your images - there is no USB connection
    • images sometimes slightly change over time. It looks like a serious bug in a firmware of a camera but so far there is no easy fix for that
    Summary
     
    So summing up. Human camera is quite a good choice. Lens specifications, dynamic range make it great for daily life shooting, street photography and alike but in many uses (wild-life, astrophotography) it might be not enough due to limitations of lens and sensor.
    Monday, August 26, 2013

    Thoughts: First enjoy, then photograph

    It was a beautiful and cold morning in Tatra mountains. First I grabbed a lot of fantastic sunrise photos and about an hour later this one. Despite the fact light wasn't that warm anymore the scene was beautiful due to its very limited tonality (just white and blue).
    One of the easiest mistakes to make while photographing is to focus too much on taking photos forgetting about enjoying the pure beauty of your subject or phenomenon you're about to shoot. It can happen when photographing sunrise, beautiful landscape, wild-life, starry skies, fireworks, rare weather conditions, street scenes... or virtually anything else. Although good photos are definitely a very nice thing (and very important for us photographers) there is nothing better than experiencing and seeing something beautiful with your own eyes - and remembering it. Image is image but memories are worth much more.

    And as strange (and ridiculous) as it might sound it happens to me every now and then. I sometimes look at my photos and discover something beautiful that I missed when taking my photos just because I spent too much time composing, levelling horizon, setting correct exposure parameters, dragging tripod from a place to place and alike. Sometimes this very something occupies just a small part of a frame and it's a pity because often it could be main subject of a photo and this photo could be the best of a whole shoot. But by focusing too much on my camera I missed it. It's even worse when I don't capture this "something" at all and discover it in photos taken by my girlfriend who seems to focus on enjoying the views much more than I do (even though she often captures even more photos than I do). Well, given that you could say that I'm simply bad photographer who doesn't see a lot. While this statement might be true of course, remember that my favourite time to photograph is golden hour which usually lasts for just a couple of minutes so it's quite easy to miss something interesting if you make wrong decisions.

    Moreover, it's one of the reasons why I like taking long-exposure photos (even though with extreme exposures things might get a little boring after a while) - I set exposure and then have a minute or even more to enjoy the view.

    So my advice is to enjoy the view more. Maybe sometimes it's even worth to leave your camera at home and just watch. That's what I do recently (no too often though ;) ) and I really like it. Also when taking photo from this post after grabbing it I spent a couple of minutes just watching because it was really beautiful.
    Sunday, August 25, 2013

    The Mirror

    Photographing lakes is one of the easiest ways to get perfect (or close to perfect) reflections. There are no high waves (at least most of the time) as in seas and also water is more static compared to rivers for instance. So it's possible to capture water surface that looks like a mirror. It looked like one in the photo above. There are small ripples in the bottom right corner but other than that the lake surface is very very calm and static.

    If you're interested in Photomatix presets I used for this photo head over to this post where you will find them for download.

    Technical details:
    Camera: Canon 50D
    Lens: Canon 10-22 f/3.5-4.5 USM
    Focal length: 10 mm
    Aperture: f/22.0
    Exposure time: 1/13 s ("middle" exposure)
    ISO: 100
    Number of exposures: 7
    E.V. Step: 1.5
    Flash used: no
    Tripod: yes
    Filters: no
    Technique: HDR, tone-mapping
    Software: Magic Lantern 2.3, Photomatix Pro 4.2.7 (Details Enhancer), Lightroom 5.0, Photoshop CC
    Saturday, August 24, 2013

    Under the umbrella - night HDR photo

    I really like shooting night HDR landscape photos (like this or this). They are so different from sunsets, sunrises and blue hour shots everyone is used to nowadays. When I shoot them I try to find a very dark place but with some strong light in the background. It creates strong and often surreal effect. Also by using long exposure I bring a lot of details to these very dark scenes. For instance I shot above photo from a place where I could hardly see anything (even my camera) close to me - it was so dark. But by using long exposure and high ISO I "restored" a lot of the scene.

    Technical details:
    Camera: Canon 5D MK III
    Lens: Canon 24 f/1.4 L IS USM II
    Focal length: 24 mm
    Aperture: f/2.8
    Exposure time: 10 s ("middle" exposure)
    ISO: 800
    Number of exposures: 5
    E.V. Step: 1
    Flash used: no
    Tripod: yes
    Filters: no
    Technique: HDR, tone-mapping, luminosity masks
    Software: Magic Lantern 2.3, Photomatix Pro 4.2.7, Lightroom 5.0, Photoshop CC
    Friday, August 23, 2013

    Port in Heraklion

    I took a lot of HDR photos while in Greece but I'm still struggling with processing them because it takes a lot of time. In the past it was easier - I captured photos, opened them in Photomatix Pro, dragged a few sliders in it and saved the result. Then I opened it in Gimp and applied some sharpening and I was done. It took 30 second - 5 minutes per photo. Nowadays it's more complicated - I first apply some preliminary adjustments in Lightroom, open my exposures in Photomatix where I spend a couple of minutes making sure I preserve all details I want. Then I open my image in Photoshop and spend up to a few hours polishing it. Now this might sound like a boring task or like I'm complaining. But in fact - I'm not. I find this creative process a great fun. The reason I spend so much time on a single shot is because I like every photo to look the way I saw it. It doesn't mean to reflect reality but to reflect my view (maybe even imagination?) of a place or situation. In the past I wasn't much into that - I just wanted my photo to have nice colors and to be quite sharp. But there was no vision involved :)

    Today HDR photo was taken in Heraklion port. This Venetian style port is the most interesting and beautiful part of the city in my opinion.

    Technical details:
    Camera: Canon 5D MK III
    Lens: Canon 24-105 f/4 L IS USM
    Focal length: 105 mm
    Aperture: f/8.0
    Exposure time: 1/125 s ("middle" exposure)
    ISO: 100
    Number of exposures: 5
    E.V. Step: 1
    Flash used: no
    Tripod: no
    Filters: circular polarizing filter
    Technique: HDR, tone-mapping
    Software: Magic Lantern 2.3, Lightroom 5.0, Photoshop CC
    Thursday, August 22, 2013

    Sunset in Warsaw again

    I hope you aren't bored with my photos from Warsaw because today I decided to share yet another one showing sunset. I took a total of 5 exposures but then decided to manually blend only 4 of them rejecting the darkest exposure because there were no highlights it could save - thus it was redundant.

    But if you are bored with these photos I have some good news - I plan to increase variety of shots posted here. So one day it'll be Warsaw, the next day some landscape and then Madrid for instance.

    I'm also at the stage of planning new greatly improved version of my complete HDR tutorial. I also consider creating a video tutorial out of it if there will be enough interest so let's me know if you're interested to watch something like that.

    Technical details:
    Camera: Canon 5D MK III
    Lens: Canon 24-105 f/4 L IS USM
    Focal length: 105 mm
    Aperture: f/10.0
    Exposure time: 8 s ("middle" exposure)
    ISO: 200
    Number of exposures: 5
    E.V. Step: 1
    Flash used: no
    Tripod: yes
    Filters: no
    Technique: long-exposure, manual blending
    Software: Magic Lantern 2.3, Lightroom 5.0, Photoshop CC
    Wednesday, August 21, 2013

    Sunset over Warsaw

    For a few years now my goal was to make my HDR photos look as realistic as possible. At first I struggled but then, month by month I started to get closer and closer to that very goal. Now I think I'm really not that far from reaching it. I try to avoid oversaturated colors, my photos are usually halo-free and I also try to make both shadows and highlights to look realistic. My photos look quite good and believable to me and I hope that you also share that opinion. If not, please let me know as I'd love to improve (but probably am a bit too happy with my own work to notice its flaws).

    Today HDR photo taken during sunset in Warsaw. At first I wanted to go with a long exposure but then realized that sun reflecting in ripples of Vistula river actually look nice. So I quickly unscrewed ND400 filter I had prepared (almost dropping it from about 20 m... I guess I'd lost it) and took this very photo.

    Technical details:
    Camera: Canon 5D MK III
    Lens: Canon 24-105 f/4 L IS USM
    Focal length: 24 mm
    Aperture: f/20.0
    Exposure time: 1/5 s ("middle" exposure)
    ISO: 200
    Number of exposures: 7
    E.V. Step: 1
    Flash used: no
    Tripod: yes
    Filters: no
    Software: Magic Lantern 2.3, Photomatix Pro 4.2.7, Lightroom 5.0, Photoshop CC
    Tuesday, August 20, 2013

    Blue hour in Warsaw

    Another one from Warsaw, taken from Swietokrzyski Bridge. I took quite a few photos last time and have plans to take even more. This one was taken more for fun but it turned out quite nice with some very nice reflections in the rail.

    Technical details:
    Camera: Canon 5D MK III
    Lens: Canon 24-105 f/4 L IS USM
    Focal length: 24 mm
    Aperture: f/11.0
    Exposure time: 0.8 s ("middle" exposure)
    ISO: 200
    Number of exposures: 5
    E.V. Step: 1
    Flash used: no
    Tripod: yes
    Filters: neutral density filter
    Software: Magic Lantern 2.3, Photomatix Pro 4.2.7, Lightroom 5.0, Photoshop CC
    Monday, August 19, 2013

    Tutorial: post-processing infrared photos

    Some time ago I shared a short tutorial: Introduction to Infrared photography. By that time I gave you just a few basic tips on how to take infrared photos and how to set white balance to make them look good. Today I would like to give some tips on how to process them as it isn't that straightforward as you might think.

    First of all after you open your infrared photo in Lightroom or Photoshop you will notice that it is very reddish even if you set custom white balance in the camera (what I really recommend). It's because both applications (and many others too) have fixed limits for white balance with minimum value being 2000. But in case of infrared photos you need much lower values to make your IR photos look good.

    So what you need to do is to create custom DNG profile to allow lower values.

    1. Download free Adobe application known as Adobe DNG Profile Editor.
    2. Convert your Infrared photo to DNG. To do that in Lightroom right-click on the photo and select Export -> Export To DNG.
    3. Open Adobe DNG Profile Editor and open your saved DNG photo in it.
    4. Go to the Color Matrices tab.

    Infrared photo opened in Adobe DNG Profile Editor before making any changes to the profile. This is how Adobe applications like Lightroom or Photoshop render infrared photos by default.
    5. Move the Temperature slider all the way to the left (-100). Your photo should look a bit better now:


    6. You're done with editing DNG profile so save your newly created profile by selecting File -> Export Profile. In order to make your newly created profile accessible in Lightroom and Photoshop make sure to export it under following location:
    • If you're on Windows: C:\Users\USER_NAME\AppData\Roaming\Adobe\CameraRaw\CameraProfiles
    •  If you're on Mac: /Users/USER_NAME/Library/Application Support/Adobe/Camera Raw/Camera Profiles/
    Note that for each camera you own you must create separate profiles.
      7. Restart Lightroom (or Photoshop), go to Develop module and navigate to the Camera Calibration tab and select your newly created profile in Profile combo box. Your photo should now look much better. If the profile isn't visible in the profile combo box make sure you exported it to the right place as specified in point 6.
      8. Now adjust white balance setting. It should look like something like this at this stage:
      It doesn't resemble typical infrared photo you probably saw over the net. Most commonly the sky has deep blue colour but in the image above you can clearly see that most common colours are still oranges and reds.

      We will fix that in the next few steps.

      9. At this stage I make some exposure corrections, fix whites etc. What I really recommend doing is dragging Blacks slider a bit to the left to add your photo some contrast because IR photos are often low contrast.
      10. Open your image in Photoshop.
      11. Create Channel Mixer adjustments layer.
      1. Select Red output channel and set Red to 0% and Blue to 100%.
      2. Select Blue output channel and set Red to 100% and Blue to 0%.
      This way we swapped Red & Blue channel and the image should look much more familiar:


      12. Final steps are optional. I usually increase saturation of Blues and Cyans and reduce saturation of Reds and Yellows. I also increase contrast using Levels adjustment layer.

      Also note that this tutorial showed just one way of post processing infrared photos. You can aim for completely different style (eg. black & white infrared photos are also very popular). As with any other photos your creativity is the limit.

      Sunday, August 18, 2013

      Crown of Thira

      I uploaded one image from Santorini a few days ago. Time for another one - this time showing capital of the island - Thira - as seen from high vantage point over the town. This spot is known as Crown of Thira.

      Technical details:
      Camera: Canon 5D MK III
      Lens: Canon 24-105 f/4 L IS USM
      Focal length: 24 mm
      Aperture: f/11.0
      Exposure time: 1/160 s ("middle" exposure)
      ISO: 100
      Number of exposures: 5
      E.V. Step: 1
      Flash used: no
      Tripod: no
      Filters: circular polarizing filter
      Software: Magic Lantern 2.3, Photomatix Pro 4.2.7, Lightroom 5.0, Photoshop CC
      Saturday, August 17, 2013

      Before/after comparison: sunset in Warsaw

      before after

      Time for another before/after comparison + some post processing details. This time a sunset photographed in Warsaw. What I focused on in this shot was that beautiful huge cloud behind the Royal Palace. I wanted it to be the hero of this shot and to make the exposure of the final image match the exposure of that cloud. For that reason I decided to go with low light processing. If I made the city brighter it would look slightly unnatural and also viewer would pay more attention to it than the cloud itself.

      I took 5 exposures at 1 EV apart but ended up manually blending only 4 of them. I dropped the brightest one because it was too bright for my needs.

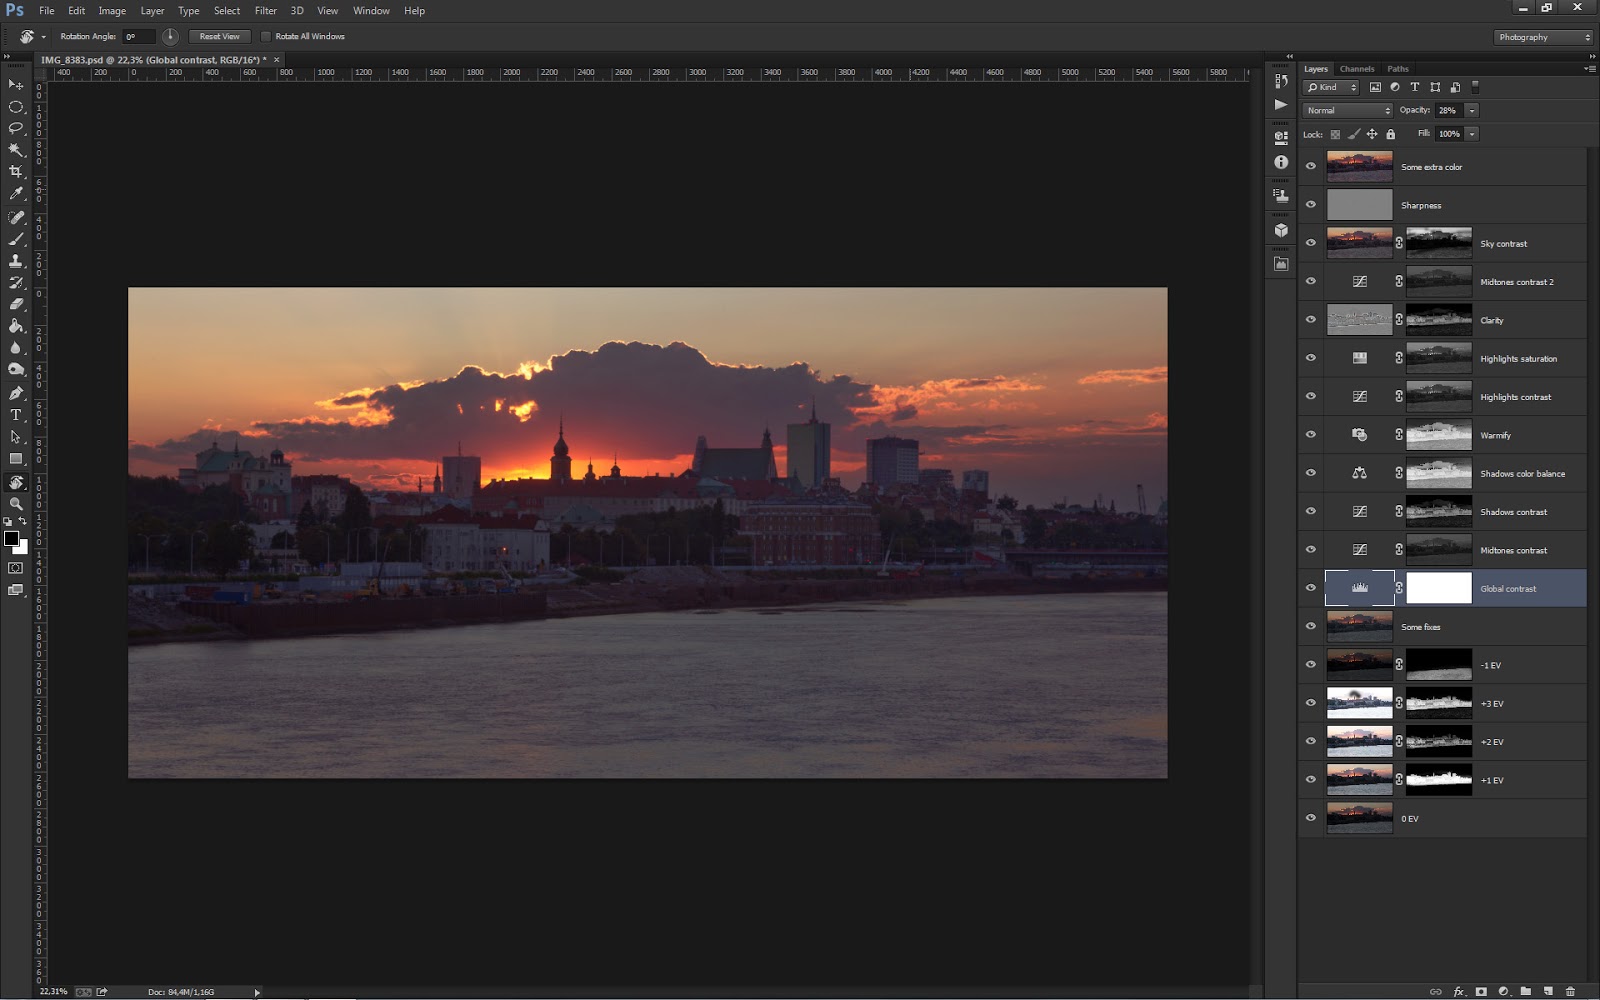
      In the image below you can see what layers I used to create final image. Starting from bottom they are:
      1. 0 EV - base image. I took from it sky and water.
      2. +1 EV, +2 EV, +3 EV - images that correspond to +1 EV, +2 EV and +3 EV photos from my bracketed sequence. I used them to brighten up city itself.
      3. -1 EV - photo I used to darken water a little bit to match general brightness of the image.
      4. Then I applied some global fixes to the image.
      5. Global contrast - I then increased global contrast using Levels adjustment layer by decreasing gamma to 0.82 and moving White Point to 164.
      6. Midtones contrast - then I slightly increased midtones contrast using Curves adjustment layer.
      7. Shadows contrast - applied some contrast to the city buildings.
      8. Shadows color balance - I fixed colour balance of shadows portions of the image by moving it towards Red and Magenta.
      9. Warmify - I applied warm photo filter to the shadows.
      10. Highlights contrast - I increased contrast of brightest parts of the image using Curves adjustment layer.
      11. Highlights saturation - I increased saturation of Reds and Yellows in the sky.
      12. Clarity - increased shadows clarity by applying High Pass filter with large radius to them as described in this tutorial.
      13. Midtones contrast 2 - added a bit more of midtones contrast.
      14. Sky contrast - added a bit of contrast to the cloud and sky using Overlay blending mode.
      15. Sharpness - added some sharpening.
      16. Some extra color - increased saturation using Topaz Adjust filter.

      Finally some EXIF and other technical specs:

      Technical details:
      Camera: Canon 5D MK III
      Lens: Canon 24-105 f/4 L IS USM
      Focal length: 105 mm
      Aperture: f/22.0
      Exposure time: 8 s ("middle" exposure)
      ISO: 50
      Number of exposures: 5
      E.V. Step: 1
      Flash used: no
      Tripod: yes
      Filters: neutral density filter
      Software: Magic Lantern 2.3, Lightroom 5.0, Photoshop CC
      Friday, August 16, 2013

      Milky Way wallpaper

      One of my favorite and most popular photos. I shared it before but I think today is a good reason to reshare it as starting today you can download this image as a HD wallpaper. To get it just go to the Wallpapers section or click on one of the links below to get resolution suitable for your monitor:
      Thursday, August 15, 2013

      Vistula - the blue river

      I'm not taking photos of Warsaw very often. Rather rarely. The problem is that I know this city too well to be excited about photographing it. What can be interesting in the Old Town? Or any of the bridges? Or parks? They look so familiar and boring. However, very recently I realized that in fact this city is quite beautiful and very picturesque and that I'm making huge mistake by not portraying it. So yesterday I packed my gear and went to one of the best spots to photograph sunsets and city panoramas - the Swietokrzyski Bridge.

      I soon realized I made the right decision. The light was really gorgeous. Sunset was golden and blue hour was... well blue. Literally - it was really blue. Even Vistula river which normally doesn't have very pretty color looked like turquoise or something like that. Beautiful.

      Technical details:
      Camera: Canon 5D MK III
      Lens: Canon 24-105 f/4 L IS USM
      Focal length: 47 mm
      Aperture: f/9.0
      Exposure time: 4 s ("middle" exposure)
      ISO: 200
      Number of exposures: 5
      E.V. Step: 1
      Flash used: no
      Tripod: yes
      Filters: no
      Software: Magic Lantern 2.3, Photomatix Pro 4.2.7 (Exposure Fusion), Lightroom 5.0, Photoshop CC
      Wednesday, August 14, 2013

      Windy sunset on Crete

      It was windy on Crete during my stay what actually made it easier to stand the heat. And also was good for landscape photography - I like that blur created by strong wind. It makes the scenes more dynamic and also can help in removing distracting elements from the picture. To get long enough exposure when shooting sunsets I needed to use ND400 neutral density filter. Otherwise I could get only very fast shutter speeds.

      Technical details:
      Camera: Canon 5D MK III
      Lens: Canon 24 f/1.4 L USM II
      Focal length: 24 mm
      Aperture: f/11.0
      Exposure time: 8 s ("middle" exposure)
      ISO: 100
      Number of exposures: 6
      E.V. Step: 1
      Flash used: no
      Tripod: yes
      Filters: ND400 neutral density filter
      Software: Magic Lantern 2.3, Photomatix Pro 4.2.7 (Exposure Fusion), Lightroom 5.0, Photoshop CC
      Tuesday, August 13, 2013

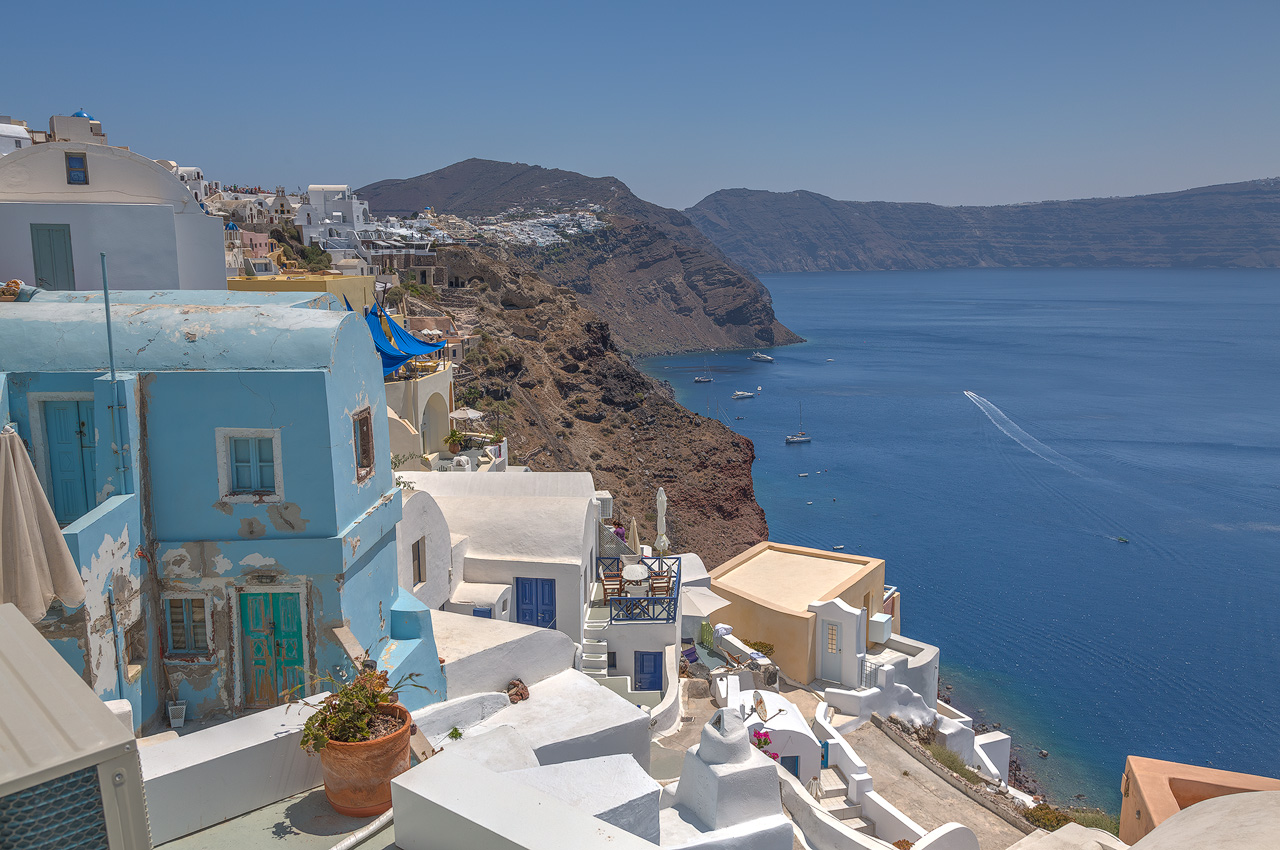
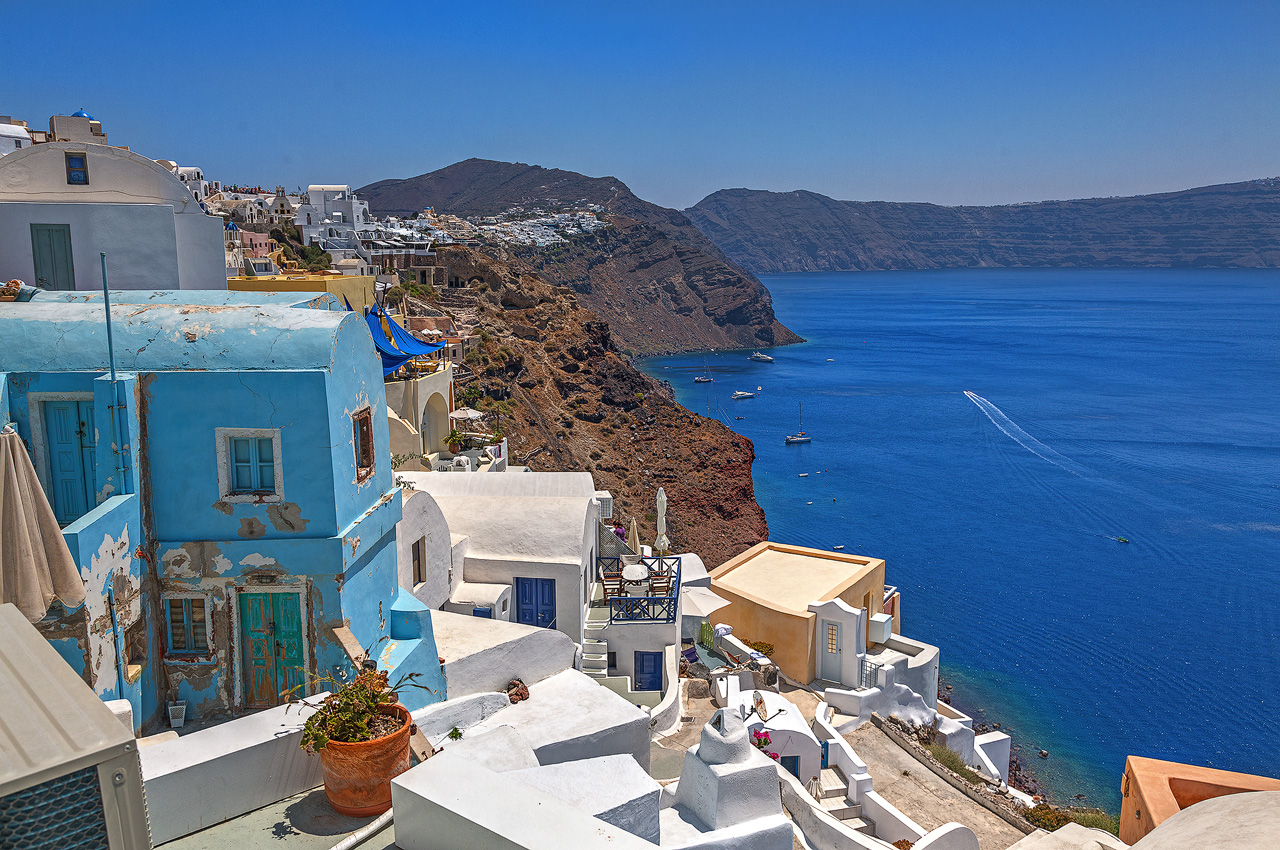
      Before/after comparison: Oia on Santorini

      before after

      I haven't done a before/after comparison in a while so here is one today. Taken in Oia, one of the most famous towns on island of Santorini it shows the result from Photomatix Pro (before) vs image after some tweaks in Photoshop (after). As you can see I created rather flat and low contrast image in Photomatix. This way it was easier for me to apply final adjustments in Photoshop to get the result I wanted - to show you what I saw when taking this picture.

      So yes, I was on Santorini. Just for a day and honestly speaking I wouldn't stand a single day longer there. Don't get me wrong, I really liked the towns of Oia and Thira very much - I found them to be very picturesque and having nice atmosphere but in the middle of summer there were so many tourists that it was impossible to fully enjoy that. It was slightly better in Thira but in Oia where there is only one main public road through town with not that many side roads it was really tough. Everyone was on that very road. Add temperatures around 30 degrees centigrade and almost no wind on that day and you'll get what I experienced.

      It was so crowded that it was very difficult to take pictures. Tripod was impossible to use at all but taking handheld wasn't much easier. Everyone wanted to take a snap or sweet photo of themselves with that beautiful view in background. Cool, I don't have anything against that as long as I can take pictures as well. But when I started taking them the crowd noticed that I don't photograph anybody so they thought that I must be crazy or something. So they asked me to stop so they could take their own photos. It was unfair.

      Also today I would like to start a new series in which I'll share my post processing details a bit more. This idea was in fact greatly inspired by one of my favorite photograhers - +Miroslav Petrasko from http://blog.hdrshooter.net/.

      In the image below you can see what layers I used to create final image. Starting from bottom they are:
      1. Background layer is output from Photomatix Pro. I applied some small corrections in Lightroom to it eg. to fix levelling of horizon.
      2. I applied some midtones contrast to add extra boost to the image.
      3. Then I applied some contrast to the brightest parts of the image - mainly to the houses and sky to make them stand out more.
      4. Added some contrast to shadows - mainly to water and cliffs.
      5. Increased blues saturation in the sea, sky and also in the house on the left.
      6. Increased reds and yellows saturation to add some pop to the cliffs.
      7. Increased shadows clarity by applying High Pass filter with large radius to them as described in this tutorial.
      8. Added a bit more of highlights contrast.
      9. Added a bit more of midtones contrast.
      10. Added some preeliminary sharpening.
      11. Added some details to the highlights.
      As you can see I used quite a lot of adjustment layers. What I noticed is that week after week I use more and more layers. And I also spent more time on a single image - from "just" 2 hours to something like 3 days. Reason I do that is because I want to have my photos as polished as possible. They aren't ideal but they are slowly improving in terms of quality.


      Finally some EXIF and other technical specs:

      Technical details:
      Camera: Canon 5D MK III
      Lens: Canon 24-105 f/4 L IS USM
      Focal length: 28 mm
      Aperture: f/8.0
      Exposure time: 1/400 s ("middle" exposure)
      ISO: 100
      Number of exposures: 5
      E.V. Step: 1
      Flash used: no
      Tripod: no
      Filters: circular polarizing filter
      Software: Magic Lantern 2.3, Photomatix Pro 4.2.7, Lightroom 5.0, Photoshop CC
      Monday, August 12, 2013

      Tutorial: dealing with lens flares

      Above photo was treated with technique described in this tutorial
      When I was taking some snapshots as a kid a lot of people told me not to point the camera in the direction of the sun. And I listened (I was that kind of kid which sometimes listened to those older than me). But many years later when I started photographing for serious I quickly learnt that pointing my camera in the sun is actually one of the easiest ways to get some amazing light. Especially during sunrise or sunset when light passes through a lot of particles creating beautiful phenomena like haze or sun rays (known as God rays, light shafts or light beams). Or also during blue hour when strong light sources turn into some amazing stars.

      But there is indeed one thing that is very very bad about shooting into the sun. Flares. Those nasty red, yellow, pink or green spots, dots or bows you get in the image if the sun (or any strong light source in fact) is in the frame.

      This might not be that bad in some cases (eg. it might work in some portraits adding some extra interest to them) but usually for a landscape photographs it doesn't look good. It looks ugly.

      In this tutorial I will try to share a few tips on dealing with lens flares: from avoiding them to removing them at the post-processing stage.

      Avoiding lens flare

      So let's start with some tips on how to actually avoid the phenomenon of lens flares as it's always easier to do this in camera than later in post:
      • avoid shooting into the sun or any direct light - it's quite obvious but it's not always possible. Also it's very limiting
      • try to shoot from the shade - this way no direct light falls on the front element of your lens 
      • use the lens hood - to limit direct light falling on your lens
      • use prime lens - they have less optical elements and so they are less prone to the flares
      • avoid using to many filters or at least make sure to use coated ones - each lens is another optical element what increases a chances of lens flares to occur.
      • block the sun - you can use compositional elements like trees or buildings to reduce the flares. Just put them so they completely or partially cover the sun
      • try different focal lengths and apertures - flares often behave differently depending on the focal range of the lens as well as selected aperture. Often flares are looking better if you stop down your lens to f/8 or f/11.
      But sometimes avoiding the lens flare isn't possible. In such a case you have to employ different strategy.

      Hide the sun

      In the tips above I mentioned blocking the sun. If you have no compositional element to do this or you prefer to see the sun in your shots there is similar technique but it requires a bit of post processing.

      1. First take two shots. First one should be normal i.e. with sun visible in the frame. In the second photo make sure to block the sun with your palm (or finger, some object etc.). Make sure it has the same exposure parameters as the first one. For that you can either use Fully Manual mode or use Exposure Lock feature of your camera if you're shooting in Aperture Priority mode (Av or A).


        2. Then back in Photoshop just blend the images in such a way that no flare is visible anymore. First identify the flares. In the image below I marked the ugliest with red pen:
          1. Open both images as layers in Photoshop making sure that image with your hand in it is above the other one.
          2. Create layer mask for the top layer and fill it with black.
          3. Select brush tool, set it opacity to around 25% and its color to white.
          4. Paint your layer mask over the areas where you notice flare artifacts. For my image I used following layer mask:

            As you can see this mask is white in the lower part of the image and also where the tree is, meaning that in this parts data from flare-less image is used.

            There is one problem with this method however. It's quite difficult to use if you're using long exposures. Keeping your hand steady for 1/100th of a second or 1/4th of a second is easy. But keeping it steady for 30 seconds is definitely not.

            Removing the flares in Photoshop

            It might be not the easiest and quickest tasks but it's definitely possible. The key is to use a combination of Hue/Saturation adjustment layer and Clone tool.

            I used this technique for example in the photo below.

             And it is how medium exposure photo looked before:


            What I basically did was to first do some cloning to remove the flares in the rocks in the lower right as well as some in the clouds. I also used Hue/Saturation adjustment layer which was black apart from the regions around the sun. Reds saturation and lightness was significantly reduced to make it blend with the image better.
            Sunday, August 11, 2013

            Infrared tiny planet

            Today I'd like to share sort of unusual photo. Probably you've heard about tiny planets and infrared photography. If not take a look at my tutorials about creating tiny planets effect and introduction to infrared photography. This time I decided to combine the two and created infrared tiny planet. To do that I first captured infrared 360 degrees panorama in Greece and then converted it into a tiny planet.

            BTW I have a few ideas for tutorials for coming weeks and hope to share one next week.
            Saturday, August 10, 2013

            The layers

            In the past when I was programming realtime 3D graphics (for video games) one of my main interest was atmospheric scattering. It's a rather complex phenomenon let me tell you but basically it's about the light travelling through various particles and being scattered what results in it changing colour. We can observe it for instance as beautiful haze near the horizon during sunset or sunrise.

            Despite the fact I don't code 3D graphics anymore (as I simply don't have time for that) I still like watching this phenomenon in real life. In the photo above you can see beautiful layers, photographed during sunset on Crete, which without atmospheric scattering wouldn't be visible.

            Technical details:
            Camera: Canon 5D MK III
            Lens: Canon 70-300 f/4-5.6 L IS USM
            Focal length: 229 mm
            Aperture: f/8.0
            Exposure time: 1/25 s
            ISO: 100
            Number of exposures: 1
            E.V. Step: n/a
            Flash used: no
            Tripod: yes
            Filters: no
            Software: Magic Lantern 2.3, Lightroom 5.0, Photoshop CC
            Friday, August 9, 2013

            Path in the forest

            Still no new photos from Greece. So instead a HDR photo I took a few years back (two or three), in the forest somewhere in Masurian district, Poland. I really liked how the path lead the way as well as lights and shadows play on the path.
            Thursday, August 8, 2013

            Sunrise on Fuerteventura

            A little break from my photos from Greece today because I process them way slower than I hoped to. But I will post them in next few days so stay tuned if you're interested in the way I saw Crete or Santorini.

            Instead today I'd like to share a sunrise photo taken on Fuerteventura. I decided to use slower shutter speed to give sense of motion and roughness of the sea. I didn't want to go with too slow times though because this way I would loose that fantastic dynamism of the scene (as very long exposures make the scene much calmer, as you can learn from my tutorial about that, than it is).

            BTW funny thing - in the last few days it's much warmer in Warsaw than it was on Crete - 36 degrees centigrade vs "just" 30. I planned to take some photos but with temperatures that high I'm just trying to survive :)

            Technical details:
            Camera: Canon 5D MK II
            Lens: Canon 24-105 f/4 L IS USM
            Focal length: 24 mm
            Aperture: f/13.0
            Exposure time: 5 s ("middle" exposure)
            ISO: 100
            Number of exposures: 7
            E.V. Step: 1 EV
            Flash used: no
            Tripod: yes
            Filters: ND8 neutral density filter
            Software: Magic Lantern 2.3, Photomatix Pro, Lightroom 5.0, Photoshop CC
            Wednesday, August 7, 2013

            Canon 5D Mark III Review

            I took this photo with Canon 5D MK III during blue hour. The tree was lit by the lights of the hotel situated nearby what resulted in a bit surreal look.
            For more than a year I was using Canon 5D Mark II but very recently I switched to its successor - 5D Mark III. Was it worth the switch? Read my short review below.

            Just after starting up 5D MK III you notice one thing - it is much more professional than its predecessor. From menu layout to AF system and weather sealing. Everything is more complex and looking much more professional than in Mark II. And complex doesn't mean worse or more difficult - extra options are welcome as they are creating some very nice opportunities.

            The size and weight of the camera is very close to that of 5D MK II. Most of the buttons are in the same places but there are still some nice ergonomics and layout improvements and additions, like:
            • ON/OFF switch is now situated in the same place where mode dial is. At first I wasn't sure if it's good but after longer use I really prefer it to the older way. It's much more difficult to switch it on/off accidentally, eg. in a photo bag. What's more now this switch is bi-state instead of tri-state from 5D Mark III.
            • Mode you're shooting in is now locked. If you want to turn mode dial you first need to press small button at the top of it. Again it helps in preventing accidental changing of the mode.
            • Slightly bigger LCD screen (3.2 inch vs 3.0 in Mark II) this is great as it makes reviewing photos easier
            • Depth-of-field preview button is now on the right of the lens what makes it more easier to access. It's also slightly larger.
            • Rate button which allows you to rate your photos in a camera. It's a really great feature because then these marks will show, eg. in Lightroom what makes rejecting and picking best photos much easier and effective
              New Auto Focus System

              There was much talk about new auto-focusing system in 5D Mark III and I can only confirm what you probably know already - it's really superb. 61 AF points give a lot of opportunities and given the fact that many of them are cross type and double-cross type (41 and 5 respectively) you no longer need to stick to the center AF point because other are usable and accurate as well.

              Also continuous AF is finally usable! It's fast and have a lot of options for different types of movement. In my tests it performed very well even with fast moving subjects.

              The only issue with AF is that the points could be wider spreaded in a frame because they are still gathered quite close to the center.

              For me quite important change is increasing number of frames to 7 in auto-bracketing mode. It's a significant improvement over just 3 frames available in 5D MK II. Combined with very fast burst mode (6 frames per second) it makes for a great HDR camera.

              Moving subjects were a big problem for AF from 5D MK II. In 5D MK III this is no longer an issue. This beautiful tiger was walking quite fast in my direction but the image still is very sharp and correctly focused.

              HDR

              There is also a HDR mode but frankly speaking I don't like it. I much prefer to have better control over the creative process and this of 5D MK gives almost no options. Also it isn't as sophisticated as eg. Photomatix and it can't be given computing power of regular PC vs computing power of DSLR. However, this mode can be quite useful to check how your HDR might look, if you exposed the shadows and highlights correctly etc.

              Image Quality and low-light performance

              But what about image quality? It's almost the same as in 5D MK II, dynamic range is also very close to that and it's about 11 EV. Compared to some Nikons (eg. D800 with 14 EV of dynamic range) this value isn't impressive. So that's rather disappointing.

              I did notice some improvements in case of low light shooting. For me the maximum usable ISO on 5D MK II was 6400. On 5D Mark III both 12800 and 25600 (which are now native ISO) are fully usable. There is some noise of course but it's very easy to get rid of it with Lightroom or any other noise reduction tool.

              Other changes

              But there are plenty of other improvements. Below are a few I especially like:
              • Virtual horizon which makes levelling the photos much easier.
              • Videos with up to 60 FPS (although 60 FPS isn't available in Full HD)
              • Ability to develop RAWs inside camera
              • ISO expandable to 102.400!
              • Multi-exposure mode - you shoot a few photos and they are combined into one. Although one can do that in Photoshop of course, having such option in camera is great
              Summary

              Pros:
              • a lot of great additions and improvements
              • fantastic AF performance
              • fast burst mode (6 FPS)
              • auto-bracketing up to 7 frames 
              • great low-light performance
              Cons:
              • dynamic range could be better
              • AF points could be spaced a bit wider 
              So summing up it's a really great camera. If it had dynamic range of Nikon D800 it would be ideal. It isn't but I believe it's still worth a switch because it's packed with a lot of useful features that make taking photos much easier and that also help in achieving better results.
                Tuesday, August 6, 2013

                Relax in the shade of power plant

                When I'm travelling apart from taking landscape photos which are my favourite I also try to capture something that shows nature of the places I visit. Or photos which tell how I feel about particular place. So today here is one from Greece. It shows a couple of people walking and holding their hands. They are relaxed probably in love but at the same time they are walking towards power plant which is hardly romantic.

                I tried to compose this shot in such a way that both the couple and power plant were in the corners of imaginary 3x3 grid thus satisfying the rule of thirds. Regarding post processing I slightly increased contrast and decreased saturation in order to get a bit of apocalyptical look (not to much though as there are some nice emotions in this shot too).

                Note that I used small trick here. I used tele zoom lens which has the effect of shortening perspective. As you can read from EXIF below I shot this shot at 182 mm focal length. But as I was using a crop sensor (Canon 50D) effective focal range is 291 mm. It means that in reality power plant was much further from the couple than it might seem from the image.

                Technical details:
                Camera: Canon 50D
                Lens: Canon 70-300 f/4-5.6 L IS USM
                Focal length: 182 mm
                Aperture: f/5.0
                Exposure time: 1/1000 s
                ISO: 100
                Number of exposures: 1
                E.V. Step: n/a
                Flash used: no
                Tripod: yes
                Filters: no
                Software: Magic Lantern 2.3, Lightroom 5.0, Photoshop CC
                Monday, August 5, 2013

                Cretan beach at night

                I'm back from my vacation in Greece which included towns of Heraklion, Amoudara and ruins of Knossos (Crete) and towns of Oia and Thira (Santorini). During last 2 weeks I was mostly relaxing (it's a great thing to do from time to time!), spending my time in warm water, eating like mad or drinking cocktails but I also found some time to take some photos. And by some I mean something around 8.000 photos. However, many of them are quite similar because beaches near the place where I stayed were rather boring (sand but no rocks) what didn't give that good opportunities for sunrise and sunset photography.

                What's more I didn't take any astro photos (and I had hoped to do that...) because during my stay the sky was rather hazy so there were just a couple of brightest stars visible. Well, it happens. Hopefully, I'll take them next time.

                I did, however, capture quite a few long exposure and night photos like the one above. I really like the result despite the fact I applied just quick processing to it to see how it looks. I also practised my general photography skills, macro photography, infrared photography and portraits. And I think I made some improvement in each of the fields and I hope to share some results soon.

                What I found quite interesting is that despite the fact I was away and not writing any new posts on my website, the number of visits stayed the same. It seems that my blog is being shared more frequently and that it starts to appear in google search results quite often. Nice!

                Technical details:
                Camera: Canon 5D MK III
                Lens: Canon 24 f/1.4 L II USM
                Focal length: 24 mm
                Aperture: f/1.4
                Exposure time: 1.3 s
                ISO: 800
                Number of exposures: 1
                E.V. Step: n/a
                Flash used: no
                Tripod: yes
                Filters: no
                Software: Magic Lantern 2.3, Lightroom 5.0, Photoshop CC
                 
                © Copyright 2011 Photoshop and Photography All Rights Reserved.
                Free Templates by Cool Blogger Tutorials- Powered by Blogger.com.