Powered by Blogger.
Monday, September 30, 2013

Colors at sunrise

Today I would like to share a photo taken during sunrise on Fuerteventura Island.

Technical details:
Camera: Canon 50D
Lens: Canon 10-22 f/3.5-4.5 USM
Focal length: 24 mm
Aperture: f/11.0
Exposure time: 8 s ("middle" exposure)
ISO: 400
Number of exposures: 5
E.V. Step: 1
Flash used: no
Tripod: no
Filters: ND8 neutral density filter
Technique: manual blending, luminosity masks
Software: Magic Lantern 2.3, Lightroom 5.0, Photoshop CC
Sunday, September 29, 2013

Walking by the stream

Today HDR photo from Koscieliska Valley in Polish Tatra mountains. As you can see there are quite a few people in the frame. Normally I would try to get rid of them but in this case they add a sense of scale to this image and therefore I decided to leave them.

Technical details:
Camera: Canon 5D MK II
Lens: Canon 24-105 f/4 L IS USM
Focal length: 24 mm
Aperture: f/8.0
Exposure time: 1/250 s ("middle" exposure)
ISO: 100
Number of exposures: 5
E.V. Step: 1
Flash used: no
Tripod: no
Filters: circular polarizing filter
Technique: HDR, tone-mapping, luminosity masks
Software: Magic Lantern 2.3, Photomatix Pro 4.2.7 (Details Enhancer), Lightroom 5.0, Photoshop CC
Saturday, September 28, 2013

Before/after comparison: Colourful sunset

before after

Time for another before/after comparison + some post processing details (for more go here). This time a sunset photographed in Masuria region, Poland.

I took 7 exposures at 1 EV spacing, merged them to HDR and tone-mapped in Photomatix Pro (which is Before). Then I edited my image with luminosity masks technique in Photoshop CC (After).

In the image below you can see what layers I used to create final image. Starting from bottom they are. As you can see I grouped the layers in err... groups. This way the work can be organized much better because I instantly know where certain layer is. In this case it's not a big problem but sometimes I have images with much more layers where this becomes an issue.
  1. Background - image produced by Photomatix Pro.
  2. Fixes - various corrections, like denoising, spot removal etc. Basically any adjustments that need to be done in a destructive way. Doing this early in the workflow is essential.
  3. Global color balance - fixes for white balance
  4. Shadows color balance - correction of colors in the trees areas to reduce reddish cast a little bit.
  5. Midtones contrast - I increased midtones contrast using Curves adjustments layer.
  6. Shadows contrast - added some contrast to darkest parts of the image and slightly brightened them up (I used Screen blending mode to get brightening effect)
  7. Highlights contrast - added contrast to highlights in sky and grass
  8. Clouds contrast - added contrast to the clouds by using Curves adjustments layer and using Overlay blending mode with small opacity.
  9. Shadows clarity - added clarity to the shadows by using this technique.
  10. Sharpening - added some sharpening using high-pass sharpening technique.
  11. Clouds detail - added some extra detail to the clouds using Topaz Detail 3 plugin.

Finally some EXIF and other technical specs:

Technical details:
Camera: Canon 50D
Lens: Canon 10-22 f/3.5-4.5 USM
Focal length: 10 mm
Aperture: f/22.0
Exposure time: 2.0 s ("middle" exposure)
ISO: 100
Number of exposures: 7
E.V. Step: 1
Flash used: no
Tripod: yes
Filters: no
Technique: HDR, tone-mapping, luminosity masks
Software: Magic Lantern 2.3, Photomatix Pro 4.2.7 (Details Enhancer), Lightroom 5.0, Photoshop CC
Friday, September 27, 2013

Jetty at sunset

Today a HDR photo of a jetty taken during late sunset.

Technical details:
Camera: Canon 50D
Lens: Canon 10-22 f/3.5-4.5 USM
Focal length: 12 mm
Aperture: f/18.0
Exposure time: 4 s ("middle" exposure)
ISO: 100
Number of exposures: 7
E.V. Step: 1.0
Flash used: no
Tripod: yes
Filters: no
Technique: HDR, tone-mapping, luminosity masks
Software: Magic Lantern 2.3, Photomatix Pro 4.2.7, Lightroom 5.0, Photoshop CC
Thursday, September 26, 2013

Beginner's HDR photography tutorial. Part 1. Why do we need HDR?

Ok, so here it is. The very first part of my HDR photography video tutorial! In this part, which is a very brief introduction to HDR photography, I'm giving some reasons why HDR is sometimes essential.

Next parts where I will show you how to process photos in Photomatix, how to get rid of various artifacts and finally how to post-process tone-mapped photo are on the way so stay tuned!

So without further ado here is Part 1 of my HDR photography video tutorial (make sure to subscribe to my YouTube channel to get updates on next parts):

Tuesday, September 24, 2013

Welcome to Oia

Today it's time for a HDR photo from Oia, Santorini. Oia is one of the most picturesque towns I've ever been to, even despite the fact it takes just a few minutes to go from its one end to another. Yes, it's really that small. And crowded. And beautiful at the same time.

If you would like to learn HDR photography, read my free HDR tutorial.

Technical details:
Camera: Canon 50D
Lens: Canon 10-22 f/3.5-4.5 USM
Focal length: 10 mm
Aperture: f/14.0
Exposure time: 1/250 s ("middle" exposure)
ISO: 100
Number of exposures: 3 
E.V. Step: 2.0
Flash used: no
Tripod: no
Filters: no
Technique: HDR, tone-mapping
Software: Magic Lantern 2.3, Photomatix Pro 4.2.7, Lightroom 5.0, Photoshop CC
Monday, September 23, 2013

Autumn in the forest

I spent last weekend shooting some photos in the beautiful region of Masuria, Poland. I took some wonderful sunset photos but not only. In the photo above you can see that I also took some macro images. I hope you like it :)

Technical details:
Camera: Canon 5D MK III
Lens: Canon 100 f/2.8 L IS USM Macro
Focal length: 100 mm
Aperture: f/10.0
Exposure time: 1/100 s
ISO: 3200
Number of exposures: 1
E.V. Step: n/a
Flash used: no
Tripod: no
Filters: no
Technique: n/a
Software: Lightroom 5.0, Photoshop CC
Friday, September 20, 2013

Young tiger in the grass

Today I'd like to share a photo of young tiger from Warsaw zoo. It's a really beautiful animal and it was a great pleasure to photograph him and watching him playing.

Technical details:
Camera: Canon 5D MK III
Lens: Canon 70-300 f/4-5.6 L IS USM
Focal length: 252 mm
Aperture: f/8.0
Exposure time: 1/250 s
ISO: 250
Number of exposures: 1
E.V. Step: n/a
Flash used: no
Tripod: no
Filters: circular polarizing filter
Technique: n/a
Software: Lightroom 5.0, Photoshop CC
Thursday, September 19, 2013

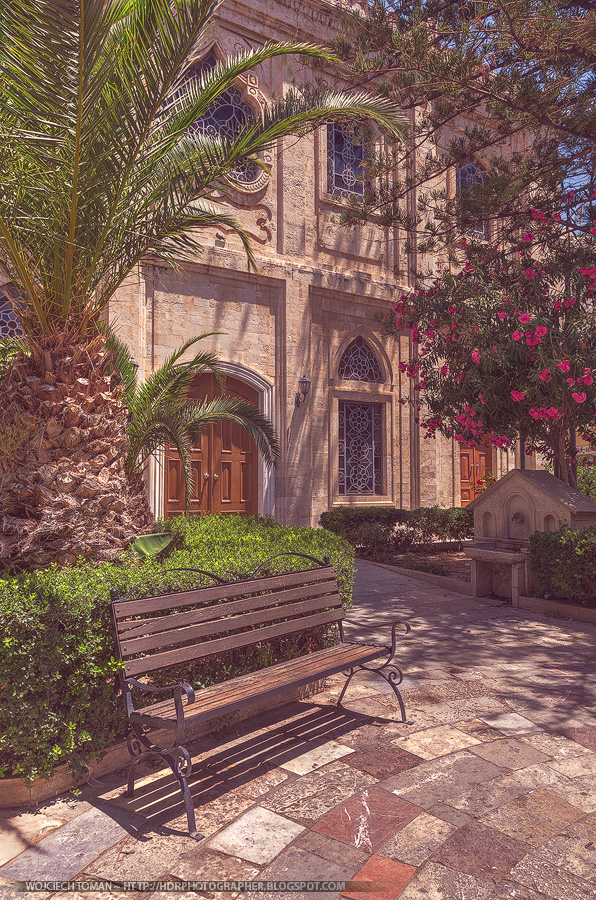
Vintage HDR photo from Heraklion and YouTube channel


Today I would like to share a vintage style HDR photo I took in Heraklion during my recent vacations on Crete. Hope you enjoy!

Also please note that I finally configured my YouTube channel (which you can watch here). If you would like to watch video tutorials from me (and I now plan to release them more regularly, at least one every 2 weeks or more often) please do subscribe to it.

Technical details:
Camera: Canon 5D MK III
Lens: Canon 24-105 f/4 L IS USM
Focal length: 24 mm
Aperture: f/8.0
Exposure time: 1/60 s ("middle" exposure)
ISO: 100
Number of exposures: 5
E.V. Step: 1
Flash used: no
Tripod: no
Filters: circular polarizing filter
Technique: HDR, tone-mapping, luminosity masks, vintage processing
Software: Magic Lantern 2.3, Photomatix Pro 4.2.7, Lightroom 5.0, Photoshop CC
Wednesday, September 18, 2013

Tutorial: using selective adjustments in Lightroom

Today I would like to share with you a new video tutorial I have just recorded. This time I present selective adjustment tools available in Lightroom:
  • graduated filter,
  • adjustments brush and
  • radial filter (which was introduce in Lightroom 5).
Tuesday, September 17, 2013

Thoughts: Specialization in photography

There is so much to do in photography. You can shoot landscapes, architectures, cars, real estate, portraits, fashion, weddings, tamed or wild animals, insects, stars, street scenes... whatever you want. Really - sky is the limit. The problem is that each of these subjects requires a bit different approach, technique and skills. And even different equipment.

For example landscape photography is much about patience and strong will (and steady tripod!) because you might need days or weeks to capture a single photo you have in mind. And you will often go back home with nothing worth sharing (eg. when you expected nice sunrise but it was raining). It's even worse when you need to hike for several hours to reach your destination just to find out that there is nothing really worth capturing (eg. the light is boring). What's more you will often need to get up very early (to shoot sunrise) or miss dinner (to shoot sunset). Wild-life photography is much about understanding animals, knowing their behaviours, spending hours studying them. But you also need to be silent and cautious. You need to become part of they world. Sort of. Portrait photography requires good interpersonal skills to tell the model what you expect from him/her, make him/her feel comfortable during the shoot etc. And also you need to have great understanding of light. And let me tell you one thing - I as former 3D graphics programmer know equations describing light, how it behaves, reflects off surfaces etc. Yet I cannot apply it to my photography. I see light as mathematical formula not a tool to craft art. Unfortunately.

For above reasons, apart from a few photographers who are just exceptions proving this thesis (take a look at works of +Michael Woloszynowicz or +Pawel Tomaszewicz for instance - both these guys are shooting wonderful landscape, architecture but also portrait work), most of the others are greatly specialized. And so am I. As you probably noticed my main area of focus is landscape photography. From time to time I share other photos ranging from macro to portraits but my main strength is shooting nature views. I like hiking, I like silence at sunrise/sunset, I don't have problem with eating late meals. I feel great when I can photograph landscape. I might not be the best landscape photographer in the world (quite frankly I'm nowhere near the level I would love to reach) but it's my world. I specialize in this kind of photography.

Focusing on one area is a very good thing because you spend your efforts improving quite a small subset of skills (eg. you don't need to learn artificial light if you're mainly shooting with natural light). You also spend your money only on equipment targeted towards this kind of photography (eg. ultra wide angle lenses for landscape photography or powerful flash units for potraits). This way you also increase your chances of capturing some really stunning photos. If for 10 days in a row you go out to photograph sunset there is quite a chance that at least one of them will be stunning. But if one day you go photographing sunset, another you shoot portraits, on the next one animals and then macro... well, there is a great chance you'll end up with mediocre photos...

At the same time bear in mind it's a good thing to try something different from time to time to see other possibilities and improve general skills (like composition for instance). If you focus on something too much you loose wider perspective what can also be a bad thing for your photography. So summing up specialization is a great thing that can make you a great photographer. But at the same time step out of your comfort zone from time to time to progress as a photographer.

Technical details:
Camera: Canon 50D
Lens: Canon 10-22 f/3.5-4.5 USM
Focal length: 10 mm
Aperture: f/16.0
Exposure time: 1/100 s ("middle" exposure)
ISO: 100
Number of exposures: 3 
E.V. Step: 2.0
Flash used: no
Tripod: yes
Filters: no
Technique: HDR, tone-mapping
Software: Magic Lantern 2.3, Photomatix Pro 4.2.7 (Details Enhancer), Lightroom 5.0, Photoshop CC

Monday, September 16, 2013

Evening walk

I took this photo last year in Dahab, Egypt while doing some landscape photography. It shows a family during an evening walk near the sea. The water you see in the picture remained there after high tide.

Technical details:
Camera: Canon 5D MK II
Lens: Canon 70-300 f/4-5.6 L IS USM
Focal length: 300 mm
Aperture: f/9.0
Exposure time: 1/100 s
ISO: 3200
Number of exposures: 1
E.V. Step: n/a
Flash used: no
Tripod: yes
Filters: no
Technique: black & white conversion
Software: Magic Lantern 2.3, Lightroom 5.0, Photoshop CC
Sunday, September 15, 2013

Predator's approaching

Today a photo of a beautiful jaguar in Warsaw zoo. I decided to go with low-light to add more drama to this shot.

Technical details:
Camera: Canon 5D MK II
Lens: Canon 70-300 f/4-5.6 L IS USM
Focal length: 300 mm
Aperture: f/5.6
Exposure time: 1/250 s
ISO: 400
Number of exposures: 1
E.V. Step: n/a
Flash used: no
Tripod: no
Filters: no
Technique: n/a
Software: Magic Lantern 2.3, Lightroom 5.0, Photoshop CC
Saturday, September 14, 2013

Masurian Sunset

Today I would like to share HDR photo taken in Masuria, Poland 2 years ago. Sorry for not writing anything more but I'm rather busy recently.

Technical details:
Camera: Canon 5D MK II
Lens: Canon 24-105 f/4 L IS USM
Focal length: 24 mm
Aperture: f/18.0
Exposure time: 1/8 s ("middle" exposure)
ISO: 100
Number of exposures: 5
E.V. Step: 1.5
Flash used: no
Tripod: yes
Filters: no
Technique: HDR, tone-mapping, luminosity masks
Software: Magic Lantern 2.3, Photomatix Pro 4.2.7 (Details Enhancer), Lightroom 5.0, Photoshop CC, Topaz Restyle
Friday, September 13, 2013

Resting horses

Another HDR photo from Polish Tatra mountains. Taken last winter on the road to Morskie Oko Lake (Sea Eye Lake) it shows horses resting after a ride with the tourists.

I took this photo handheld because I had very long hike planned for that day and walking in the snow is rather tiring so I preferred to limit my equipment as much as possible. I do it from time to time as you might have noticed.

If you're interested in learning HDR photography, read my free HDR tutorial. For those of you wandering how I capture HDR photos handheld read tips I posted here.

Technical details:
Camera: Canon 5D MK II
Lens: Canon 24-105 f/4 L IS USM
Focal length: 24 mm
Aperture: f/7.1
Exposure time: 1/400 s ("middle" exposure)
ISO: 200
Number of exposures: 5
E.V. Step: 1
Flash used: no
Tripod: no
Filters: circular polarizing filter
Technique: HDR, tone-mapping, luminosity masks
Software: Magic Lantern 2.3, Photomatix Pro 4.2.7, Lightroom 5.0, Photoshop CC
Thursday, September 12, 2013

Smooth water

Today I'd like to share a long exposure photo I took last year on Fuerteventura island during one beautiful sunrise. The sea was really really rough as it was high tide. The waves hit the rocks with great anger splashing water all around me (and almost stealing tripod with my camera by hitting it directly). It was a really dynamic scene. But I had another idea for it. I decided that I would prefer something more calm and tranquil. So I put ND400 neutral density on my lens (it stops about 9 EV), set very slow aperture and long exposure (80 seconds). This way I tamed the sea. I made it calm. When I photographed this scene I could hear roaring sounds of waves hitting lava rocks. But when I look at this picture I hear no sound. It's more about silence :) It's so easy to cheat with photography :)

If you would like to learn more about smooth water effect, read my tutorial about it.

Technical details:
Camera: Canon 5D MK II
Lens: Canon 24-105 f/4 L IS USM
Focal length: 47 mm
Aperture: f/22.0
Exposure time: 80 s
ISO: 100
Number of exposures: 1
E.V. Step: n/a
Flash used: no
Tripod: yes
Filters: ND400 neutral density filter
Technique: exposure fusion, luminosity masks
Software: Magic Lantern 2.3, Lightroom 5.0, Photoshop CC
Wednesday, September 11, 2013

Crypt in HDR

Neo-romanesque crypt in Madrid once again. It's a really great place and I uploaded photos from there earlier: here, here and here. It's a small paradise for HDR photographers - great dynamic range, nice lights, beautiful textures. I could spend hours in there.

Technical details:
Camera: Canon 5D MK II
Lens: Canon 24-105 f/4 L IS USM
Focal length: 24 mm
Aperture: f/8.0
Exposure time: 4 s ("middle" exposure)
ISO: 400
Number of exposures: 5
E.V. Step: 1
Flash used: no
Tripod: yes
Filters: no
Technique: exposure fusion, luminosity masks
Software: Magic Lantern 2.3, Photomatix Pro 4.2.7 (Fusion/Natural), Lightroom 5.0, Photoshop CC
Tuesday, September 10, 2013

Colours of autumn

Autumn is one of my favourite seasons with some very nice warm light and beautiful colours. One of my favourite places to photograph it in Warsaw is Royal Baths Park (aka Royal Lazienki Park and Łazienki Królewskie in Polish). Trees covered in yellows, oranges and reds look really beautiful reflecting in numerous ponds and small rivers.

I took above photo just a few days ago and there are still a lot of greens as it is just beginning of autumn in Poland so I will need to revisit this place.

BTW if you're interested in how I post-processed this photo in Photoshop after using Photomatix Pro here is a short time-lapse:


And finally some technical specs:

Technical details:
Camera: Canon 5D MK III
Lens: Canon 24-105 f/4 L IS USM
Focal length: 24 mm
Aperture: f/7.1
Exposure time: 1/80 s ("middle" exposure)
ISO: 1000
Number of exposures: 5
E.V. Step: 1
Flash used: no
Tripod: no
Filters: circular polarizing filter
Technique: exposure fusion, luminosity masks
Software: Magic Lantern 2.3, Photomatix Pro 4.2.7 (Fusion/Natural), Lightroom 5.0, Photoshop CC
Monday, September 9, 2013

Lake at sunset

Reflections. As you might have noticed they are one of my favourite subjects in photography because they add so much depth and interest to a photo. They can turn even a boring scene into interesting one. So here is one more reflection from me. There was almost no wind so there are just a couple of small ripples on the water surface making the reflection almost mirror-like.

You can also download Photomatix Presets used for this photo here.

Technical details:
Camera: Canon 50D
Lens: Canon 10-22 f/3.5-4.5 USM
Focal length: 10 mm
Aperture: f/16.0
Exposure time: 1/4 s ("middle" exposure)
ISO: 100
Number of exposures: 7
E.V. Step: 1.5
Flash used: no
Tripod: yes
Filters: no
Technique: HDR, tone-mapping, luminosity masks
Software: Magic Lantern 2.3, Photomatix Pro 4.2.7 (Details Enhancer), Lightroom 5.0, Photoshop CC
Sunday, September 8, 2013

The Monserrate Palace in Sintra

Today HDR photo I took in Sintra, picturesque town near Lisbon, depicting the Monserrate Palace. Built in 1858 by British Sir Francis Cook is surrounded by one of the most beautiful and magical English gardens I've ever seen. I could walk there for hours especially as this place doesn't seem to be very famous amongst tourists visiting Sintra.

Technical details:
Camera: Canon 5D MK II
Lens: Canon 24-105 f/4 L IS USM
Focal length: 105 mm
Aperture: f/9.0
Exposure time: 1/125 s ("middle" exposure)
ISO: 100
Number of exposures: 3
E.V. Step: 2
Flash used: no
Tripod: no
Filters: circular polarizing filter
Technique: HDR, tone-mapping, luminosity masks
Software: Magic Lantern 2.3, Photomatix Pro 4.2.7 (Details Enhancer), Lightroom 5.0, Photoshop CC
Saturday, September 7, 2013

Before/after comparison: Clouds over the city

before after

Time for another before/after comparison + some post processing details. This time a sunset photographed in Warsaw. BTW I would be very interested if you prefer these workflow details in form of a video (like this one) or in a form of a short article like the one you're currently reading?

I took 7 exposures at 1 EV spacing, merged them to HDR and tone-mapped in Photomatix Pro (which is Before). Then I edited my image with luminosity masks technique in Photoshop CC (After). As you can see the difference between output from Photomatix Pro and final result isn't huge this time. I mainly increased contrast and slightly increased saturation.

In the image below you can see what layers I used to create final image. Starting from bottom they are:
  1. Background - image produced by Photomatix Pro.
  2. Midtones contrast - I increased midtones contrast using Curves adjustments layers.
  3. Highlights contrast - added contrast to highlights in sky and grass
  4. Shadows contrast - added some contrast to darkest parts of the image and slightly brightened them up (I used Screen blending mode to get brightening effect)
  5. Highlights saturation - added some extra saturation to sky and clouds, especially to the yellows just above the horizon.
  6. Shadows saturation - added a bit of saturation to darkest parts of the image, especially purples and pinks (eg. roof of the building in foreground).
  7. Sharpening - added some sharpening.

Finally some EXIF and other technical specs:

Technical details:
Camera: Canon 5D MK III
Lens: Canon 24-105 f/4 L IS USM
Focal length: 105 mm
Aperture: f/14.0
Exposure time: 1/125 s ("middle" exposure)
ISO: 100
Number of exposures: 7
E.V. Step: 1
Flash used: no
Tripod: yes
Filters: no
Technique: HDR, tone-mapping, luminosity masks
Software: Magic Lantern 2.3, Photomatix Pro 4.2.7 (Details Enhancer), Lightroom 5.0, Photoshop CC
Friday, September 6, 2013

Warsaw - my beautiful city

Warsaw is a city where I live. Although it might not be the most beautiful city in the world (and also not the most beautiful in Poland) it's getting more beautiful year by year - at least from landscape photographer's perspective. A lot of tall and interesting buildings, nice Vistula river banks (parts of it are renovated right now). The main issue for me is amount of ads - they are virtually everywhere! There are 10 billboards on a single junction near the place I live! And it's even worse in the city centre...

Here is one of the HDR photos I took recently at the end of sunset (or at the beginning of blue hour).

I used focal length of 105 mm to compress perspective a little bit and to make buildings appear closer to each other. In this case I manually blended 5 exposures mainly to restore some details in the shadows as the buildings in front were rather dark.

Technical details:
Camera: Canon 5D MK III
Lens: Canon 24-105 f/4 L IS USM
Focal length: 105 mm
Aperture: f/10.0
Exposure time: 13 s ("middle" exposure)
ISO: 100
Number of exposures: 5
E.V. Step: 1.0
Flash used: no
Tripod: yes
Filters: no
Technique: HDR, manual blending, luminosity masks
Software: Magic Lantern 2.3, Lightroom 5.0, Photoshop CC
Thursday, September 5, 2013

Severe storm


One thing which you should notice today when entering my blog's main page is that I increased photos size there as well. They are now almost 20% larger compared to what they were! I still recommend clicking on the "Read more..." link as this way you can learn a lot more about a photo I share (not only EXIF but often also post-processing details or a story behind the shot). BTW you can always click on a photo to view it in even bigger size and on black background.

Most of you liked the new blog template although a few of you gave me some great suggestions and I plan to implement some of them in following days.

Today's photo was taken during a severe storm in Poland a few years ago. Unfortunately, I removed EXIF data from the image by that time so I can't share it today.
Wednesday, September 4, 2013

New (prototype) layout of the blog


It's the second time this year that I decided to change layout of my blog. I liked the old one but got a bit bored with it. One of the benefits of new template is that photos are slightly larger what should result in a better watching experience. I also plan to add a few completely new features.

Please let me know your opinions.

Please note that for a couple of days some things might be broken.

Today photo is a single exposure taken inside a church in Montpellier. From the beginning it was more an experiment how much noise is possible to remove without sacrificing the quality too much. Although some details are definitely lost I think that result isn't that bad.

Technical details:
Camera: Canon 50D
Lens: Canon 10-22 f/3.5-4.5 USM
Focal length: 10 mm
Aperture: f/3.5
Exposure time: 1/30 s
ISO: 1600
Number of exposures: 1
E.V. Step: n/a
Flash used: no
Tripod: no
Filters: no
Technique: luminosity masks
Software: Magic Lantern 2.3, Lightroom 5.0, Photoshop CC
Tuesday, September 3, 2013

HDR tutorial displayed 20.000 times!

I'm very proud and excited to announce that my free HDR photography tutorial, detailing whole process of creating HDR photo (from taking to processing in Photomatix Pro and making adjustments later) has now reached a total number of 20.000 views!

As I mentioned some time ago, I'm currently in the process of planning new version of the tutorial as well as a series of video tutorials about HDR photography. Both of which will be free of course.

Today a photo I took from a boat when leaving Santorini island. The cliffs looked really nice in the warm light of slowly setting sun.

Technical details:
Camera: Canon 5D MK III
Lens: Canon 24-105 f/4 L IS USM
Focal length: 105 mm
Aperture: f/14.0
Exposure time: 1/160 ("middle" exposure)
ISO: 640
Number of exposures: 3
E.V. Step: 2.0
Flash used: no
Tripod: no
Filters: circular polarizing filter
Technique: manual blending, luminosity masks
Software: Magic Lantern 2.3, Lightroom 5.0, Photoshop CC
Monday, September 2, 2013

Sunset in Tatra mountains

Here is another photo from Tatra mountains, Poland. I took it during sunset hence very warm and pleasant light. In the valley you can see Koscielisko town.

Technical details:
Camera: Canon 5D MK II
Lens: Canon 24-105 f/4 L IS USM
Focal length: 28 mm
Aperture: f/9.0
Exposure time: 1/320 ("middle" exposure)
ISO: 640
Number of exposures: 3
E.V. Step: 2.0
Flash used: no
Tripod: no
Filters: no
Technique: HDR, tone-mapping, luminosity masks
Software: Magic Lantern 2.3, Photomatix Pro 4.2.7, Lightroom 5.0, Photoshop CC
Sunday, September 1, 2013

City silhouette

I like capturing silhouettes during sunset and there are not many subjects that work as great as city architecture. Although Warsaw architecture isn't very high it still looks quite nice against warm golden sky.

Technical details:
Camera: Canon 5D MK III
Lens: Canon 24-105 f/4 L IS USM
Focal length: 105 mm
Aperture: f/14.0
Exposure time: 1/250
ISO: 100
Number of exposures: 1
E.V. Step: n/a
Flash used: no
Tripod: yes
Filters: no
Technique: luminosity masks
Software: Magic Lantern 2.3, Lightroom 5.0, Photoshop CC
 
© Copyright 2011 Photoshop and Photography All Rights Reserved.
Free Templates by Cool Blogger Tutorials- Powered by Blogger.com.