Powered by Blogger.
Tuesday, April 30, 2013

Tutorial: Winter & mountains HDR photography


Photographing in winter is one of the most challenging things to do in landscape photography. Not only are the conditions difficult (freezing, snowing or foggy) but also cameras don’t always work well under these circumstances (underexposing photos, problems with AF, batteries drain faster). Photographing winter in the mountains is even more challenging because trekking becomes more tiring and also it might be risky at times. Despite difficulties, winter landscape photography is really rewarding – you can get some beautiful light and mood for free as light is generally warmer and reflects from snow and ice.
In this article I will try to share some tips on taking HDR and landscape photos in mountains & winter scenery. I also share some photos to give you an even better idea:
  1. Safety
    I start with safety because I consider it the most important aspect of photographing winter in the mountains. Not only might the slopes be slippery which increases chances of falling (and breaking your leg or camera) but there might be a high risk of avalanches too. During my recent stay in the mountains, the risk of avalanches was 3 in 5 step scale what means Considerable (statistics say that very many avalanches occur even at 2/5 in Polish mountains!). For that reason I preferred staying in the valleys. Remember – there is no photo worth risking your life or health. If you’re ever in the position where you risk your life for photography think how many good photos you will loose if you die. And by the way the valleys are still very beautiful.

  2. Protect your gear
    Most cameras don’t like moisture at all. In the mountains there is plenty of it – falling snow or rain, fog, waterfalls are all sources of it. You can cover you camera and lenses with a plastic bag or hood specifically designed for this purpose. If you don’t have either of them make sure to have at least a dry cloth with you and clean your equipment from time to time. Although some lenses are water- and weatherproof (e.g. Canon L-series lenses) you still need a filter to make this “protection” really work. UV filters will do most of the time. One last thing to remember is that going from cold winter scenery into a warm room might result in fog condensation inside the lens (one of the last things you would like to happen to your gear). So if possible don’t treat your gear with shock therapy and put it near the open window for a while and then close. The idea is to warm up the gear slowly. Step by step.
  3. Travel light
    Trekking in the mountains is tiring even in spring or summer. With deep snow (and sometimes ice) all over the track it gets even more difficult. And most of the interesting locations aren’t accessible by any vehicle (sorry guys :) ). So it is essential to take only necessary equipment with you. Normally, when shooting in the urban areas, I have 2 cameras, a tripod and 1 or 2 additional lenses with me (plus a lot of cables, filters, a flash etc.). In the mountains I travel with only 1 camera (and sometimes an additional lens) + tripod + a few favorite filters + spare batteries. This makes it possible to trek 15 – 25 km without being completely exhausted. Tea in the vacuum flask might also be a good idea.

  4. Make sure you have additional batteries
    Batteries run out much quicker when it’s cold. Having additional power source is therefore essential to take all shots you want. With long walks I started around morning golden hour and ended at evening golden hour. I was taking plenty of shots (up to 1000 per day, including some longer exposures) so many batteries were essential. And additional batteries will be even more important if you’re planning to shoot some night HDR shots. Not only is it cold but the exposures might be as long as 120 seconds or even longer.
  5. Take a circular polarizing filter with you.
    Always. On a clear day it will help you make the sky more blue (and the trees more green). Besides, mountains are full of waterfalls and small streams. CPL filter will help you reduce unwanted reflections in them (and on the nearby rocks). BTW on the subject of waterfalls – be prepared that some of the smaller ones might be frozen in winter.
  6. Use your best lenses in terms of chromatic aberration levels.
    Snow scenes are often very contrasty which makes it great for increasing colour fringing. Generally speaking primes perform better in this regard than zoom lenses so if you have some – make sure to use them.

  7. Try shooting in vertical orientation
    Although I take most of my landscape photos in landscape orientation, in the mountains I often prefer vertical orientation. The reason for this is that all tall subjects (like tall pines or mountains) look better in this orientation. More majestic.
  8. Focus on details.
    Although mountains look amazing in a wide angle try to zooming in and focusing on smaller part – be it part of the peak, a stone in the stream or lake. When I talk about details I would like to suggest trying to find interesting textures and small details (moss, texture of the rocks) as they look very interesting after tone-mapping.
  9. Get up early in the morning
    If you’re lucky and it’s sunny you might be able to capture some amazing fog. If you find a high vantage point it will get even better because you will be able to capture the valley covered with clouds or fog. Such scenes might have very wide dynamic range (especially if there is sun in the sky) but hey – we’re shooting HDR, aren’t we? Another tip: make sure you use Cloudy or Shade white balance setting to give this nice warm feel to your sunrise photos. Similarly, blue hour might be pretty amazing in the mountains as there is also a great chance of fog around evening.

  10. Shoot more brackets
    In most cases 3 photos at 2 EV spacing won’t be enough – the reason for that is that many scenes will have much wider dynamic range than “regular” scenes. You might need up to 5 photos at 2 EV spacing (or 9 at 1 EV) to cover whole dynamic range of the scene where there is snow. The worst case is when you have both snow, sky with sun and clouds and forest in the frame. Sun and snow are both very bright. Forests are very dark. The other difficult case is a stream (dark water), with rocks in it covered with bright moss and all that surrounded with bright white snow. Bear in mind that it’s easy to go over the top with HDR processing winter scenery. The thing is our own eyes don’t capture whole dynamic range of the winter scene. Look at the sun and forest on the mountains hills. It will look as black (even though the trees are green).
  11. Make sure snow is white in your photos by:
    • Setting custom white balance (Auto doesn’t work well in the majority of cases) – note that snow isn’t the best source to set white balance because it isn’t really white and what’s more it’s reflecting surrounding environment (in a different way than water does but still).
    • In Photomatix Pro (or any other HDR app) you will notice that snow becomes grey. To prevent it in Photomatix you can: increase Smooth Highlights (even up to maximum value of 100), White Point (above default 0.25% value) and play with Lighting Adjustments and Luminosity settings.
  12. Try Exposure Fusion instead of tone-mapping
    With winter scenes it might be easier to get realistic results with Tone Compressor or Fusion/Natural processing methods than with Details Enhancer. One of the reasons is that with both methods the snow won’t turn grey. The other is that snow doesn’t really need a lot of local contrast adjustments.
I hope these few short tips will help you capture better winter HDR photos.
Monday, April 29, 2013

Inspiring Photographers: Michael Woloszynowicz

The easiest and most effective way to learn photography is to learn from the best photographers. They inspire and affect our own work. By looking at their photos you can learn more than from a few tutorials or books. I would therefore like to introduce you to the new series of posts in which I will share details and photos from photographers who inspire me in my photography adventures. Hopefully they will inspire you as well.

I would like to start this series with great Michael Woloszynowicz, award winning Toronto based photographer. Michael is very hard to classify because no matter what subject he photographs the output is truly outstanding. Landscape, architecture or portrait - all of his photos are amazingly beautiful. I bet that if he captured macro photos they would be superb as well.

Now a few words about Michael.

Bio: Michael has a background in computer science and an MBA in corporate finance. Despite his affinity for math and science, Michael was drawn to the creativity and expression found in photographing people, buildings and cities. He photographs primarily for commercial clients, modeling agencies and personal assignments. When he’s not taking pictures or editing them he can be found sampling food and wine with his fiancĂ©e Melanie or relaxing with a book.
Favorite subjects: Architecture and cities, portraits, landscapes
Photo gear: Nikon D800 with Nikkor zoom lenses including the 14-24mm f/2.8, 24-70mm f/2.8, 70-200mm f/2.8 and 85mm f/1.4 and 50mm f/1.4 primes. On the post processing side, he uses a MacBook Pro with Retina display, Adobe Lightroom 4, Photoshop CS6 and Nik Color Efex Pro 4.
Photography style: "My photography is far from photojournalistic as I strive to present my subjects as the best version of themselves through a mix of in camera technique, multiple exposure blending, lighting and post processing. My style is to produce images with a modern commercial feel that incorporate a good deal of contrast and depth. With architecture my goal is to make the images feel three dimensional and draw the viewer into the scene through lead-in and anchoring elements. With portraiture I shoot both natural light and strobe but often aim for a mix of both. The final image tends to have a blended commercial and fashion feel with a good deal of split tone adjustment and dodging and burning."
Follow Michael: website, Facebook

Below you will find a small selection of Michael Woloszynowicz's works (after viewing them make sure to follow Michael's blog and his FB profile :) ). BTW the last photo in this collection is one of my favorite photos I've seen in the last few months. It's incredible and the one I would definitely love to capture one day.

Enjoy!


Sunday, April 28, 2013

B&W HDR from Timanfaya National Park

I love B&W HDR photos. I mentioned that a few times already. Here is another one taken in Timanfaya National park on Lanzarote Island (Canary Islands). I really like how the mountain (which is a volcano in fact) is detailed in this shot.

Technical details:
Camera: Canon 5D MK II
Lens: Canon 24-105 f/4 L IS USM
Focal length: 70 mm
Aperture: f/8.0
Exposure time: 1/400 s ("middle" exposure)
ISO: 100
Number of exposures: 3
E.V. Step: 2
Flash used: no
Tripod: no
Filters: circular polarizing filter
Software: Magic Lantern 2.3, Photomatix Pro 4.2.5, Lightroom 4.2, Photoshop CS6
Saturday, April 27, 2013

Orange vs Blue

I really like using orange and blue complementary colors in my images. It's one of the easiest ways to make the image pop (because complementary colors are especially pleasing to our eyes). You just capture some orange subject against the blue sky and voila - you get great photo :) .

Together with symmetry in the image above it works pretty well and results in a quite interesting and pleasing image. Also I wanted the gates of the Temple of Debod to invite the viewer to walk through them.

In this case I manually blended 6 exposures (so no Photomatix Pro preset today...). I took 7 but eventually decided to reject the darkest one (-3 EV) as I could easily restore highlights using -2 EV and -1 EV images.

Technical details:
Camera: Canon 5D MK II
Lens: Canon 24-105 f/4 L IS USM
Focal length: 35 mm
Aperture: f/16.0
Exposure time: 5 s ("middle" exposure)
ISO: 100
Number of exposures: 7
E.V. Step: 1
Flash used: no
Tripod: yes
Filters: ND8 neutral density filter
Software: Magic Lantern 2.3, Lightroom 4.2, Photoshop CS6
Friday, April 26, 2013

Old Town in Madrid

The weather in this case wasn't good so this resulted in somewhat grey and dull look of this image. What I like about this photo, however, is amount of details and its clarity.

Technical details:
Camera: Canon 5D MK II
Lens: Canon 24-105 f/4 L IS USM
Focal length: 24 mm
Aperture: f/8.0
Exposure time: 1/800 s ("middle" exposure)
ISO: 800
Number of exposures: 3
E.V. Step: 2
Flash used: no
Tripod: no
Filters: no
Software: Magic Lantern 2.3, Photomatix Pro 4.2.6 (Details Enhancer), Lightroom 4.2, Photoshop CS6
Photomatix Pro settings: download
Thursday, April 25, 2013

Canon 24 f/1.4 L USM II Review

Canon 5D MK II | 1/160 s | f/1.4 | ISO 200
For a few months now I'm a lucky owner of a Canon 24 f/1.4 L II lens. It's the fastest prime lens I own and use it for many of my landscape shots and almost for all night landscape shots (including both HDRs and astrophotos).

First some technical specs:
Aperturesf/1.4 - f/22
Field of view84 degree
Minimum focusing distance25 cm
Filter thread77 mm
Dimensions9.35 cm × 8.69 cm
Weight650 g
Number of aperture blades8
Auto-focusYES
USMYES
Image-stabilizationNO
Price~ 1800 USD

The build quality is typical for L-series lens and it means it's excellent. The lens looks and feels very firm, solid and durable (in fact I think this lens looks more solid than most of the other L-lenses). The only downside is that it's pretty heavy (650 g) and quite large. It also uses 77 mm filter thread.

Sharpness is fantastic across whole frame. It might be a bit soft at f/1.4 (but still sharper than most of the lenses wide-open) but stop it down to just a f/2.8 or f/3.5 to get razor sharp images. However, please note that f/1.4 is still completely usable and I use it with success to capture many night photos.

Chromatic aberration is hard to notice even at f/1.4. There is also no noticeable issues with distortion. Also flares are rather small. Please note that I can compare results here to Canon 24-105 at 24 mm.

One more thing to note is that this lens produces very nice bokeh.

The greatest drawback is large vignetting at f/1.4 (vignetting is really strong!). However, together with very shallow depth of field produced by this aperture it creates interesting effect so it may not be a downside for everyone.

Another is that this lens is quite expensive (it costs about 1800$).

Summing up this short review, Canon 24 f/1.4 II is a truly wonderful lens which I would recommend to anyone serious about landscape photography as well as for anyone shooting in low-light situations (astrophotographers, wedding photographers, etc.).

Pros:
- excellent image quality (great sharpness, low chromatic aberration, low distortion)
- great build quality
- fast and accurate auto-focus
- beautiful bokeh
- very fast aperture

Cons:
- heavy vignetting at f/1.4
- quite expensive
- heavy

Below are a few more sample photos taken with this lens on 5D MK II:

Canon 5D MK II | 1/125 s | f/1.4 | ISO 200
Canon 5D MK II | 1/320 s | f/7.1 | ISO 100

Canon 5D MK II | 1/500 s | f/7.1 | ISO 100
Canon 5D MK II | 30 s | f/1.4 | ISO 100
Wednesday, April 24, 2013

Royal Palace in Madrid in the morning

I took this HDR photo of a Royal Palace in Madrid in the morning. There were plenty of puddles after all night rain so I decided to use one of them to reflect the building in it.

Technical details:
Camera: Canon 5D MK II
Lens: Canon 24-105 f/4 L IS USM
Focal length: 28 mm
Aperture: f/16.0
Exposure time: 1/160 s ("middle" exposure)
ISO: 400
Number of exposures: 3
E.V. Step: 2
Flash used: no
Tripod: no
Filters: no
Software: Magic Lantern 2.3, Photomatix Pro 4.2.6 (Exposure Fusion), Lightroom 4.2, Photoshop CS6
Photomatix Pro settings: download
Tuesday, April 23, 2013

Soft evening light

I took this image sort of by accident (or with a lot of luck hard to tell!) because it was the last image I managed to capture during that particular golden hour. During the last exposure (5th one - +2EV) of my bracketed sequence there was no more warm light on the buildings. This very beautiful light was gone. It was all grey and boring.

Even though I captured as many as 5 exposures I eventually decided to use only 2 of them: 0EV and +1EV and manually blended them in Photoshop. I loved the look of 0EV and I only masked in some very deep shadows (like trees for instance) from the +1EV photo.

Technical details:
Camera: Canon 5D MK II
Lens: Canon 24-105 f/4 L IS USM
Focal length: 35 mm
Aperture: f/18.0
Exposure time: 0.6 s ("middle" exposure)
ISO: 100
Number of exposures: 2
E.V. Step: 1
Flash used: no
Tripod: yes
Filters: ND8 neutral density filter
Software: Magic Lantern 2.3, Lightroom 4.2, Photoshop CS6
Monday, April 22, 2013

Neo-romanesque crypt in Madrid - another HDR photo

Today another HDR photo showing Neo-romanesque crypt in Madrid. I shared one photo of this crypt already but I think I like this one a bit more.

BTW today I introduce a new addition to the Technical Details section of my posts (previously known as EXIF Data). Last field, named Photomatix Pro settings is a preset I used to create an image. Import it or load it in Photomatix to get similar look to the one above. Of course the presets will be added only for the images processed with Photomatix Pro.

Technical details:
Camera: Canon 5D MK II
Lens: Canon 24-105 f/4 L IS USM
Focal length: 24 mm
Aperture: f/8.0
Exposure time: 8 s ("middle" exposure)
ISO: 400
Number of exposures: 5
E.V. Step: 1
Flash used: no
Tripod: yes
Filters: no
Software: Magic Lantern 2.3, Photomatix Pro 4.2.6 (Exposure Fusion), Lightroom 4.2, Photoshop CS6
Photomatix Pro settings: download
Sunday, April 21, 2013

Case study: sunset in Tatra mountains

More and more people keep me asking how did I process my particular photos. As it's rather difficult to describe in text as this process often involves many steps, many layers masks (in some cases a few dozens!), various blending modes etc. I decided to start new series of short video tutorials in which I will show you some details about my post-processing.

In the first part of this new series I'm showing post-processing of above photo taken in Tatra mountains, Poland. I shared this image before but as you were interested in learning more about post-processing this photo I'm resharing it.

But without further ado, here's the video tutorial:
Saturday, April 20, 2013

New milestone: 200k pageviews!


Yesterday evening my blog reached another milestone - a total number of 200.000 page views! Well, that's really great, especially as back in November 2012 I thought that around April 2013 it would be something around 100k. I would therefore like to thank everyone who visits this site, who finds it interesting, who likes my photos, who downloaded my Photomatix and Lightroom presets. Thank you!!! I also hope that during your visits you learnt something from me :)

BTW if you like this blog I would be grateful for sharing it, either on Facebook or telling your friends who are interested in photography (and HDR photography) about it.

Finally, I also hope that you will enjoy my next articles, tutorials and photos. I have still plenty to share!

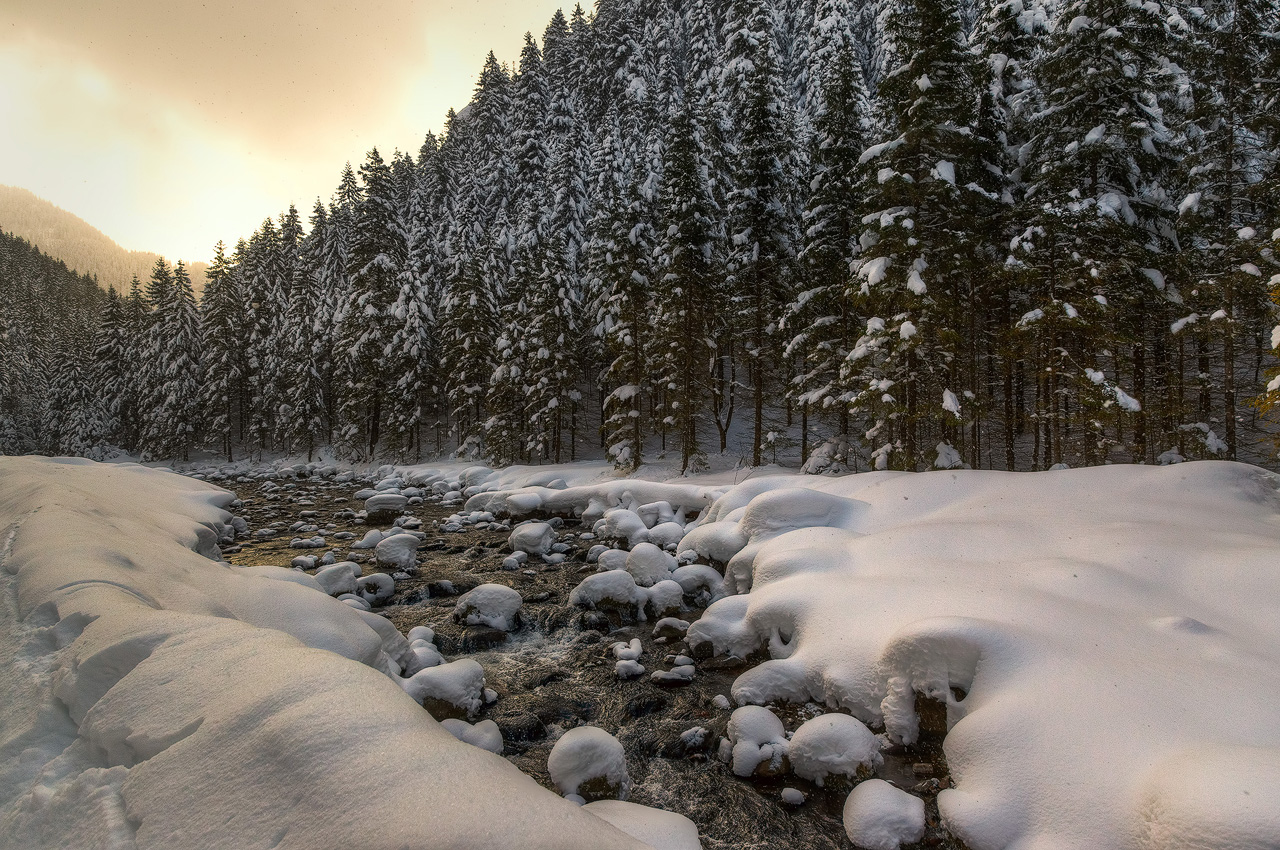
Today I'm sharing a winter HDR shot taken in Zakopane, Poland. After processing it with Exposure Fusion in Photomatix, I opened it in Photoshop where I decreased saturation of all colours but blue (which I slightly increased). I also brightened whites using Curves tool and applied some global contrast. Finally I added small vignette to focus attention in the middle of the frame.

EXIF data:
Camera: Canon 5D MK II
Lens: Canon 24-105 f/4 L IS USM
Focal length: 47 mm
Aperture: f/8.0
Exposure time: 1/200
ISO: 200
Number of exposures: 3
E.V. Step: 2
Flash used: no
Tripod: no
Filters: no
Software: Magic Lantern 2.3, Photomatix Pro 4.2.6 (Exposure Fusion), Lightroom 4.2, Photoshop CS6
Friday, April 19, 2013

Being happy with your own photos


Believe me or not for a very long time I was unhappy with my photos. I found all of them, but just a few, of very poor quality - both technically and regarding post-processing. However, this changed in the last 3 - 5 months although I'm not completely sure why. I'm now both happy and quite satisfied with photos I manage to make. And you know what? It's a great feeling. I'm now confident with my skills as a photographer. I'm also aware of the progress I'm making - day by day and week by week. Of course I still take better and worse photos - but that's completely normal. Even the one and great Ansel Adams took worse than usual photos from time to time I guess.

It doesn't just make me feel good but also it helps me to focus on taking good and better photos. I can think on the result I want to achieve, the effect or atmosphere I want to create in my photos. Not whether my photos will be good enough to share them.

All these doesn't make me great photographer in the blink of an eye. No. I still have a long way in front of me. Maybe I will never become great photographer at all. However, it's not really important (although it would be cool for instance to sell prints of my photos :) ). Because I'm already happy with my work even if no one is going to see it. I'm taking photos because I like it. I take them because this way I portray the world I see it.
Thursday, April 18, 2013

Photomatix Pro presets for night scenes

Night scenes are beautiful but at the same time quite challenging for photographers - exposures are long, images have more noise than in daylight, it's often cold. Although I can't make taking photos any easier for you I can at least help you in processing them. So today I'm sharing 7 presets for Photomatix Pro to process night scenes! I used these presets in many of my night photos (including above) like this or this so I hope you will be able to get some great results with them as well.

You can download the presets here. They are both for Details Enhancer and Fusion/Natural processing methods.

For more information on processing and taking HDR photos read my HDR tutorial.

To install the presets*:
  1. Download the presets and extract them on your disk.
  2. Start Photomatix Pro 4.2. If you haven't updated to 4.2 visit HDRsoft homepage and download your upgrade (in case you're eligible to it).
  3. Open any image and tonemap it to go to the tonemapping preview mode.
  4. In the Presets window change tab from "Built-In" to "My Presets".
  5. In the combo-box in the upper part of the Presets window select "Import Presets..." item.
  6. Navigate to the directory where you extracted presets and select all the files you want to import. You might also want to specify category for the imported presets (eg. "Downloaded"). To do this just fill in the text field at the bottom of the Import window.
  7. Accept the selection and wait for the thumbnails to appear. Voila!
Wednesday, April 17, 2013

Frozen lake

It's spring finally here in Warsaw. So today I upload a photo from winter taken during morning blue hour :)

EXIF data:
Camera: Canon 5D MK II
Lens: Canon 24-105 f/4 L IS USM
Focal length: 24 mm
Aperture: f/8.0
Exposure time: 1/15 s ("middle" exposure)
ISO: 100
Number of exposures: 7
E.V. Step: 1
Flash used: no
Tripod: yes
Filters: no
Software: Magic Lantern 2.3, Photomatix Pro 4.2.6, Lightroom 4.2, Photoshop CS6
Tuesday, April 16, 2013

Lightroom 5 beta - evolution not revolution

I took this photo almost 2 years ago in the Old Town of Warsaw, Poland during sunset. There is quite a mess in the frame but what I like in this image is very soft light, resulting in very calm and tranquil atmosphere.
With previous versions of Lightroom introducing so many new cool features (eg. version 4.0 reinvented most of the sliders, added Book module; 4.1 introduced tone-mapping as well as improved controls for chromatic aberration reduction) I expected the same from the next major release, i.e. 5.0 which beta was just released by Adobe yesterday. You can download the beta for free from Adobe website. It will continue to work until 5.0 is officially released (a few months from now probably).

Frankly speaking I'm slightly disappointed with scope of changes. Although there are some nice and interesting additions, there is nothing without what I couldn't live (eg. I can't live with Clarity slider from 4.0 :) ). Here is the list of major changes with a short comment from me for each of the features. Probably there are hundreds of smaller improvements but I'm yet to discover them:

Improved Spot Removal - spot removal saw some great overhaul in version 5.0. It is no longer simple spot removal in fact as you can select irregular regions (and not only "spots") by making brush strokes. So I would say it's now closer to Spot Healing Brush tool from Photoshop CS (although still not that powerful).

In the image below I used this feature to get rid of the trash bin:


Upright - the best addition of all in my opinion - it can automatically fix skewed horizontal or vertical lines with a single mouse click. It does some great job and will probably be loved by anyone shooting architecture without a tilt-shift lens. What's great about this feature is that it doesn't crop much of the image.
In the image below I managed to fix all vertical lines by choosing Vertical option from Upright panel:


Radial local adjustment - up to know there were 2 types of local adjustments: graduated filter and adjustment brush. Now there is 3rd one - radial gradient filter. It works in a bit similar way to U-Point technology from Nik. You draw a circle (or an ellipse) and adjustment is applied only inside it (or outside of it). You can also feather the adjustment.

Below is the sample image. I used two radial filters on the clouds to add more drama to them. I could of course use adjustment brush to achieve the same result but it was much quicker with radial filter. Graduated filter wouldn't work here well as there isn't clear line dividing sky and the buildings.


Offline editing - you no longer need to have access to your original files while editing photos (of course you will need this access during export) - instead you can use Smart Preview - smaller version of the original file.

There are also some improvements to Slideshow and Book modules. However, I haven't looked into them yet as I don't use neither feature often.

As I said these are pretty nice features but I don't think they will greatly improve image quality like changes in version 4 did. For me the only useful ones are Radial filter and Upright so unless I will find some other useful improvements I will stick to version 4 for now.

I'm interested to hearing your thoughts, so share them here or eg. on Facebook.
Monday, April 15, 2013

Being published matters

Yes, being published matters for photographers. However, there is even one thing which I prefer to have my photos published - my articles published or translated to other languages :) it happens from time to time. Just today my recent article about Golden and Blue hours was translated to Italian. Why I think it's so cool? Because I spend great amount of time writing tutorials, tips and articles about photography. If someone considers it good, informative or interesting - it's very important to me because it motivates me to write more, more and more :) I might not be that great photographer but I really love sharing knowledge. If I can reach more people - that's really amazing!

Now a few words about photo from this post. Normally I prefer to shoot landscape and architecture during golden or blue hours because light is amazing then (soft shadows, warm, sometimes surreal). However, in this case I wanted to capture something else - the colours (mainly greens and magentas) were so vivid during daylight that I wanted to show them. I'm also quite pleased with composition. It's symmetrical and the path leads the eye through the image.

EXIF data:
Camera: Canon 5D MK II
Lens: Canon 24-105 f/4 L IS USM
Focal length: 24 mm
Aperture: f/8.0
Exposure time: 1/640 s
ISO: 400
Number of exposures: 1
E.V. Step: n/a
Flash used: no
Tripod: no
Filters: circular polarizing filter
Software: Magic Lantern 2.3, Lightroom 4.2, Photoshop CS6
Sunday, April 14, 2013

Before/after comparison: Temple of Debod in HDR

before after

Debod Temple (aka Temple of Debod) in Madrid is the oldest piece of architecture in the city and probably one of the oldest in whole Spain. However, it comes from... Egypt. It was built in southern Egypt (about 15 km from Aswan) around 2nd century BC.

The temple was given to Spain by government of Egypt as a sign of gratitude for its efforts to save rich historical legacy (by this I mean taking part in archaeological works) in the 1960s. The temple was rebuilt in 1972 in one of the Madrid's parks, namely the Parque del Oeste, where it is placed today and is available to public (including visits inside).

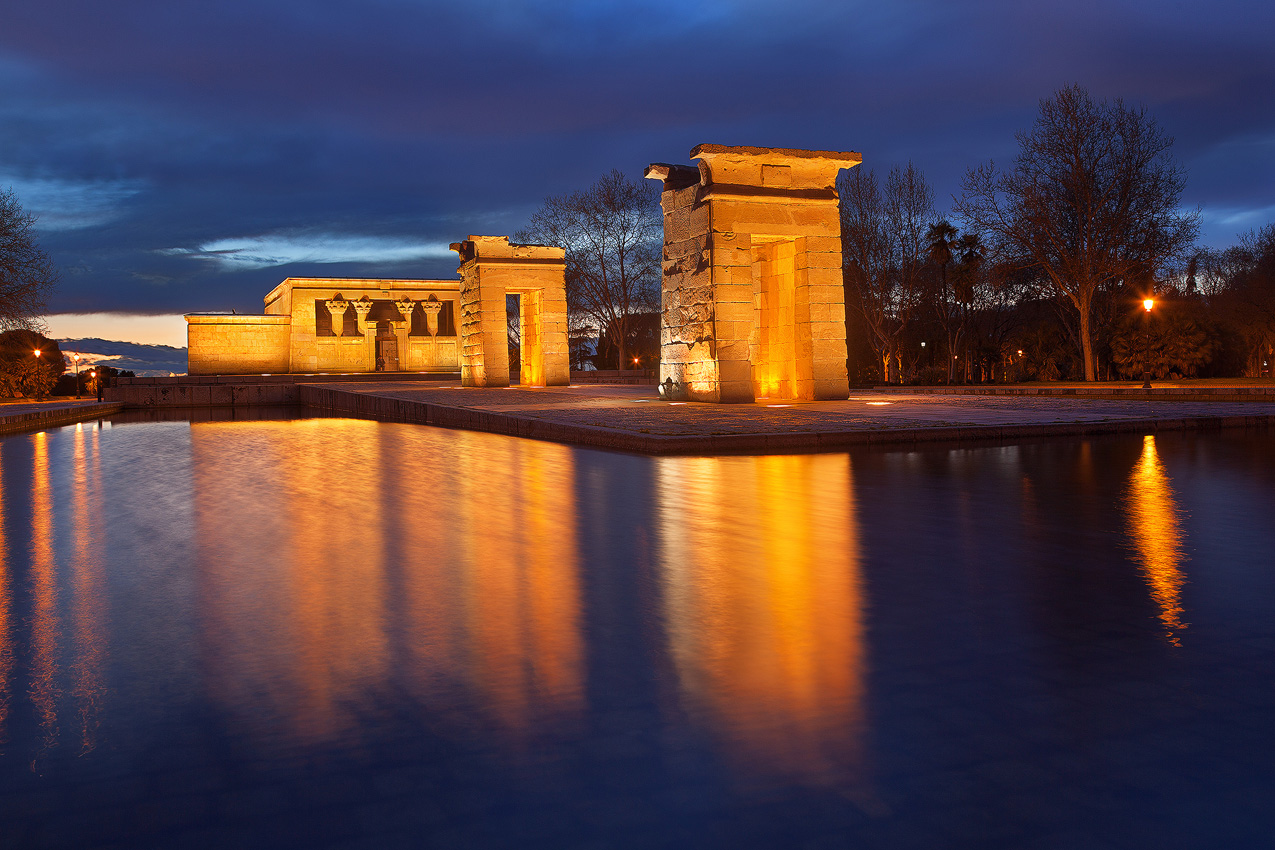
I wanted to create a nice blue hour shot with clear separation between the sky, water and temple using complementary colours (orange and blue). I manually blended 7 exposures taken at 1 EV spacing, mainly to restore blown-up highlights in the sky, water and in the temple itself. I also slightly brightened water areas as well as the trees in the right.

EXIF data:
Camera: Canon 5D MK II
Lens: Canon 24-105 f/4 L IS USM
Focal length: 32 mm
Aperture: f/10.0
Exposure time: 10 s ("middle" exposure)
ISO: 100
Number of exposures: 7
E.V. Step: 1
Flash used: no
Tripod: yes
Filters: ND8 neutral density filter
Software: Magic Lantern 2.3, Lightroom 4.2, Photoshop CS6
Saturday, April 13, 2013

Night HDR photo of the Cathedral in Madrid

It was late evening when I was taking this photo. However, hundreds of other people were there, most of them taking photos too. I was the only one to use tripod, however, what resulted in people giving me strange looks :) from the faces of guys with DSLRs it seemed they were either jealous or at least regretted not taking a tripod with them :)

It was impossible to get rid of the people entirely from the frame so instead of fighting with them, I decided to use them to my advantage. I used long exposure to turn the majority of them into "ghosts". I love this effect because this way photo doesn't freeze a moment any more. It instead freezes period of time (like a few seconds video compressed into one still image). It is evidence of time passing by.

Only people staying almost completely still throughout the exposure appeared in the final shot. And ones that appeared look pretty cool as they take a photo with a flash! Not only it adds some additional light on them but also looks pretty interesting.

EXIF data:
Camera: Canon 5D MK II
Lens: Canon 24-105 f/4 L IS USM
Focal length: 28 mm
Aperture: f/8.0
Exposure time: 10 s ("middle" exposure)
ISO: 200
Number of exposures: 7
E.V. Step: 1
Flash used: no
Tripod: yes
Filters: no
Software: Magic Lantern 2.3, Lightroom 4.2, Photoshop CS6
Friday, April 12, 2013

Calm sea in the morning

Recently I uploaded quite a few photos from Madrid. To keep you interested, a small change of subject today. It's a long exposure (60 seconds) photo I took in the morning on Fuerteventura island. I wanted to create silky smooth water and I managed to. If you're interested in creating such an effect yourself, read my tutorial about it.

EXIF data:
Camera: Canon 5D MK II
Lens: Canon 24-105 f/4 L IS USM
Focal length: 40 mm
Aperture: f/8.0
Exposure time: 60 s
ISO: 200
Number of exposures: 1
E.V. Step: n/a
Flash used: no
Tripod: yes
Filters: ND400 neutral density filter
Software: Magic Lantern 2.3, Lightroom 4.2, Photoshop CS6
Thursday, April 11, 2013

Catedral de la Almudena

As I showed recently I really like using puddles for creating reflections. Here is another example showing Cathedral de la Almudena in Madrid. In this case I wanted to create nice symmetry. As the cathedral was symmetrical around vertical axis itself I wanted to give one more dimension of symmetry around horizontal axis (this way the image should be also symmetrical by both diagonal axes) by using reflection. Of course the crane and buildings in the far back ruin the effect a bit but I think it still looks quite interesting.

From the image it might seem that the puddle I used to reflect the building was really huge, 60 meters in diameter or so. The truth is it had rather normal size (around 80 cm in diameter, maybe even less). It's just a simple illusion, small optical trickery. What I did was to shoot with a wide-angle lens from a very low angle by... putting my camera in the water (let's say I was testing if it's really well-sealed against water - don't try it yourself though). As the lens was just a few millimetres above puddle surface, everything what was close to it appeared larger. Things in the back laying in the same surface (the ground) became shorter in turn. For instance notice that there is almost no gap between the puddle end and the fence (it was about 50 meters) and between the fence and the cathedral (real gap was about 60 - 70 meters).

EXIF data:
Camera: Canon 5D MK II
Lens: Canon 24-105 f/4 L IS USM
Focal length: 24 mm
Aperture: f/20.0
Exposure time: 1/13 s ("middle" exposure)
ISO: 400
Number of exposures: 3
E.V. Step: 2
Flash used: no
Tripod: no
Filters: circular polarizing filter
Software: Magic Lantern 2.3, Lightroom 4.2, Photoshop CS6

Wednesday, April 10, 2013

Tutorial: Golden and blue hour explained

Quite often I receive questions about two terms closely related to photography which I use commonly on my blog as well as on my Facebook profile. They are:
  • golden hour,
  • blue hour.
So in this short post I will try to explain both terms as if you're serious about landscape, architecture or portrait photography it is very important you know them.

Golden hour, often referred to as magic hour, is the first and the last hour of sunlight during the day. It means that there are two golden hours in fact: morning and afternoon. It's often explained that morning golden hour starts with the sunrise and ends about 1 hour later. Similarly afternoon golden hour starts about an hour before sunset.

However, you will quickly find out that in fact morning golden hour often starts a couple of minutes before sunrise and that the afternoon golden hour often lasts a few minutes after sunset. During my journeys I came up to a conclusion that my favourite light is about 2 - 5 minutes before sunrise or about 10 minutes before sunset.

During golden hour the light is very soft and very warm (almost golden hence its name; but it can be even almost red resulting in some very dramatic shots). Also shadows are very soft, often almost non-existent (great for portraits!). In such conditions architecture, landscape and portraits look the best. Why shadows are almost non-existent? It's because light is no more directional (it's very diffused) due to the fact it has to travel through large amounts of particles (like dust, sand) which are gathered mainly just above the horizon.

The light during this hour is so beautiful that many landscape photographers say that you SHOULD NOT take landscape photos during any other time of the day (maybe apart from the blue hour described below). Although I'm not that radical I really really recommend trying to take photos during that part of the day as it will make any subject shine.

Below you will find a HDR photo taken during golden hour in Rome.

Blue hour in turn is an hour just before morning golden hour and just after afternoon golden hour. It's a period of day when there is no sun but it isn't completely dark yet. The name comes from the fact that the light has blue (or sometimes purple) hue. It produces magical and sometimes surreal atmosphere. Also the sky often have deep blue colour during this hour.

Although it can be used both for landscapes and architecture I think the latter makes the best use of it. City lights are often orange or yellow. Provided the sky is blue you will get great complementary colours increasing both the clarity, contrast and quality of the photo. As for landscapes it's the best time of day to capture long exposure photos, to smooth water etc. There is so little light that you won't need to stop your aperture to f/22 or use ND400 filter in many cases.

Moreover, during blue hour there are no shadows at all. It's because there is no light source present in the scene.

One more tip. If you're shooting morning blue hour remember that it's often the coolest time of day (until about 30 minutes after sunrise). So warm tea and warm clothes might be a really good idea.

Below you fill find a HDR photo taken during blue hour in Madrid. The Debod Temple depicted in this image was lit with some orange lights what resulted in great complementary colours. Addition of reflection in front of it added even more complementary colours to the scene:

Bear in mind that golden and blue hours might be much shorter than an hour (the term is very loose). They might last just a few minutes or they even might not exist under certain conditions (eg. overcast sky)! Also the light isn't consistent during neither golden nor blue hour. It changes all the time. To get the very best photo you need to keep shooting as otherwise you might miss that very spot of the best light. Unfortunately the best light during the day often lasts for a few seconds to just a 1 - 2 minutes.

One last thing: how to find out what time the blue and golden hours occur? There are plenty of tools, one of them is available for free online: here. It's a golden and blue hour calculator. Just select your location, date, click on the Submit button and you will be shown exact time and duration of both golden hour and blue hour. Very useful.
Tuesday, April 9, 2013

Royal Palace in Madrid or 1 in a 1000

Today a photo of Royal Palace in Madrid. Unfortunately it's not allowed to take photos inside it (and really it would make for some amazing images as the palace is absolutely beautiful!). I shared this photo in a few places already but I didn't post any story with it so far. And I would like to give an example of something via this photo.

When I approached Royal Palace during early sunset I knew it will make for a perfect location to take some blue hour photos (ok I knew it earlier but during sunset I finally came up with good composition). Lamps in front of it produce some orange light, Palace itself is lit using almost white lamps. Given that the sky during blue hour has deep blue colour I ended up having three layers of different colours of which two are complementary colours (orange and blue).

When taking such a photo there are two problems, however:
  1. Light during late sunset and blue hour changes very quickly so it's easy to miss the best light (and regret that afterwards).
  2. There were thousands of people walking in front of the palace what makes the photo less interesting, too crowded and generally not good.
Normally to solve 2. I should try taking this photo during sunrise. The problem was mornings were rather rainy during my stay. What's more I really liked the idea of having remains of sunlight (manifested as brighter areas in the sky) in the frame. So instead I used slow aperture (f/16.0) and rather long exposure (0 EV photo had exposure of 3.2 seconds). This way I could blur motion easily what looks quite nice.

The first issue wasn't a real problem but to get the best light it required capturing a lot of images. The best light I could get was when the lamps on the palace weren't fully warmed up. So to get this very shot I captured something around 1000 photos (after around 200 my girlfriend seemed to be bored and around 500 a bit annoyed :) ). Quite a lot. Well, there are a few others I really like but this one is the best in my opinion.

People wondering in front of the palace seemed to be quite intrigued by the fact that I stay almost in the same place for more than half an hour and take photos. It's also funny how people actually react to photographers using tripods. A lot of them looked directly into the lens with expression of something like interest on their faces.

EXIF data:
Camera: Canon 5D MK II
Lens: Canon 24-105 f/4 L IS USM
Focal length: 24 mm
Aperture: f/16.0
Exposure time: 3.2 s ("middle" exposure)
ISO: 100
Number of exposures: 7
E.V. Step: 1
Flash used: no
Tripod: yes
Filters: no
Software: Magic Lantern 2.3, Photomatix Pro 4.2.6 (Details Enhancer), Lightroom 4.2, Photoshop CS6
Monday, April 8, 2013

Reflection in a puddle - Torres Colon

Reflections are a great way to make composition (and whole image) more interesting. You can use them to add symmetry to your image for instance. Sometimes you can make them look like a portal to another parallel reality.

In case of this photo of Torres Colon in Plaze de Colon in Madrid I found this puddle in the shadow of a tree and decided to fill it with reflection of the Torres Colon skyscraper built in the 1970's. Thanks to the reflection, the image looks quite nice. Without it it would be pretty boring.

EXIF data:
Camera: Canon 5D MK II
Lens: Canon 24-105 f/4 L IS USM
Focal length: 24 mm
Aperture: f/8.0
Exposure time: 1/160 s ("middle" exposure)
ISO: 200
Number of exposures: 3
E.V. Step: 2
Flash used: no
Tripod: no
Filters: circular polarizing filter
Software: Magic Lantern 2.3, Lightroom 4.2, Photoshop CS6
Sunday, April 7, 2013

The best light I've ever seen

Debod Temple in Madrid. I researched that site one morning during my stay and since then knew that it's a perfect location to shoot sunsets. However, as it was raining most of the time I started to loose hope there will be any good sunset.

But I was lucky to capture above image. I think this is the most amazing light I've ever seen. When I was leaving a hotel room it was raining and it didn't seem there will really be sunset (so I had plan B to shoot some architecture). However, when I got to the location I saw some amazing clouds (still no sun though). So I started to shoot them. In the middle of one my long exposures sun finally apperead. Unfortunately I was shooting in the opposite direction. So I had to pack my tripod, run about 100 m, set everything up again and hope it will last long enough to take at least one photo. My girfriend later told me it had looked quite funny to see me running with all the equipment throught the puddles :) But I made it. I took this very picture and even a few more. It all lasted exactly 6 minutes and 35 seconds (including my run). Never before did I work so quickly on the photo site :)

Believe me or not but the ediding here is very small. I set color balance, blended the images and added some contrast.


EXIF data:
Camera: Canon 5D MK II
Lens: Canon 24-105 f/4 L IS USM
Focal length: 28 mm
Aperture: f/18.0
Exposure time: 2.5 s ("middle" exposure)
ISO: 100
Number of exposures: 7
E.V. Step: 1
Flash used: no
Tripod: yes
Filters: ND8 neutral density filter
Software: Magic Lantern 2.3, Lightroom 4.2, Photoshop CS6
Saturday, April 6, 2013

Neo-Romanesque crypt in Madrid

HDR really shines when used for church photos. Lighting conditions inside them are one of the most extreme that can be found resulting in extreme dynamic range. It's usually dark (or very dark) but at the same time there are some very bright spots like lamps, candles or windows. Besides, old churches have some amazing textures and detail which after enhancing by tone mapper look much better.

However, I'm not a really big fan of shooting churches. I don't know why frankly speaking. I just prefer landscapes to them. But when I was in Madrid I couldn't resist taking some photos in Neo-romanesque crypt near (or rather below) the cathedral because the light there as well as textures were pretty amazing. After seeing that, cathedral didn't look that beautiful to me so I just shot a few photos there.

Above photo was fused using Exposure Fusion processing method in Photomatix Pro. Then I tuned it using luminosity masks to get the final look. The last step was converting the image to sepia and blending it with the original one to get the tonality I wanted.

EXIF data:
Camera: Canon 5D MK II
Lens: Canon 24-105 f/4 L IS USM
Focal length: 24 mm
Aperture: f/8.0
Exposure time: 1/100 s ("middle" exposure)
ISO: 100
Number of exposures: 7
E.V. Step: 1
Flash used: no
Tripod: yes
Filters: no
Software: Magic Lantern 2.3, Photomatix Pro 4.2.6 (Exposure Fusion), Lightroom 4.2, Photoshop CS6
Friday, April 5, 2013

Arco de la Victoria

There are quite a few triumphal arches in Madrid. Some are in fact remains of old city gates (like the one in the Alcala street). Above, however, was never a gate. Known as a Victory Arch (Arco de la Victoria) was built by general Franco in 1956 (looks much older by the way) as a tribute to his army who defeated the republicans during the Spanish civil war in the late 30's

BTW in the back you can see Mirador del Faro, also known as the Faro de Moncloa or Faro de Madrid. Unfortunately the tower is now closed. Hopefully they will reopen it one day as it would offer great view.

EXIF data:
Camera: Canon 5D MK II
Lens: Canon 24-105 f/4 L IS USM
Focal length: 24 mm
Aperture: f/7.1
Exposure time: 1/100 s ("middle" exposure)
ISO: 200
Number of exposures: 3
E.V. Step: 2
Flash used: no
Tripod: no
Filters: circular polarizing filter
Software: Magic Lantern 2.3, Lightroom 4.2, Photoshop CS6
Thursday, April 4, 2013

Easter Processions in Madrid


I spent a wonderful week (which was Holy Week) in Madrid, Spain. Although the weather was rather bad most of the time (rain, heavy rain or at least fully overcast sky) what means that I didn't have many opportunities to take nice photos I really enjoyed my stay there. I loved so much about this city, from its atmosphere, fantastic food, interesting history and architecture to Easter celebrations. What really amazed me were martyrs processions. Gloomy and hooded figures walking through the streets of the city (mainly in the old town) in the rhythm of the loud drums make for an unforgettable experience. Not only when seen late at night (eg. 3 AM) but even during the day.

It was very difficult to capture a photo of their walk because the streets through which they passed were very crowded. However, I was lucky enough to have a hotel in the middle of the historical district of Madrid so I was able to capture this short footage from the balcony. And I think that sound in this case is very important. So enjoy :)
 
© Copyright 2011 Photoshop and Photography All Rights Reserved.
Free Templates by Cool Blogger Tutorials- Powered by Blogger.com.