Powered by Blogger.
Saturday, October 19, 2013

Before/after comparison: hala Gasienicowa

before after

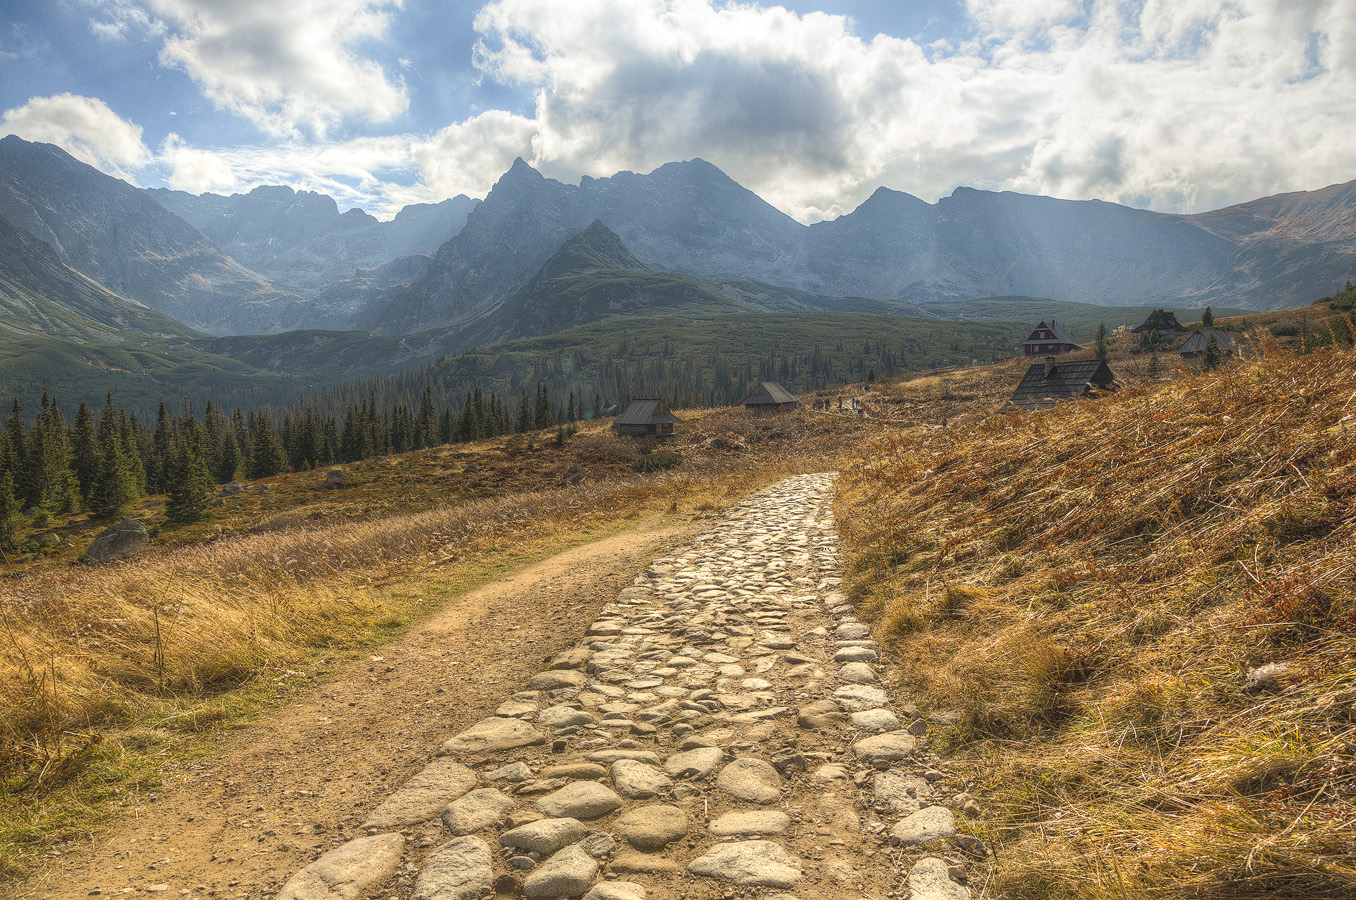
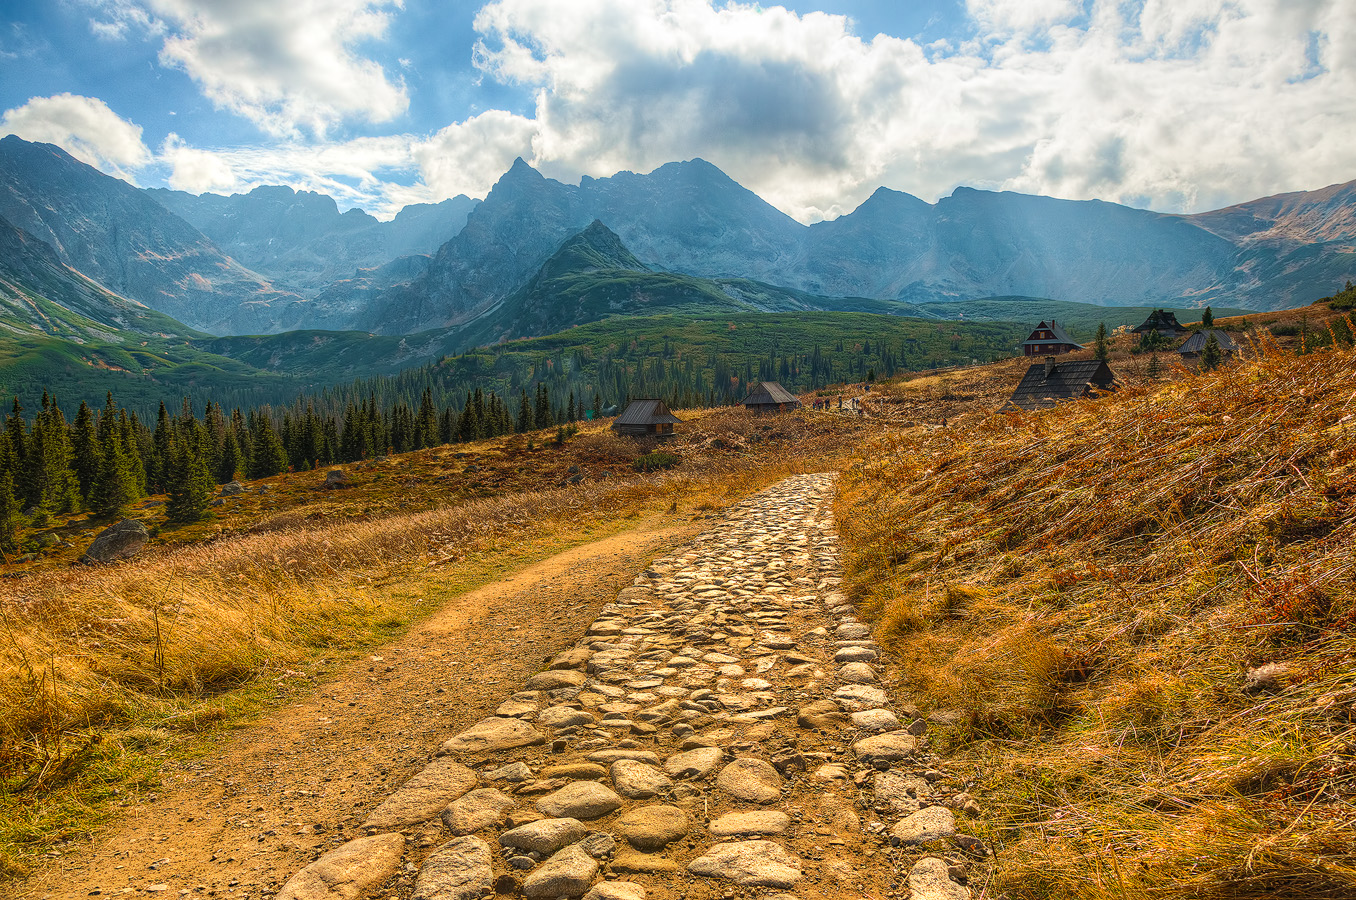
It's time for yet another before/after comparison + some post processing details (for more comparisons go here). This time the very beautiful Hala Gąsienicowa in Polish Tatra Mountains.

This time I took only 3 exposures at 2 EV spacing, merged them to HDR and tone-mapped in Photomatix Pro (which is Before). Then I edited my image with luminosity masks technique in Photoshop CC (After).

In the image below you can see what layers I used to create final image. Starting from bottom they are:
  1. Background - image produced by Photomatix Pro's Details Enhancer - to learn how to create HDR images read my HDR tutorial.
  2. Fixes - various corrections, like denoising, spot removal etc. Basically any adjustments that need to be done in a destructive way. Doing this early in the workflow is essential.
  3. Mountains contrast - increased contrast of the mountains using Soft Light blending mode and duplicated background layer.
  4. Midtones contrast - increased midtones contrast using Curves adjustments layer.
  5. Highlights contrast - added contrast to highlights in the path and clouds.
  6. Shadows contrast - added some contrast to darkest parts of the image (mountains, grass) and slightly brightened them up
  7. Midtones contrast 2 - I increased midtones contrast using image created from all layers and using Soft Light blending mode.
  8. Mountain color balance - slightly modified color balance in the mountains area to make it a bit less cyan.
  9. Green saturation - increased saturation of greens in the mountains area.
  10. Vibrancy - increased vibrancy globally using Vibrance adjustments layer.
  11. Clarity - increased clarity of mountains and grass using this technique.
  12. Path clarity - increased clarity of path only using this technique.
  13. Sharpening - added some sharpening using high-pass sharpening technique.
  14. Final denoising - applied a bit of additional denoising in the sky.

Finally some EXIF and other technical specs:

Technical details:
Camera: Canon 5D MK III
Lens: Canon 24-105 f/4 L IS USM
Focal length: 24 mm
Aperture: f/8.0
Exposure time: 1/640 s ("middle" exposure)
ISO: 640
Number of exposures: 3
E.V. Step: 2
Flash used: no
Tripod: no
Filters: circular polarizing filter
Technique: HDR, tone-mapping, luminosity masks
Software: Magic Lantern 2.3, Photomatix Pro 5.0 beta (Details Enhancer), Lightroom 5.0, Photoshop CC
Friday, October 18, 2013

Meeting a brown bear and Smreczynski Staw

Smreczyński Staw is a beautiful pond near Kościeliska Valley at the height of about 1200 meters above sea level.
It was a long and rather tiring climb but after a few hours we finally made it to Saddle below Kondracka Kopa (1863 meters above sea level). Unfortunately saddle welcomed us with freezing and very strong wind known as Halny what made it very difficult not only to take some photos but also to rest properly before going down. In fact initially we considered going further to 2005 meters onto Kondracka Kopa but due to the wind we altered our plans and decided to go back directly. After a short break to drink some liquids and eat some snacks we started our descent. It turned out to be even more tiring than the climb. Almost 10 kgs of photo equipment plus additional belongings seemed to be much heavier at this point. The stones seemed to be even more slippery than they were, when we had been climbing up. And the wind didn't make it any easier.

So after going for about 150 or 200 meters, we decided to take a break near some berries bushes. They provided some shelter from cold wind so I thought it's a great place for some quick rest. But soon after we had stopped we heard the voice somewhere from above:

- Do you see it? - I was too tired to realize that it was me and my girlfriend who were supposed to answer.
- Do you see it? - the voice asked the same question for the second time, louder this time and almost at the same time I saw a woman walking down with a small girl. At this stage I realized that we should probably answer.
- What "it"?
- There was a female bear with two children when I was ascending. She was very close to the road and I'm not sure if it's safe to go down or go back up and try finding another route.

That was quite a shock. Bears at this time of year are especially dangerous and female bears with children are even more aggressive because they want to protect their kids (quite natural I would say). And there is one more thing - when bears eat a lot of fruit (like berries or peaches for instance) they're fermenting in their stomachs what make bears behave as after drinking alcohol. So drunk bear, wanting to sleep and being extra anxious about their kids didn't seem like the best that could happen to us.

Still we decided to continue our descent (as climbing up again wasn't something I was very keen on), walking cautiously and paying extra attention to our surroundings. Initially, for about 50 meters, there was nothing suspicious but then we saw them - beautiful brown bear family calmly eating berries... They were about 75 meters or so from us. Not too close but not too far either. They could quickly get close to us if they wished to. Luckily they didn't notice us (or maybe they just didn't care about scared tourists?). I don't remember much from this point apart from the fact that we virtually run down the steep slope. The stones weren't that slippery anymore and the equipment became very light. The wind disappeared somewhere as well.

It was a scary experience but I also find myself very lucky. Meeting such beautiful animals in their natural environment is one of the most beautiful things under the sky. They're at home, we're intruders (or guests) there. For that reason I find it very sad that so many people don't know how to behave in parks, forests, mountains. They're shouting, laughing so loudly that animals seem to be scared or feeding them by leaving sandwiches near the track... I saw all these during last week. Unfortunately.

I didn't take any photo of the bears and now I'm a bit disappointed about that as this could be my only chance. But still the experience was so great and intense that I will probably never forget it :)

And now finally some technical specs for the image above.

Technical details:
Camera: Canon 5D MK III
Lens: Canon 24-105 f/4 L IS USM
Focal length: 24 mm
Aperture: f/9.0
Exposure time: 1/100 s ("middle" exposure)
ISO: 400
Number of exposures: 5
E.V. Step: 1.0
Flash used: no
Tripod: yes
Filters: circular polarizing filter
Technique: HDR, tone-mapping, luminosity masks, panorama
Software: Magic Lantern 2.3, Photomatix Pro 5 beta (Details Enhancer), Lightroom 5.0, Photoshop CC
Thursday, October 17, 2013

And the winner is...

There were quite a lot of entries in my post-processing challenge. I hope you had some fun playing with photos taken by me. From my point of view it was also a great experience and inspiring as well to see so many different versions of those photos.

Based on the number of submissions I decided to pick 3 photos which I found most interesting ones. The choice was very tough in fact as I liked many more versions. Also it's very subjective (maybe next time I will make Facebook voting?) so please don't be sad/angry/disappointed if you don't see your photo today.

#1 Vineets Photography:
http://www.vineet-suthan.com/photoblog/

For me it's the most interesting version (and so it's the winner). Use of brown tones looks really interesting and in my opinion fits the image. Also the highlights are properly restored (they weren't in my version ;) ).


#2 Frank Bramkamp:
https://plus.google.com/104762767414084728435/posts

Frank used my photos in quite creative way adding a lot of details and some elements that weren't present in the original shots. This resulted in some great mood.

#3 Foto Buddy:
http://www.flickr.com/photos/foto-buddy/

And last but not least - version with some excellent contrast and sharpness (especially when viewed in large).

Wednesday, October 9, 2013

Beautiful discovery - Montserrat Monastery

How this could happen I'm not sure but I wasn't aware of this photo for 3.5 years! I took it during my trip to Barcelona in 2010 and for some reason didn't like it at first. And it was patiently waiting on my hard drive for its chance. While viewing and reviewing some older photos today I accidentally came across it. The view immediately attracted my attention. And so did the depth which is really amazing in this photo. So I applied some quick post-processing using selective adjustments in Lightroom... And wow, the image is really nice. Lesson learnt - sometimes photos that doesn't look nice to you might be in fact very good so it's better not to delete them immediately.

BTW you still have some time to take part in my post-processing challenge: http://hdrphotographer.blogspot.com/2013/10/post-processing-challenge-monastery-in.html. I will publish the results in a week from now :)
Tuesday, October 8, 2013

Beginner's HDR photography tutorial. Part 2. Introduction to Photomatix Pro

Today it is time for second part of my HDR video tutorial. In today's part I'm talking about Photomatix Pro, introducing you briefly to its interface and core features including images alignment, deghosting and of course tone-mapping. In next parts I will go into details on how to create realistic looking images and how to deal with various artifacts and issues that you can encounter in HDR photography.

If you haven't already make sure to watch Part 1 in which I talk about HDR photography in general and give some reasons why we do need it.
Monday, October 7, 2013

Panorama of Tatra Mountains

Time for a panorama photo I took last winter in Tatra mountains. I photographed the mountains while walking in Koscieliska Valley near Zakopane (BTW this valley is really beautiful and great for calm walks without hurry). There was a bit of a fog or some low clouds so the clarity isn't as great as I would like it to be but at least the contrast is great. Dark trees look really nice on the pure white snow background.

Also remember about my post-processing challange: http://hdrphotographer.blogspot.com/2013/10/post-processing-challenge-monastery-in.html.

If you're interested in taking panoramic photos yourself, you can read my tutorial about creating them.

And finally something completely unrelated. I added "Top 5 This Week" section on the right side of the blog in which you will see the most popular (considering number of views) posts from last 7 days. Normally the posts in this list are found useful or informative by a large number of viewers so if you're interested in photography take a look at them from time to time.

Technical details:
Camera: Canon 5D MK II
Lens: Canon 24-105 f/4 L IS USM
Focal length: 24 mm
Aperture: f/7.1
Exposure time: 1/200 s ("middle" exposure)
ISO: 800
Number of exposures: 7 x 3
E.V. Step: 2.0
Flash used: no
Tripod: no
Filters: circular polarizing filter
Technique: HDR, tone-mapping, luminosity masks, panorama
Software: Magic Lantern 2.3, Photomatix Pro 4.2.7, Lightroom 5.0, Photoshop CC
Sunday, October 6, 2013

Soft evening light

Today I'd like to share old HDR photo taken near Warsaw on one freezing cold winter evening. The light was very beautiful and soft what made this scene look very calm. The winter is coming soon. It's one of my favourite seasons for landscape photography because light is very warm, contrast is huge and there is nothing more beautiful than sun light reflecting in the ice on the river. So if you would like to prepare better for it, you can read my tips on winter HDR photography.

Also it's great to see some entries for my post-processing challenge already. If you haven't sent one already make sure to do it here.
Saturday, October 5, 2013

Post-processing challenge: Monastery in Lisbon

Today I would like to invite you to a small fun challenge. Below you will find some 3 bracketed images taken by me. I used them to create a HDR photo above and I'd like to see your version of this image.

Download the bracketed photos for above image here.

Please share the links to your versions in the comments below. I will feature the best of them (how many depends on number of submissions) in a separate post on my blog in about a week. Please also make sure to give a link to your website/FB profile so I can link to them too and give you some viewers.

Also here is a brief description of what I did to give you some ideas and inspiration:
  1. I tone-mapped image in Photomatix Pro 4.2.7 using Details Enhancer.
  2. I applied some global contrast adjustments in Lightroom.
  3. I removed a person from an image using cloning tools.
  4. I increased details clarity.
  5. I added a few solid color layers and blended them with image from Photomatix using different blending modes to get old and desaturated feel.
  6. I increased contrast.
  7. Finally I increased sharpness.
Friday, October 4, 2013

Autumn is here

Autumn is finally here with its beautiful golden and red tones. And the weather is quite nice in recent days so we can enjoy it.

I took this image a few days ago. I captured 7 exposures which I later merged to HDR and tone-mapped in Photomatix Pro 5 beta. Once again I used the very new Contrast Optimizer tone-mapper.

Technical details:
Camera: Canon 5D MK III
Lens: Canon 24-105 f/4 L IS USM
Focal length: 84 mm
Aperture: f/10.0
Exposure time: 1/6 s ("middle" exposure)
ISO: 100
Number of exposures: 7
E.V. Step: 1
Flash used: no
Tripod: yes
Filters: circular polarizing filter
Technique: HDR, tone-mapping, luminosity masks
Software: Magic Lantern 2.3, Photomatix Pro 5.0 beta (Contrast Optimizer), Lightroom 5.0, Photoshop CC
Thursday, October 3, 2013

Steps in Thira

It's another photo processed with Photomatix Pro 5 Contrast Optimizer (which is one of my favorite features available in beta). This scene required doing HDR for several reasons:
  • shadows near steps in foreground were rather darks,
  • sky was very bright,
  • there were a lot of bright highlights like white tables, houses walls that were reflecting sun light.
However, I wanted a very natural look that wouldn't scream HDR. In Photomatix 4.2.x I often used Details Enhancer. It required using specific settings and also meant some post-processing work as output needed to be low-contrast. But with Contrast Optimizer in Photomatix Pro 5 beta it's so much easier to get natural results. I mainly use default settings which produce very natural and nicely looking result.

Technical details:
Camera: Canon 5D MK III
Lens: Canon 24-105 f/4 L IS USM
Focal length: 28 mm
Aperture: f/11.0
Exposure time: 1/250 s ("middle" exposure)
ISO: 200
Number of exposures: 5
E.V. Step: 1
Flash used: no
Tripod: no
Filters: circular polarizing filter
Technique: HDR, tone-mapping, luminosity masks
Software: Magic Lantern 2.3, Photomatix Pro 5 beta (Contrast Optimizer), Lightroom 5.0, Photoshop CC
Wednesday, October 2, 2013

Photomatix 5's Contrast Optimizer in Action

I have quite a few photos processed with Photomatix Pro 5 beta's new algorithms that were pending upload. Today here is one of them - taken in the port in Heraklion it shows some of the boats.

The boats were moving quite a lot due to strong wind and so were the ropes that you can see in foreground. I used automatic deghosting in this case (which now allows selecting base photo and strength of deghosting) and this way I was able to remove all ghosts from the image.

Technical details:
Camera: Canon 5D MK III
Lens: Canon 24-105 f/4 L IS USM
Focal length: 24 mm
Aperture: f/8.0
Exposure time: 1/160 s ("middle" exposure)
ISO: 100
Number of exposures: 5
E.V. Step: 1
Flash used: no
Tripod: no
Filters: circular polarizing filter
Technique: HDR, tone-mapping, luminosity masks
Software: Magic Lantern 2.3, Photomatix Pro 5 beta (Contrast Optimizer), Lightroom 5.0, Photoshop CC
Tuesday, October 1, 2013

Photomatix Pro 5 beta released

I'm not real estate photograher but Fusion/Realistic is really great. Note how well highlights outside the window were preserved.
Recently I was very busy (I had very little time to take and process my photos as you could notice)... today I can finally reveal why :) At HDRsoft Ltd. we've just released public beta of Photomatix Pro 5!

Download the Photomatix Pro 5 public beta here.

BTW one of the huge benefits of working as a developer in a company creating photo editing applications is that you can try new features much earlier than anyone else. That's great when you're a photographer at the same time ;)

The list of changes is very long so here are only the main updates and additions:
  • 2 completely new processing methods which will be especially welcomed by fans of very natural looking HDR/Fused images:
    • Contrast Optimizer - it is a local tone-mapper. However, it is virtually halo free and also produces very natural looking images (although you can go grungy if you wish). Output from this method is also very clean, has nice clarity and the method is very easy to use. Are you familiar with tone-mapper from Lightroom? If so you will love Contrast Optimizer because in my opinion it often produces even better results (slightly cleaner and more crisp).
    • Fusion/Real-Estate - it's a new fusion method. Although it was present in version 4.2 it was very slow and for that reason it was available only in Batch Bracketed mode (under the name of Fusion/Realistic). Now it's much faster (about 10 times!) and is available in Preview mode as well. It's also greatly improved. I often use this feature instead of manual blending as it gives me the results I would like to get with manual blending. If you're familiar with Fusion/Natural you know that it can sometimes blow out highlights. It's not a problem with Fusion/Real-Estate which preserves them perfectly. Although this method is targeted mainly to real-estate photographers, other photographers will benefit from it as well as I'm definitely not real-estate photographer yet I find it very useful.
  • Improved automatic ghost removal - you can now specify which source photo to use for automatic deghosting as well as strength of deghosting.
  • Improved images alignment - images that didn't align previously when match by features option was used, should do now.
  • Sliders are now real-time - if your CPU is fast enough you can check an option in Preferences to make sliders respond in real-time. That is image will change as you drag the slider.
  • Multiple presets in Batch mode - not only GUI of Batch processing has been redesigned to make it more intuitive to use, but Photomatix 5 also introduces ability to process photos using multiple presets. Up to now it was only possible to use different processing methods at the same time (eg. both Details Enhancer and Fusion/Natural) - now it's possible to process same photos using multiple settings for a given processing method. So now you can even run a batch with all your presets :)
  • Improved transfer of EXIF data.
  • Bug fixes - plenty of them :)
     
    © Copyright 2011 Photoshop and Photography All Rights Reserved.
    Free Templates by Cool Blogger Tutorials- Powered by Blogger.com.