Powered by Blogger.
Thursday, February 28, 2013

It's all about light

If someone asked me several years ago what had been the most important thing in photography I would probably had replied - Subject. However, now my answer is completely different - it's Light. No matter how beautiful the subject is (whether a gorgeous model or amazing landscape) it will look bad if the light is bad. On a dull day landscape will look flat, lacking colours and contrast and therefore boring. With harsh light the face of the model will be full of ugly shadows (which aren't there under "good" light).

But when the light is good, when it's beautiful you even don't need gorgeous subject to get a nice shot. But if you capture some amazing subject under this amazing light and you will get a truly wonderful photo.

As a landscape photographer I'm always looking for that "good" light. It doesn't occur often unfortunately. Not only the best light happens for just a couple of minutes a day (in the morning and late afternoon) - known as golden hours but also not each golden hour is as beautiful. If there are no clouds the light won't be that beautiful as it could be. Clouds are changing directions of sun rays (they are both diffusing, reflecting and refracting sun rays but it's rather complicated phenomena) and therefore we see how they change colour. So addition of clouds is rather welcome. But if there are too many of them we will again end up with rather boring looking scene which wouldn't be warm at all but rather gray. And clouds aren't the only factor influencing light during golden hour. Particles in the air, time of the year amongst many more influence it. And you also need patience and a bit of luck.

With the photo above I think I got most of it (with a lot of luck as I had arrived there just a couple of minutes before this Nature's show started). I'm really pleased with the light in it. So much I didn't even use HDR - it's a single exposure. A single exposure full of some very nice light :)

EXIF data:
Camera: Canon 5D MK II
Lens: Canon 24-105 f/4 L IS USM
Focal length: 40 mm
Aperture: f/9.0
Exposure time: 1/160
ISO: 640
Number of exposures: 1
E.V. Step: n/a
Flash used: no
Tripod used: no
Filters used: no
Software: Magic Lantern 2.3, Lightroom 4.2, Photoshop CS6
Wednesday, February 27, 2013

Night HDR shot of Zakopane

I wanted to take such a shot for quite a while but it's rather difficult in Warsaw as there is no ideal high vantage point. There was one in Zakopane, however. I took this shot from 1100 meters above sea level while the valley is at approximately 700 meters above sea level. 400 meters of difference produced pretty nice view I believe.

When composing the shot I knew what I wanted to achieve. I wanted several layers (sky, mountains, town and snow) and also made sure that 1/3 goes for the sky, 1/3 for the mountains and valley and 1/3 for the foreground. I think that this composition works pretty well here.

EXIF data:
Camera: Canon 5D MK II
Lens: Canon 24 f/1.4 L USM II
Focal length: 24 mm
Aperture: f/5.0
Exposure time: 13 s ("middle" exposure)
ISO: 500
Number of exposures: 3
E.V. Step: 2 EV
Flash used: no
Tripod used: yes
Filters used: no
Software: Magic Lantern 2.3, Photomatix Pro 4.2.5 (Exposure Fusion), Lightroom 4.2, Photoshop CS6
Tuesday, February 26, 2013

Alpine view in Tatra mountains

There are times when no matter what you do, you simply can't ruin the shot. If light is beautiful, if view is also beautiful - there's not a chance. I think that was the case with the image above. We (me and my fiancee) just returned from a whole day trekking and were pretty tired (ok, ok - exhausted) walking in the fog. But the weather suddenly improved and we experienced one amazing sunset. The view was clear and the light was amazingly warm. Just gorgeous. We spent next dozen of minutes shooting like mad not too loose anything, running from place to place to capture as many a beautiful photos as possible.

I'm really really happy about how the image above turned out - from the warm light on the house in the right to the view in the background. What's more I think that this is one of my best images taken recently.

Would love to live there BTW - view on such days is gorgeous :)

EXIF data:
Camera: Canon 5D MK II
Lens: Canon 24-105 f/4 L IS USM
Focal length: 35 mm
Aperture: f/7.1
Exposure time: 1/200 s ("middle" exposure)
ISO: 400
Number of exposures: 3
E.V. Step: 2 EV
Flash used: no
Tripod used: no
Filters used: circular polarizing filter
Software: Magic Lantern 2.3, Photomatix Pro 4.2.5 (Details Enhancer), Lightroom 4.2, Photoshop CS6
Monday, February 25, 2013

The Summit

Forgive me yet another B&W HDR photo but I just couldn't resist uploading it as I love how contrasty this shot turned out to be.

As you also probably noticed there weren't many tutorials this month. I was pretty busy recently but expect new and exciting content in weeks to come :)

EXIF data:
Camera: Canon 5D MK II
Lens: Canon 24-105 f/4 L IS USM
Focal length: 105 mm
Aperture: f/9.0
Exposure time: 1/2000 s ("middle" exposure)
ISO: 800
Number of exposures: 3
E.V. Step: 2 EV
Flash used: no
Tripod used: no
Filters used: circular polarizing filter
Software: Magic Lantern 2.3, Photomatix Pro 4.2.5 (Details Enhancer), Lightroom 4.2, Photoshop CS6
Sunday, February 24, 2013

Black & white HDR: Alpine hut

Today a mountain hut (alpine hut, mountain hostel, mountain shelter - whatever you call it) in Koscieliska valley, Tatra mountains, Poland. Yesterday I posted color version of this photo on my FB profile but I think that B&W version works as well.

EXIF data:
Camera: Canon 5D MK II
Lens: Canon 24-105 f/4 L IS USM
Focal length: 32 mm
Aperture: f/7.1
Exposure time: 1/500 s
ISO: 800
Number of exposures: 3
E.V. Step: 2 EV
Flash used: no
Tripod used: no
Filters used: circular polarizing filter
Software: Magic Lantern 2.3, Photomatix Pro 4.2.5 (Details Enhancer), Lightroom 4.2, Photoshop CS6
Saturday, February 23, 2013

Shepherd's Hut

I found this hut while walking in the valleys surrounding Zakopane city. Would love to see it in spring when it is surrounded by green but I still like how it looks in the middle of the winter. The scene is so peaceful and calm :)

EXIF data:
Camera: Canon 5D MK II
Lens: Canon 24-105 f/4 L IS USM
Focal length: 35 mm
Aperture: f/8.0
Exposure time: 1/500 s
ISO: 400
Number of exposures: 1
E.V. Step: n/a
Flash used: no
Tripod used: no
Filters used: circular polarizing filter
Software: Magic Lantern 2.3, Lightroom 4.2, Photoshop CS6
Friday, February 22, 2013

Before/after comparison: Blue hour HDR from Zakopane

before after

It was a wonderful blue hour, one of the most beautiful I've ever experienced. The light wasn't really blue but rather purple and was diffused by the fog what created some really magical mood.

Frankly speaking it is not really a HDR photo but manual blend. I hardly ever do manual blends because I prefer the look of tone-mapped or fused images but this was a rare case when I couldn't get this image right otherwise than to blend the 5 exposures manually.

You might argue that it's a bit too dark. Maybe, but I like it this way :)

EXIF data:
Camera: Canon 50D
Lens: Canon 24-105 f/4 L IS USM
Focal length: 28 mm
Aperture: f/8
Exposure time: 5 s ("middle" exposure)
ISO: 500
Number of exposures: 5
E.V. Step: 1 E.V.
Flash used: no
Tripod used: yes
Filters used: no
Software: Magic Lantern 2.3, Photomatix Pro 4.2.5, Lightroom 4.2, Photoshop CS5
Thursday, February 21, 2013

HDR tutorial: Exposure Fusion explained

New tutorial today on my blog. I will describe Exposure Fusion processing method available eg. in Photomatix Pro, Photomatix Essentials and Enfuse. Note that originally this article was published on HDR One page and I really recommend visiting that site as it's full of free HDR resources by some world's best HDR photographers (what I'm doing amongst them is sort of mystery ;) ). Note 2: this article will soon become part of my comprehensive HDR tutorial.

INTRODUCTION


A long time ago when no one had heard about HDR, photographers were still able to increase the dynamic range of their photos. What they did, and many photographers still do, was to open several exposures in Photoshop and blend them using layer masks.  When they blended the layers they had to decide which image to use for each region of the image. This way they could restore highlights using an underexposed photo and details in shadows using an overexposed one.  Nowadays this technique is commonly referred to as manual blending or XDR for extended dynamic range (compared to high dynamic range).

Exposure Fusion is based on that experience but it is a more automatic process. Instead of doing it manually you can blend your images directly in Photomatix. Basically exposure fusion is about taking the best pixels from all photos and outputting them to the final image. Whether a pixel can be considered good or bad depends on many factors like for instance colour saturation, well-exposedeness, low noise-level etc. Also exposure fusion isn’t limited to simple read and write operations. For any pixel it can take data from 1 image or from all images and to calculate the mean of values read (or some other characteristic). It can also increase colour saturation and much more. The possibilities are virtually endless.

Unfortunately not many HDR software offer exposure fusion. Photomatix (both Pro and Essentials) and Enfuse are the most popular ones with such functionality built-in. I will focus on the first one in this tutorial.

Before jumping into details on processing using Exposure Fusion, here are some of the benefits of using it:
  • exposure fusion results in noise reduction (contrary to local tone-mapping which amplifies noise) – this makes it perfect for night and long-exposure “HDR” photos,
  • images have more natural look. Especially real-estate, night and foggy shots benefit from this natural look.
  • images are free of halo artifacts,
  • using exposure fusion might be easier because it has fewer parameters to set – also it is more intuitive as many photographers are already familiar with notion of blending images.
And here are drawbacks of it:
  • images lack local contrast compared to tone-mapped images. However, this can be improved in post-processing,
  • high memory usage that increases with bit-depth and number of images,
  • works only with multiple exposures, if you need to use it for a single exposure you need to derive fake multiple exposures from it (eg. by adjusting Exposure slider in Lightroom and then exporting as TIFF/JPG). You can read how to this in my tutorial.
As you can see from above, exposure fusion produces images that doesn’t have problems typical for HDR photography: noise, halos and unnatural look. Sounds great, doesn’t it? Well, that’s one of the reasons exposure fusion became so popular amongst real estate photographers. That's also the reason why I use it for the majority of my night shots.

CREATING FUSED IMAGES IN PHOTOMATIX PRO

Creating fused images in Photomatix Pro doesn’t differ much from regular tone-mapping workflow. The main difference is step 1 below:
1) Make sure to use a dedicated RAW converter to convert images to JPG/TIFFs prior to loading them into Photomatix. This way you will achieve best quality. The reason for this is that the Raw converter built into Photomatix is quite simple – although sufficient for tone-mapping it doesn’t produce as good results when used together with exposure fusion. For this reason I always develop my images in Lightroom and then export them to Photomatix using the Lightroom plug-in (which comes with your copy of Photomatix Pro).
2) You start by selecting photos to fuse. As I already mentioned you need 2 or more photos to be able to use Exposure Fusion in Photomatix.
3) After clicking ok, you need to specify Preprocessing Options. I specified them this way and clicked Ok:

A few notes here. First of all if you’re using Lightroom, make full use of it. It has a powerful Raw converter so if you still remember point 1, it’s better to use it instead of Photomatix’s. Another benefit is that Photomatix integrates pretty well with Lightroom. If you haven’t already, make sure to install the Lightroom plug-in which comes with your copy of Photomatix. This way if you right click your images -> select Export -> Photomatix Pro you will be able to run Photomatix directly from Lightroom.
For this example I shot the photos with a tripod (7 exposures at 1 EV spacing). There could still be some small horizontal and vertical movement so I checked Align images by correcting horizontal and vertical shifts box. Also there were some people moving in the frame so I checked Remove ghosts option.
4) In Preview mode switch Process to Exposure Fusion:
5) Just below Process, there is a method combo-box. Select one of the following methods:
  • Fusion/Natural – it produces the most natural-looking results (hence the name). I will focus on this method in this tutorial,
  • Fusion/Intensive,
  • Fusion/Auto – fuses images automatically, you can’t control the process at all,
  • Fusion/Average – averages the images. Same as above – you have no influence on the look of the images,
  • Fusion/2 images – let’s you select two images of all your exposures and then fuses only them,
  • Fusion/Realistic – this option produces best results (at least for real estate photographers), however, it is also the most computationally-expensive one. For this reason it’s only available in batch mode
6) Specify parameters. For Fusion/Natural they are:
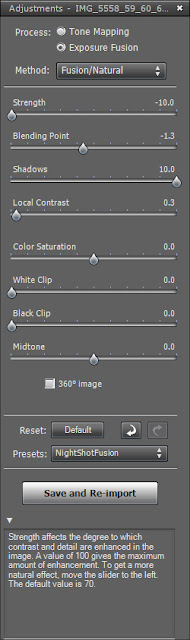
  • Strength – strength of local contrast enhancements. I usually leave it at 0.0 or move it to the left (negative values) as it tends to produce more natural looking images
  • Blending point - specifying negative value gives more weight to underexposed images; positive values give more weight to overexposed images in turn. If it sounds confusing – moving slider to the left makes Fusion algorithm “prefer” underexposed photos. Moving to the right, make it prefer overexposed ones.
  • Shadows – brightens the shadows. I usually move this value to 10.0 which is maximum for this setting. This way I can restore more details in shadows.
  • Local contrast – increases sharpness and local contrast of details in the image. I mentioned that Exposure Fusion does have worse local contrast than tone-mapping – this setting tries to overcome this. I try to keep this value in range 0.0 to 3.0. Larger values might result in a painterly and unnatural look. Value of 2.0 usually works best.
  • Color saturation – increases or decreases saturation of colors in the image. I usually keep it at 0 as I play with colour later in Photoshop or Lightroom.
  • White clip – clips the highlights. I usually don’t change it.
  • Black clip – clips the shadows. I usually don’t change it.
  • Midtone - specifies brightness of midtones. I usually move it to the right to the degree that depends stricly on the image
For my image I used settings from the image above.
7) Hit process button and save your image
At this stage your photo might look like this:


It looks natural, that’s for sure. However, it lacks contrast and colours a little bit (especially compared to tone-mapped images). So what I typically do at this stage is to open my photos in Lightroom or Photoshop and apply some adjustments there. Most of the time I increase contrast, colour saturation and sharpen my images. After that I end up with a photo like the one at the beginning of this article.
Wednesday, February 20, 2013

On the track

I try to avoid this normally but today I'm uploading a few photos in one post. Nothing spectacular - just a few signs I found on the tracks in Tatra mountains:


Tuesday, February 19, 2013

Mount Olympus

When I saw this scene through the window of my hotel I immediately thought of Mount Olympus. When I was reading Greek mythology I imagined that Olympus look this way with clouds separating human and divine worlds.

EXIF data:
Camera: Canon 50D
Lens: Canon 70-300 f/4.5-5.6 L IS USM
Focal length: 200 mm
Aperture: f/8.0
Exposure time: 1/1000 s
ISO: 100
Number of exposures: 1
E.V. Step: n/a
Flash used: no
Tripod used: no
Filters used: circular polarizing filter
Software: Magic Lantern 2.3, Lightroom 4.2, Photoshop CS5
Monday, February 18, 2013

Last rays of light


Yesterday I posted a photo of Giewont mountain during sunset. Today the very same mountain during blue hour. I really like the last "patches" of warm light on the peak.

As you can see from EXIF I used telezoom (at 300 mm) lens to get really close. This way I could focus on the details.

EXIF data:
Camera: Canon 5D MK II
Lens: Canon 70-300 f/4.5-5.6 L IS USM
Focal length: 300 mm
Aperture: f/9.0
Exposure time: 1/400 s
ISO: 500
Number of exposures: 1
E.V. Step: n/a
Flash used: no
Tripod used: no
Filters used: circular polarizing filter
Software: Magic Lantern 2.3, Lightroom 4.2, Photoshop CS5
Sunday, February 17, 2013

Giewont at sunset

This photo of Giewont (1894 meters above sea level) was taken during sunset from high vantage point (approximately 1100 meters above see level). I wanted to include several layers in this shot: sky with clouds, mountain peak, forests and town in the valley. Houses and trees give nice sense of scale to this image. I'm also pretty happy with the light - it was warm and shined beautifully on the Giewont's summit.

EXIF data:
Camera: Canon 5D MK II
Lens: Canon 24-105 f/4 L IS USM
Focal length: 80 mm
Aperture: f/7.1
Exposure time: 1/160 s ("middle" exposure)
ISO: 400
Number of exposures: 3
E.V. Step: 2 E.V.
Flash used: no
Tripod used: no
Filters used: circular polarizing filter
Software: Magic Lantern 2.3, Photomatix Pro 4.2.5, Lightroom 4.2, Photoshop CS5
 
© Copyright 2011 Photoshop and Photography All Rights Reserved.
Free Templates by Cool Blogger Tutorials- Powered by Blogger.com.
