| As for my other recent HDR photos I used Magic Lantern 2.3 for this one. |
But with Magic Lantern things are so much easier. I can simply set number of photos I want and the spacing between them and I'm done. Here are the steps:
 |
| Magic Lantern main menu |
- Change your exposure mode to Manual.
- Open Magic Lantern menu and head over to the Shoot submenu using dial (it's 4 icon from the left in the image above).
- At the top of this submenu you will notice HDR Bracketing option. It's off by default. To toggle it, just press SET button.
- It will now use your previous settings. If you haven't set ones, or would like to change them press the FUNC button over it - it will open HDR Bracketing preferences.
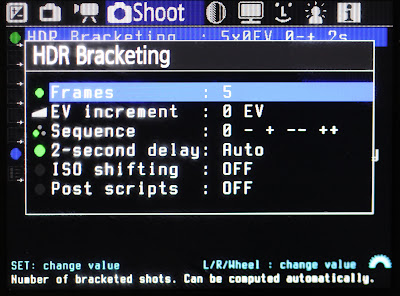
- From there you can adjust all the settings, with following being most useful (take a look at the image below for reference):
- Frames - number of exposures you would like to take. By default you can take any number from 2 - 9. There is even an Autodetect option which evaluates the scene and takes required number of shots. No need to guess!
- EV increment - EV spacing, values from 0 EV to 5 EV are possible. However, it's good to keep it in the range 1 EV - 2 EV. If you choose anything larger than that you will have not smooth color gradations as described here. If you choose value smaller than 1 EV you will need much more photos to cover the same dynamic range and also the benefit in terms of quality might be impossible to notice.
- Sequence - you can also adjust sequence in which photos are taken. In this case the choice is fairly limited and I usually keep it at default.

When you want to take a photo just press shutter release button and all the magic will happen :)


