Powered by Blogger.
Thursday, January 31, 2013

Thoughts: What HDR can give you?


For many HDR is artificial, surreal about what I wrote in a I don't like HDR post. Today I would like to focus on something different. I would like to share some thoughts what HDR can give you, what skills it can teach you and how it can help you in becoming a better photographer. I started HDR photography pretty soon after picking photography and it is what motivated me to learn more and more (and is still motivating me in fact):
  1. Thinking more about the final result - if you want to create good HDR photos you have to learn pretty quickly to visualize your final results when taking a photo. Shooting bracketed photos at random and then processing them using random settings in Photomatix won't help to create great photos. When setting your photo you should already have an idea how you want the final image to look. And at first it isn't easy as you have to be able to imagine how merged 32-bit image will look and how it can be processed using tone-mapping algorithms. But after some time you will know which subjects will work well in HDR, what mood you want to create and what settings you will use.
  2. Understanding exposure - when I was learning the very basics (well anything beyond the automatic programmes) I could read everywhere about the exposure triangle: ISO, aperture and shutter speed. When taking photos I couldn't, however, understand how they all work. What's the difference whether I change shutter speed or aperture to get good results? It didn't make sense to me. With HDR I learnt this by example (and I wasn't happy at that time, believe me - I lost some great photos ;) ). When I was increasing ISO I noticed much more noise in my images. I noticed that when I was changing aperture, the photos were sharper or more blurry depending on its value. What's more HDR photography taught me how to properly expose my photos to cover as much dynamic range as possible (and I use these techniques even when taking a single photo). You may think that it's easy - shoot as many as 20 brackets and you will for sure cover whole dynamic range of the scene. Well, that's true of course but it would take much time what could result in severe ghosting (and even light changes in the scene). So for that reason I try to keep number of bracketed photos to the necessary minimum.
  3. Using a tripod - if you're beginner probably you don't care about using a tripod much. It's heavy and sometimes limiting. But to get good HDR photos, tripod is essential. Of course Photomatix does some really great job aligning even hand-held shots but if you're shooting hand-held they might simply lack sharpness. Not to mention that some of the most beautiful HDR photos can be taken during sunset/sunrise or at night when it's virtually impossible to take a sharp photo without a tripod.
  4. Thinking more about light. When I started photography I was taking photos under all possible conditions. This resulted in many photos being dull, boring, colorless. What HDR photography taught me is that light is the key to create good photos.
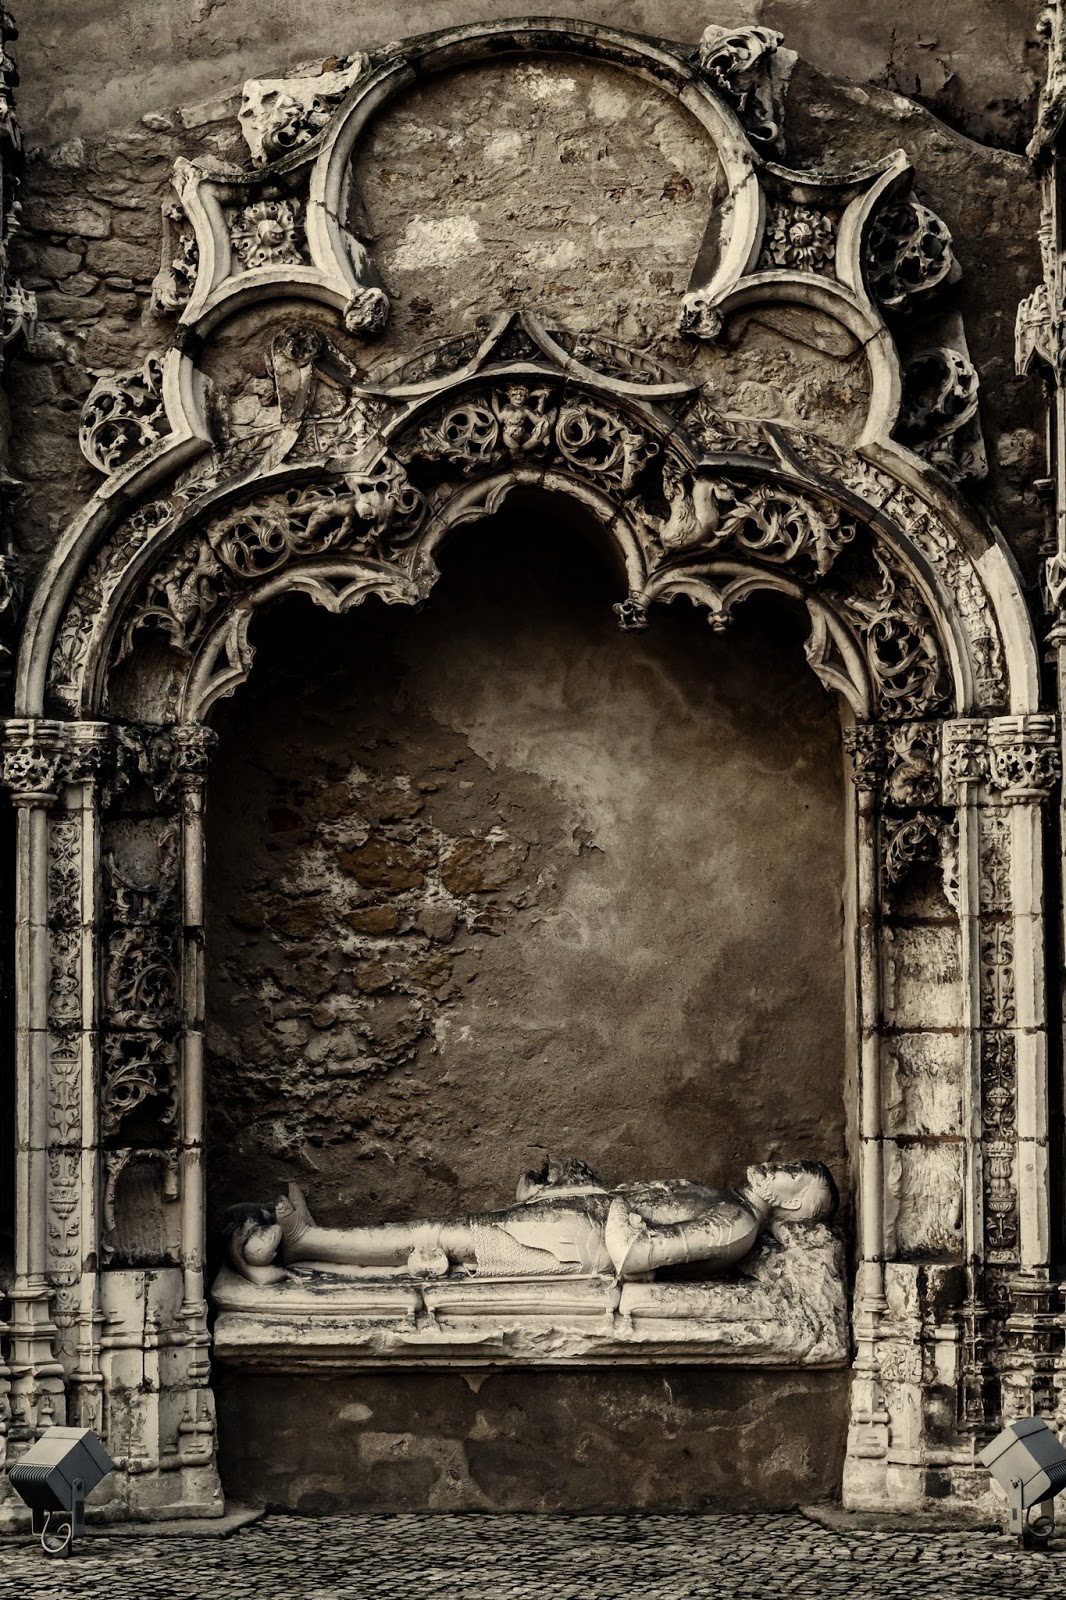
  5. Thinking more about detail and textures. Similarly to above HDR photography taught me to pay attention to detail and textures. They both look great after tone-mapping
  6. And finally the greatest thing HDR photography taught me is that photography isn't that difficult and that it's great fun. I mentioned that at the beginning of this post that HDR was what motivated me to learn. Yes, it motivated me because I found it's such a great thing to do :)
A few words about the photo above. I took it in Lisbon. I wanted to create wide perspective here so I put my camera about 10 - 15 cm above the ground and headed it up. I could have used even wider lens than 24 mm but it was enough to create the effect I wanted.

EXIF data:
Camera: Canon 5D MK II
Lens: Canon 24-105 f/4 L IS USM
Focal length: 24 mm
Aperture: f/5.6
Exposure time: 1/40 s ("middle" exposure)
ISO: 640
Number of exposures: 3
E.V. Step: 2 E.V.
Flash used: no
Tripod used: no
Filters used: no
Software: Magic Lantern 2.3, Photomatix Pro 4.2.5, Lightroom 4.2, Photoshop CS5
Wednesday, January 30, 2013

Eduardo VII Park

For me golden hour is favorite time of day. Warm light, long shadows - all that makes beautiful landscape or cityscape photos.

HDR photo above was taken during that hour in Eduardo VII Park. The park was named after British king Edward VII who visited the city of Lisbon in year 1903 to reaffirm the Anglo-Portuguese alliance. Frankly speaking I didn't like the park very much (especially as I was tired after travelling all day and walking its quite steep slopes wasn't that easy anymore) but the view from there was quite gorgeous. In the far back you can see both the city of Lisbon as well as the Castle of São Jorge.

EXIF data:
Camera: Canon 5D MK II
Lens: Canon 24-105 f/4 L IS USM
Focal length: 24 mm
Aperture: f/8.0
Exposure time: 1/160 s ("middle" exposure)
ISO: 400
Number of exposures: 3
E.V. Step: 2 E.V.
Flash used: no
Tripod used: no
Filters used: no
Software: Magic Lantern 2.3, Photomatix Pro 4.2.5, Lightroom 4.2, Photoshop CS5
Tuesday, January 29, 2013

Step-by-step HDR. Episode 2. Blue hour HDR


So it's time for another part of my video series about processing HDR photos. If you haven't watched Part 1 - here it is. This time I will show how to merge, tone-map and process 5 exposures taken at 1.5 EV spacing taken during blue hour. For more details on my workflow, read my comprehensive HDR tutorial.

My plan is to release new episode every 2 - 3 weeks but if you will find it useful, I can do it more frequently.

What you will need to follow my steps:
  • Photomatix Pro 4.2,
  • Topaz Denoise, Detail and Adjust
  • Lightroom 4
However, if you don't have some of this you can still learn a few things from my video. Good news is that all these applications have fully functional trial versions. So if you haven't tried them, maybe it's a good idea to download them.

Also I would really (and I mean REALLY) appreciate your feedback and especially shares (given you like the idea) because it could help me in reaching larger audience and maybe it will help some beginners out there.

Here is output photo:
Monday, January 28, 2013

Colourful splash


Today I would like to share yet another macro splash photo. I used some yellow background to create this golden reflection. I think it looks fairly nice :)

EXIF data:
Camera: Canon 5D MK II
Lens: Canon 100 f/2.8 L IS USM Macro
Focal length: 100 mm
Aperture: f/14.0
Exposure time: 1/200
ISO: 100
Number of exposures: 1
E.V. Step: n/a
Flash used: yes, 580 EX II
Tripod used: yes
Filters used: no
Software: Magic Lantern 2.3, Lightroom 4.2, Photoshop CS6
Sunday, January 27, 2013

Water splash and updated tutorials section

I planned this for quite a time but could never find enough time to do that: I slightly modified look of the Photography tutorials section. Now each of the tutorials apart from name, difficulty level and description has its own thumbnail which shows the effect that will be created in the tutorial. This should make finding interesting article a bit easier and quicker. There are a few tutorials that don't have their own thumbnail and I will fix that soon.

And now here is a daily photo. If you're interested how to take such a shot read my tutorial about shooting water splashes. However, in that case I wasn't using water. Instead I used some bluish fabric softener. The choice might seem weird but the great thing about this liquid is that it's denser than water so splashes have different look.

EXIF data:
Camera: Canon 5D MK II
Lens: Canon 100 f/2.8 L IS USM Macro
Focal length: 100 mm
Aperture: f/14.0
Exposure time: 1/200
ISO: 100
Number of exposures: 1
E.V. Step: n/a
Flash used: yes, 580 EX II
Tripod used: yes
Filters used: no
Software: Magic Lantern 2.3, Lightroom 4.2, Photoshop CS6
Saturday, January 26, 2013

Cat portrait

I really like shooting photos of animals (one of my favourite photos from last year is a photo of jaguar) with one of my dream being going on a safari. It's something different. You get what animal want to give you and nothing more. Will it play, sit still, look into the lens... it's totally up to it. You can try influencing its behaviour but it won't always help much :) With landscapes I also get what nature wants me to give but it's easier as the landscape at least doesn't move :)

Another thing is shooting black animals. Focusing is tough (one piece of advice - always focus on the nose, if it's out of focus and even the eyes are sharp the image will look bad...), exposing correctly is tough, using flash is tough (because it might create bright reflections on fur which might result in some crazy chromatic aberration...). Still it's very nice and I often shoot them.

Here is a portrait of my cat. The background wasn't white. Don't know all the fancy colour names but I think it could be classified as beige. I used on camera flash and bounced it off the ceiling. I would prefer another setup but generally my cats are small missiles and they don't spend anywhere more than a few seconds so I was running after her trying to capture her sitting still :)

EXIF data:
Camera: Canon 5D MK II
Lens: Canon 50 f/1.8
Focal length: 50 mm
Aperture: f/3.5
Exposure time: 1/80
ISO: 100
Number of exposures: 1
E.V. Step: n/a
Flash used: yes, 580 EX II bounced off ceiling
Tripod used: no
Filters used: no
Software: Magic Lantern 2.3, Lightroom 4.2, Photoshop CS6
Friday, January 25, 2013

Tutorial: fixing distortion in photos. Part 1. Perspective crop

Unless you own a tilt-shift lens (or a large format camera) from time to time you will face a problem of distortion. Lines that in reality should appear as straight seem to bend as they go upwards.

Look at the photo I took in the La Oliva town on Fuerteventura island to see an example of what I'm talking about:


There are a few ways to minimize this effect:
  • shoot with narrower angle. Using wide-angle lens, and especially ultra wide-angle lens, results in more distortion. Using a lens like 50 mm should help significantly. But if you're like me probably it's not an option for you. My favourite focal length is 24 mm and it is already considered a wide-angle. Not ultra but still wide.
  • step away from your subject so it fills the frame instead of tilting your camera - keeping your camera level will reduce this effect.
However, even if you follow the rules above (or simply can't or don't want to limit yourself) you will encounter this issue. So I will show you how to fix it in this new series of articles which will describe following tools:
  • perspective crop tool,
  • perspective/free transform tool,
  • lens correction filter,
  • adaptive wide angle filter.
We'll start with the first one on the above list, i.e. perspective crop tool which recently became one of my favourites. A note of warning. All of these tools are great and make fantastic job but they have one disadvantage. Each of them will result in parts of the image being cropped.

Perspective Crop is a new feature in Photoshop CS 6 and I simply love it. It's similar to a crop tool but what it does apart from cropping is correcting perspective. And believe me, it does some great job with it. Using it is fairly simple:
  1. Open your image in Photoshop CS 6.
  2. Select Perspective Crop Tool from the toolbox as shown below:
  3. Drag a rectangle around your image to select it.:
  4. Drag corners of the crop rectangle so they match horizontal and vertical lines in the image. Make sure Show Grid checkbox is checked as it is a great visual aid. Note that when you're moving left corner you will need to readjust right corner and vice versa because corners influence each other. Adjust them until the grid will match the lines in the image:
  5. When you're happy press Enter key or click on the Tick button in the top part of the window to accept the crop. At this stage you will get something like this:
  6. Much much better. The lines are straight (compare with the image at the beginning of this tutorial). There is still one serious issue though. The image now looks a bit vertically squeezed so we will use Free Transform tool to correct that.
  7. If you're making your adjustments to your background layer, Photoshop won't allow you make any transforms to it. So we need to unlock this layer. Double-click it and rename it to anything you wish.
  8. Now select Edit -> Free Transform (or press CTRL + T) and resize the layer by draggin vertically:
  9. But here is another problem - part of the sky above palm on the right is now cropped. Fixing that is simple. Just select Image -> Reveal All. However, in this case I quite like this crop so here is the final version:
Thursday, January 24, 2013

Integration with Facebook and bubbles made big


First things first. Today I added integration with Facebook. It means you can now comment using your Facebook account (no more need for Google/Wordpress). Normally you should be also able to respond to other people's comments directly on FB but I'm still testing it (i.e. I don't know if it works ;) ). So it means there are temporarily two comment boxes under the post. Looks weird? I agree. I will decide what to do with that after some time, I want first to test this widget for a couple of weeks.

Other thing is a daily photo. It's a big magnification of a foam. I used both macro lens + extension tubes + 2x teleconverter to get as big magnification as possible. I used on camera macro ring flash + some additional regular bulb. I put yellow cloth behind the foam to get this yellow background. It's amazing how abstract nature is.

EXIF data:
Camera: Canon 5D MK II
Lens: Canon 100 L IS USM Macro
Focal length: 200 mm
Aperture: f/7.1
Exposure time: 1/3 s
ISO: 100
Number of exposures: 1
E.V. Step: n/a
Flash used: yes, Nissin MF16 Macro ring flash
Tripod used: yes
Filters used: no
Software: Magic Lantern 2.3, Lightroom 4.2, Photoshop CS6
Wednesday, January 23, 2013

The Hieronymites Monastery (Mosteiro dos Jerónimos)

I published similar photo some time ago. I took it in the Hieronymites Monastery (Mosteiro dos Jerónimos) in Lisbon. Although I prefer monochrome version, I think this one is still nice.

EXIF data:
Camera: Canon 5D MK II
Lens: Canon 24-105 f/4 L IS USM
Focal length: 24 mm
Aperture: f/4.5
Exposure time: 1/100 s ("middle" exposure)
ISO: 800
Number of exposures: 3
E.V. Step: 2 E.V.
Flash used: no
Tripod used: no
Filters used: no
Software: Magic Lantern 2.3, Photomatix Pro 4.2.5, Lightroom 4.2, Photoshop CS5
Tuesday, January 22, 2013

Free Topaz Adjust presets


Presets are a very important part of my workflow. In each program I use I have a rich collection of my own settings. No matter it's Photomatix Pro, Lightroom or Photoshop. Using presets has a few advantages for me: I can work much faster (I usually just make small adjustments to them) and also my photos have more consistent look.

So after sharing presets for Photomatix and Lightroom 4 a number of times it's now time to share some presets for Topaz Adjust. I decided on sharing presets I use to fine-tune my HDR and astro photos. You can download them here. As always they are free of charge. You will find following presets in the bundle (actually there are a few more but these ones are my favourite ones):
Preset nameDescriptionExample
AstrophotoI used this preset for a number of my astrophotos including this one and this one. This preset protects highlights, does some strong adaptive exposure and enhances details what makes it great for night photography.
City at nightGreat for blue hour cityscapes like this one. Protects highlights, increases saturation and also enhances blue hue of the image.
Colourful landscapeSlightly increases colour saturation what makes it great whenever you want to pop colour in your landscape photos.
Colourful sunrisePreset very similar to colourful landscape but warmer. It also preserves more details in shadows. Both these properties make it great for sunrise photos like this one.
Night in the old town & night in the old town 22 presets that are perfect for shots in low light taken in the old towns like this one for instance.

And here is instruction how to import them to your Topaz Adjust:
  1. Download presets from the link above.
  2. Unzip archive on disk.
  3. Open Photoshop and open Topaz Labs -> Topaz Adjust
  4. Make sure presets list is shown. If not click on the arrow on the left of Topaz Adjust Window.
  5. Click Import button at the bottom of the screen and navigate to the folder where you extracted ZIP archive. Select file to import and click Open button.
Monday, January 21, 2013

Thoughts: There is no HDR photography...


Back in November 2012 I wrote a post titled I don't like HDR in which I focused on the fact that so many photographers and viewers don't like HDR photos just because they are... HDR photos. No matter how they look and how much effort was put to make them look this way, the pure fact is enough to reject them as good quality art. Well, of course I disagreed but I have some further thoughts on that.

People using HDR workflow are often calling themselves HDR photographers, including me honestly speaking (look at the top bar :) ). Well, ok normally I call myself landscape or travel photographer but there are certain occasions when I'm also calling myself HDR photographer.

But what is HDR really in terms of making photographs? Well, it's just a tool, nothing more. Like a tripod, camera body, Photoshop or tool to stitch panoramic images. I would call it a workflow tool because you have to take photos in a specific way (bracketing) and then you have to process them in a specific way too (merging to 32-bit image, tone-mapping to name a few). It's still just a tool nonetheless. Tool and nothing more.

However, photography isn't about tools at all - it's about moments, subjects and emotions. Users of Photoshop don't call themselves photoshop photographers and I hardly saw panorama photographers term around the web. You can call yourself portrait, landscape, nature, macro or wedding photographer. It tells much about what you shoot but for me it isn't important how you do that because it doesn't really matter whether you used HDR, manual blending, Photoshop, Lightroom, whether you shoot using a tripod or use 2 or 3 flashes. It isn't important for me because the only thing I care about when looking at any image is how good it is. If it's a landscape shot of course I will start wondering what techniques were used but it's because I love shooting landscapes and would love to continuously improve. Learning from the best is the easiest and fastest way to do that.

But by saying I'm HDR photographer you aren't telling much about your preferred type of photography. Are you mainly shooting architecture, wildlife or landscapes? Hard to tell - but everyone will notice that you're using HDR for your images. So to some extent we are the ones to blame for being where we are with HDR. Because we scream - I use HDR. And remember that many people when they hear HDR they immediately recall these very grungy images. You shoot HDR? So you shoot grungy unrealistic images. They might be wrong of course but it's often difficult to change the first impression.

I'm also curious what are your thoughts on this.

BTW I also made my mind about creating video tutorials. As I got quite positive feedback on the last one (and the first one really)  I will continue working on more. 350 views isn't many but isn't bad either for the start :)
Sunday, January 20, 2013

HDR One - fantastic free HDR magazine


Today I would like to share with you a link and a few thoughts about HDR One magazine. Many of us, HDR photographers, do share their knowledge in a number of places - our blogs, Facebook/Google+ accounts or simply when talking/chatting with fellow photographers. HDR One is about that - about sharing knowledge. However, it is different from photography blogs. Not one but many HDR photographers write there. From very well known like Miroslav Petrasko or Jim Nix, to a bit less known... like me :)

Yes, one of the regular contributors is me. That means that at least once every month you will read an article I wrote. The last one was just published a few days ago and is about using exposure fusion for natural photos in Photomatix. You can read it here.

Here is the most recent issue of HDR One magazine available for download. And here is the magazine's archives.

Summing up, I really recommend reading it - you can read from the best and most talented HDR photographers out there. They share they workflow, tips, show how to get rid of issues. Great read!
Saturday, January 19, 2013

Pink layered sunrise


Sunrises and sunsets are the best times of day for landscape photographers. You can get a very rich palette of colours in the sky - yellows, oranges, reds, pinks.What I like about above image are those colours. Very rich, very intensive. But there is one more thing - layers - you can clearly see a few of them in the image - sky, 2 islands, water, rocks, foam and again rocks. It makes composition quite interesting in my opinion.

EXIF data:
Camera: Canon 5D MK II
Lens: Canon 24-105 f/4 L IS USM
Focal length: 40 mm
Aperture: f/8
Exposure time: 2 s ("middle" exposure)
ISO: 200
Number of exposures: 5
E.V. Step: 1,5 E.V.
Flash used: no
Tripod used: yes
Filters used: ND8
Software: Magic Lantern 2.3, Photomatix Pro 4.2.5, Lightroom 4.2, Photoshop CS5
Friday, January 18, 2013

Isn't Milky Way beautiful?

Isn't Milky Way beautiful? Full of galaxies, stars and planets. Billions of billions of them (or maybe even more? who knows if we're right in our estimations). All far far away... that always amazes me.

Also I just got 2x teleconverter (from Kenko as Canon's is more limiting...) so I plan to test it and write a short review in the days to follow.

EXIF data:
Camera: Canon 5D MK II
Lens: Canon 24 f/1.4 L USM II
Focal length: 24 mm
Aperture: f/1.4
Exposure time: 10 s
ISO: 800
Number of exposures: 1
E.V. Step: n/a
Flash used: no
Tripod used: yes
Filters used: no
Software: Magic Lantern 2.3, Lightroom 4.2, Photoshop CS5
Thursday, January 17, 2013

Before/after comparison: Just before sunrise

beforeafter

Sometimes HDR is just inevitable. One of such examples is above. Without HDR I could either expose for foreground or background. But it was impossible to have both properly exposed. I did the first and it resulted in sky and parts of water surface being completely blown out. Even gradual density filter which I tried didn't produce effect I wanted. HDR helped a lot. Before is a 0 EV photo and after tone-mapped one which was fine-tuned in Photoshop CS.

EXIF data:
Camera: Canon 50D
Lens: Canon 10-22 f/3.5-f/4.5 USM
Focal length: 10 mm
Aperture: f/11
Exposure time: 13 s ("middle" exposure)
ISO: 400
Number of exposures: 5
E.V. Step: 1.5 E.V.
Flash used: no
Tripod used: yes
Filters used: ND8 neutral density filter.
Software: Magic Lantern 2.3, Photomatix Pro 4.2.5, Lightroom 4.2, Photoshop CS5
Wednesday, January 16, 2013

Is Magic Lantern safe?


Since I first mentioned Magic Lantern, I receive quite a lot of questions whether it is really safe. I'm using it for more than a year now (almost 1.5 I think) on both my bodies: 50D and 5D MK II. In previous version I had some small issues. Restarting a camera was all that was needed to "fix" them though. With latest release, that is 2.3, I haven't run into any problems so far. It runs perfectly for me and is invaluable addition to my photography workflow.

You must be aware though that there is no bug-free software, it's one of the fundamental rules of software development. Through testing number of bugs is minimized but they are still there (hidden somewhere, waiting for a moment to attack ;) ). Even systems which are expected to be completely free of the issues (like computers in airplanes or in military systems) aren't always. There were cases in the past where for instance a missile hit wrong target due to "small" error in its software... I'm telling you this as a developer myself. It doesn't mean that you shouldn't try Magic Lantern (I would say you have to in fact) but there might be cases when something won't work as expected. They should be pretty rare but I can't guarantee everything will be ok, especially as I'm not developing it :)

Summing up. In my opinion Magic Lantern is safe and is a really great piece of software. It's used by thousands of users out there (including professional photographers) so the chance you will have problems with it is very very small.

You can download Magic Lantern for free here.

Today photo is a fake tilt-shift created in Photoshop CS6 using its new tilt-shift blur filter. I used this HDR photo as a base.
Tuesday, January 15, 2013

New feature: Step-by-step HDR. Episode 1


So I promised a completely new feature this week on my blog. And here it is! In a series of videos I'll show you how I usually process my HDR photos step-by-step (think of it as of a case study or something like this). Today something very simple, only 3 exposures, hand-held and some simple edits in Photoshop (no masking) using Topaz plugin. It isn't meant for advanced users, rather beginners in HDR photography. I want to show that making HDR photos is really easy and doesn't require spending hours on it. For more details on my workflow, read my comprehensive HDR tutorial.

My plan is to release new episode every 2 - 3 weeks but if you will find it useful, I can do it more frequently (also if no one likes it, I will abandon the idea ;) ).

What you will need to follow my steps:
  • Photomatix Pro 4.2,
  • Topaz Denoise, Detail and Adjust
  • Lightroom 4
However, if you don't have some of this you can still learn a few things from my video. Good news is that all these applications have fully functional trial versions. So if you haven't tried them, maybe it's a good idea to download them.

BTW sorry for my accent but as you probably know I'm not native English speaker :) and I'm not really used to recording this type of videos so hopefully they will get better over time.

Also I would really (and I mean REALLY) appreciate your feedback and especially shares (given you like the idea) because it could help me in reaching larger audience and maybe it will help some beginners out there.

Final note: quality of this video might be a bit poor but I work on realising full HD version too (with lower compression). However, even with Youtube version make sure to watch it in HD resolution.

Here is output photo:


If you wish you can also play with my source files. Just download them here. Note, however, that these are TIFF files which are slightly smaller than RAW files I used in the video. Given that so many people steal photos nowadays, I'm not eager to share RAW files. Sorry for that.
Monday, January 14, 2013

New HD HDR wallpaper

Time for a new wallpaper - just head to the Wallpapers section and download the image above I took during one beautiful sunrise on Fuerteventura island. I used ND8 filter to smooth the water a little bit.

Expect more downloads later this week (presets, presets :) does it ring a bell? ) and some new HDR-related feature around middle of this week. I hope that beginners will love it.

EXIF data:
Camera: Canon 5D MK II
Lens: Canon 24-105 f/4 L IS USM
Focal length: 24 mm
Aperture: f/13
Exposure time: n/a
ISO: 100
Number of exposures: 5
E.V. Step: 1,5 E.V.
Flash used: no
Tripod used: yes
Filters used: ND8
Software: Magic Lantern, Photomatix Pro 4.2.4, Lightroom 4.1, Photoshop CS5
Sunday, January 13, 2013

100k pageviews!

I didn't expect it to happen so early in the year (a few months ago I thought it would happen around March) but today a total number of pageviews to this blog exceeded 100.000. Given that most of them were in the last 4 months it's a pretty nice achievement for me. It means that more and more people like my HDR photos and tutorials.

I took this photo in St. George's Castle (Castelo de São Jorge) in Lisbon. I really liked this cannon and decided to go with a b&w conversion to focus on textures and details which I found pretty amazing.

EXIF data:
Camera: Canon 5D MK II
Lens: Canon 24-105 f/4 L IS USM
Focal length: 47 mm
Aperture: f/11
Exposure time: 1/40 s ("middle" exposure)
ISO: 250
Number of exposures: 3
E.V. Step: 2 E.V.
Flash used: no
Tripod used: no
Filters used: no
Software: Magic Lantern, Photomatix Pro 4.2.4, Lightroom 4.1, Photoshop CS5
Saturday, January 12, 2013

Symbol of Warsaw

Palace of Culture and Science is the one of the symbols of Warsaw and at the same time the highest building in the city. Loved by some, hated by others was built by the workers from the Soviet Union in early '50s of 20th century. Why so many people hate it today? Given Polish history it shouldn't be really surprising (communism introduced by the Soviets after World War II lasted till 1989...).

I hoped to write some HDR tips/tutorial today but I'm still very short of time. However, I have some great plans for the beginning of the next week regarding my blog - I plan to introduce a completely new feature which especially beginners wanting to create photos similar to me should like.
Friday, January 11, 2013

Starry sky again

I haven't uploaded any photo of a starry sky recently but still a few remain on my hard drive. Here is one of them. I really like amount of detail as well as the colours in this shot. Sorry for not writing anything more this time but I'm short of time today. I hope to write something more (and maybe post some useful tips about HDR photography) tomorrow.

EXIF data:
Camera: Canon 5D MK II
Lens: Canon 24 f/1.4 L USM II
Focal length: 24 mm
Aperture: f/1.4
Exposure time: 10 s
ISO: 800
Number of exposures: 1
E.V. Step: n/a
Flash used: no
Tripod used: yes
Filters used: no
Software: Magic Lantern 2.3, Lightroom 4.1, Photoshop CS5
Thursday, January 10, 2013

Before/after comparison: Warsaw at blue hour

beforeafter

My blog is undergoing some heavy changes recently. After updating HDR tutorial, changing layout I'm now adding some cool gadgets. One of them you can see above. It's a before/after comparison of a photo. Just drag the handle in the middle to see either 0 EV photo (before) or tone-mapped HDR photo (after). It's a lot more convenient than hovering an image because this way you can see both images side by side what makes comparison a lot easier. I plan to show you this type of comparison more often now.

Another useful change is alteration of related posts widget. Up to now I was using LinkWithin, yesterday I switched to nRelate. This way posts shown should be indeed more related to the content of the post you're reading.

There are still some big changes planned by me so stayed tuned!

EXIF data:
Camera: Canon 5D MK II
Lens: Canon 24-105 f/4 L IS USM
Focal length: 24 mm
Aperture: f/14
Exposure time: 3.2 s ("middle" exposure)
ISO: 200
Number of exposures: 7
E.V. Step: 1 E.V.
Flash used: no
Tripod used: yes
Filters used: no
Software: Magic Lantern, Photomatix Pro 4.2.4, Lightroom 4.1, Photoshop CS5
Wednesday, January 9, 2013

Major changes to the blog


As you probably noticed my blog changed a "little bit". I hope you like it but I would be glad for any feedback. Not everything works at the moment but it's just a matter of a day or two.

EXIF data:
Camera: Canon 5D MK II
Lens: Canon 24-105 f/4 L IS USM
Focal length: 24 mm
Aperture: f/18.0
Exposure time: 10 s ("middle" exposure)
ISO: 100
Number of exposures: 7
E.V. Step: 1 EV
Flash used: no
Tripod used: yes
Filters used: no
Software: Magic Lantern 2.3, Photomatix Pro 4.2.5, Lightroom 4.2, Photoshop CS6
Tuesday, January 8, 2013

New HDR tutorial!


So two pieces of news today. First of all after many months I updated my HDR tutorial! You can read it in the HDR tutorial section. I added a lot of additional information and hints and also updated a lot of stuff (not only text but also example photos so it looks more fresh even for people who read it before). More updates are to follow in the next few weeks.

Second piece of news is that yesterday I officially became HDR One's regular contributor. If you don't know HDR One - it's an online magazine featuring articles and tutorials from a lot of well-known and great HDR photographers. All that completely for free! Being regular contributor means that you will find a new article on the site at least once a month :)
Monday, January 7, 2013

Being published matters :)


Having your photos used/published/exhibited/sold is always nice when you're an amateur. It doesn't happen very often in my case so I'm always excited when it does. For that reason, today instead of a new photo I publish an excerpt from Gallop, which is a Polish horse riding magazine (of the biggest), featuring one of my photos (one at the bottom of the page) :) In fact two of my photos were used in that very issue.
Sunday, January 6, 2013

Warsaw at blue hour

I promised new photo yesterday and here it is. I took it from the highest point in Warsaw - from viewing terrace of Palace of Culture and Science. It was pretty difficult to take a shot from there because there is a safety grid there. Fortunately enough, eyes in it were pretty big, enough to put my lens through one of them. Positioning a tripod was another challenge so I ended up with one of its legs being outside... but the shot itself is quite good :)

EXIF data:
Camera: Canon 5D MK II
Lens: Canon 24-105 f/4 L IS USM
Focal length: 35 mm
Aperture: f/16.0
Exposure time: 5 s ("middle" exposure)
ISO: 100
Number of exposures: 7
E.V. Step: 1 EV
Flash used: no
Tripod used: yes
Filters used: no
Software: Magic Lantern 2.3, Photomatix Pro 4.2.5, Lightroom 4.2, Photoshop CS6
Saturday, January 5, 2013

Park in Milan


As I have still no new photos to post, here is an old photo I took in Milan. I plan to capture some new photos today so hopefully I will have something new to upload tomorrow :)
Friday, January 4, 2013

Longing for winter

Well, yes, I'm sort of longing for winter. I mean, it's there but without snow and ice... so is it really winter? The reason I like this season is that it creates some amazing opportunities for landscape photographers with warm light reflecting in cold surfaces like ice or with some very nice haze in the morning that creates some amazing mood.
Thursday, January 3, 2013

Sleeping king

I took this photo last year in Lisbon but haven't published it yet. It is a tomb of a Portuguese knight or king that can be found in the Carmo convent. I really liked details and textures in that scene and decided to go with a slightly desaturated look to enhance them.

EXIF data:
Camera: Canon 5D MK II
Lens: Canon 24-105 f/4 L IS USM
Focal length: 35 mm
Aperture: f/8.0
Exposure time: 1/60 s
ISO: 1000
Number of exposures: 1
E.V. Step: n/a
Flash used: no
Tripod used: no
Filters used: no
Software: Lightroom 4.1, Photoshop CS5
Wednesday, January 2, 2013

Tutorial: removing halo artifacts in a HDR photo

This is quite a simple shot but I like how this one tree stands out from the crowd.

Halo artifacts. One of the nightmares in HDR photography. They appear between regions of different luminosity and virtually ruin any photo. You might have great composition, light and colours but if you have halos in your photo - it won't be considered good - rather poorly executed.

There are many ways of dealing with them and here are just a few:

In Photomatix Pro

Make sure to:
  • Have Strength around 70 or less,
  • For Lightning Adjustments use Natural+ or Natural,
  • If you still get halos make sure to increase Smooth Highlights.
This should keep your halos at a low level. Unfortunately sometimes it's still not enough. Also several Photoshop filters (like Topaz Adjust) might amplify halos so there are a few more things to do.

But for that you will need to go into Photoshop.
    In Photoshop

    There are a few ways of dealing with halos in Photoshop. First open your image with halo artifacts:


    At full size it doesn't look very bad but hit CTRL + MINUS keys several times to see nasty halo artifacts. Ugh...

    As you see highlights in the sky are a way too strong and also shadows are a way too deep. So the easiest thing to do would be to adjust both by using Curves adjustments layer.

    First make sure to select sky only (eg. with Wand selection tool) as the halos are present only in it. Then add Curves adjustment layer.

    For this image I used following settings:

    Note I darkened highlights and brightened shadows a little bit. After that adjustment the image looks like this:


    It's slightly better but still far from good.

    So what we will do is to manually Dodge & Burn the sky to get rid of too dark regions and too bright ones too. Fear not - this tool is very easy to do (and powerful too!) but I admit one has to get used to using it.

    You can use Dodge and Burn tools from the Photoshop toolbox for this but they have one serious disadvantage - they both are destructive tools. I prefer editing my images in a non-destructive way so I do the following:
    1. Press CTRL + SHIFT + N to create a new layer. In a dialog box that appears, change Mode to Soft Light and also check the box at the bottom to fill the new layer with neutral grey colour.
    2. Press Ok, to create the layer.
    3. With your new layer selected select Brush tool and change its Flow to around 2 - 3%. Also make sure your brush is soft.
    4. Paint over dark regions with White colour and over bright ones with Black. Using White colour has effect of brightening the image, while using Black - of darkening it. So when you use White on Shadows you brighten them up. Similarly when you use Black on Highlights you darken them.
    5. While painting make sure to zoom out from time to time because it might be easier to see halos at smaller magnification.
    Here is the final result:

      Although still not perfect, it now does look a lot better :)

      For your reference, here is also the Dodge & Burn layer I used. Note that the brightest parts of the image were painted with black and darkest with white colour.

      Tuesday, January 1, 2013

      Frozen splash and New Year's resolutions


      Another action shot today. This guy was making a turn when I captured this photo - I wanted to freeze both motion and splash and I think I managed to. Also the amount of detail is quite nice.

      I have some ambitious plans for this year. Apart from improving my skills in HDR field and travel photography (I have a few travels already planned for this year) I want to step out of my comfort zones again. Last year it paid off - I captured some amazing photos of jaguar and Milky Way and none of these photos were HDR. I also greatly improved my general skills thanks to that so I hope to achieve the same this year. What I want to improve most is macro and portrait photography.

      I also have ambitious plans regarding the blog. First of all expect a few more tutorials in the weeks to follow including updated and revised HDR tutorial, which so far is my most popular tutorial. Also I hope to revamp the look of the blog and introduce a lot more changes. So stay tuned :)

      EXIF data:
      Camera: Canon 50D
      Lens: Canon 70-300 f/4-5.6 L IS USM
      Focal length: 300 mm
      Aperture: f/6.3
      Exposure time: 1/800 s
      ISO: 160
      Number of exposures: 1
      E.V. Step: n/a
      Flash used: no
      Tripod used: no
      Filters used: no
      Software: Lightroom 4.1, Photoshop CS5
       
      © Copyright 2011 Photoshop and Photography All Rights Reserved.
      Free Templates by Cool Blogger Tutorials- Powered by Blogger.com.